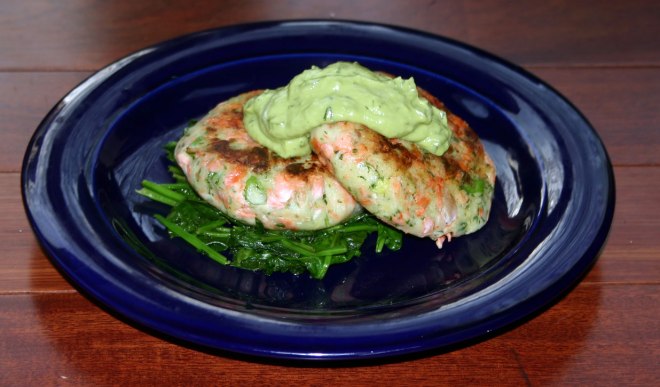
AIP Salmon Cakes With Avocado Aioli

Because I am cooking for myself a lot of the time now, I tend to make a lot of single person meals.

The only exceptions to this are when I am also cooking for my 2 housemates, or I am making something that will keep in the fridge for a few days and is easily reheated.

This recipe is one of my “single person” meals, although it would easily be doubled or tripled if you needed to feed more people.

SFC2

Salmon is a fish that is very good for us because it is an oily fish that is high in the anti-inflammatory Omega 3 fatty acids.

I usually have some wild-caught salmon fillets in the freezer that I can pull out and thaw when I need to make a quick meal just for me.

I used white (Japanese) sweet potatoes here, which are slightly less sweet than the familiar orange ones.  This recipe would work just as well with the regular sweet potatoes however…

There will be more avocado Aioli than you need for one person – just cover the remainder tightly with clingwrap, ensuring that the clingwrap is in contact with the surface of the sauce.  It will keep for another day in the fridge and can be used as a dip with veggies for your lunch.

AIP Salmon Cakes with Avocado Aioli

serves 1

SFC1

For the Salmon Cakes

  • 1 fillet fresh or frozen salmon 4-6oz (thawed if frozen)
  • 1 small sweet potato
  • 1 green onion – chopped
  • 1 tsp capers – rinsed and drained
  • 1 tbsp fresh parsley – chopped
  • pink Himalayan salt to taste
  • arrowroot flour to dust
  • 2 TBSP coconut oil – divided

For the Avocado Aioli

Prick the sweet potato all over and then cook it in the microwave for 5 minutes until it is fork tender. Depending on the power of your microwave, it may take more or less time than this.

If you do not want to use a microwave, you can also bake the sweet potato in the oven – wrap it in foil after pricking it, and bake for 30-40 minutes in a 350°F (175°C) oven until it is fork tender.

While the sweet potato is cooking, melt 1 tbsp of the coconut oil in a small skillet.  Add the fish and cook for 3 minutes per side until it is opaque and flaking.  do not over cook the fish!

Once the sweet potato is cooked, use a spoon to scoop the flesh out of the skin into a small mixing bowl and mash it well.

Flake the fish into the bowl, discarding any skin.  Add the green onion, capers and parsley, and season to taste with the salt.  Mix well.

Dust your hands with some arrowroot flour and shape the mixture into 2 patties, 1″ thick.  Dust the outside of the patties with more arrowroot flour.

Melt the remaining tbsp of coconut oil in the same skillet that you used to cook the fish.  Add the salmon cakes and cook for 5 minutes per side until heated through and golden brown.

While the salmon cakes are cooking make the avocado aioli.

Place all the aioli ingredients in a food processor and puree till smooth.  Taste and adjust the seasoning, adding more salt and necessary.

AA1

Serve the salmon cakes on top of a bed of sauteed spinach with some of the avocado aioli on top.

SFC3

Store any remaining aioli tightly covered in the fridge for up to 24 hours.

Shared at:  Paleo AIP Recipe Roundtable

Cod Baked With Lemon And Dill – AIP/Paleo

I try to eat fish fairly frequently – at least 2-3 times a week because it is so good for you.

I managed to get some frozen cod fillets at a really good price the other day, and this is what I made with them:

CBLD3

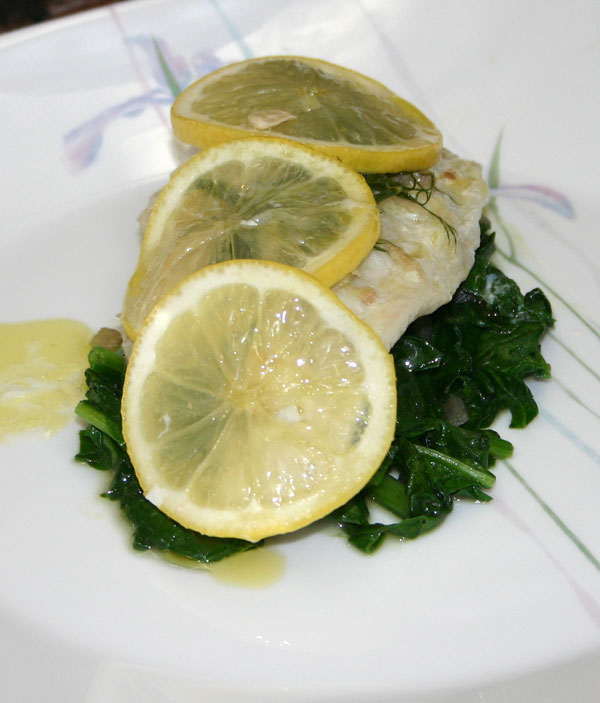
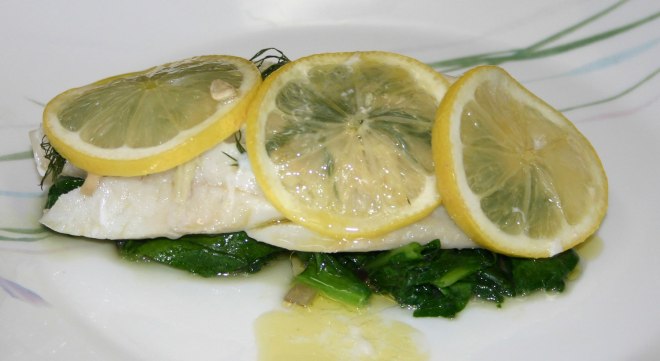
This is a simple dish to make – cod fillets baked in the oven with sea salt, olive oil, lemons and fresh dill to provide flavour.  Once cooked, I sat the fish on some spinach that had been simply cooked with a little olive oil and some sea salt.

I am not fond of overly fancy fish (what my mother would have called “fish messed around with”) – I like to keep it simple.  Baked, grilled, broiled or fried…  I love fish and like the flavour to shine, and I find that if you add too many ingredients, you do not get the real flavour of the fish.

And in this dish the flavour really really DID shine!

You don’t have to eat the lemon slices – they are really there to provide flavour as the fish cooks.  I actually did eat them, because I like lemon slices… and if you cut them thinly enough they become tender enough to eat.

When buying cod, make sure it comes from a sustainable source.  Alaskan Cod is what is currently recommended as the most sustainable.  Frozen fish is fine to eat on the AIP – in fact, unless you live on the coast, frozen fish may actually be better quality than fresh fish.  And this is certainly the case in land-locked Alberta where I live.

Also, do not be afraid to use frozen spinach – quite often it is cheaper than the fresh stuff, and it can even be fresher because it is frozen soon after picking.  The fresh spinach may often be shipped long distances and stored in grocery store warehouses for a few days before you can even purchase it.  That means that it’s nutritional value has diminished.  Of course if you can access fresh local spinach from a farmer’s market or CSA that is better still…  But no matter whether it is fresh or frozen, leafy greens like spinach are on the EWG’s Dirty Dozen list and should always be organic.

The lemon should also be organic because you will be using the skin.  I would also give it a good scrub to remove any waxes or finishes that may have been added to make it keep for longer.

This recipe is 100% AIP friendly because it was cooked so simply with minimal ingredients.

Cod Baked With Lemon And Dill

serves 2

CBLD4

  • 2 fresh or frozen cod fillets – aprox 6oz each – thawed if frozen
  • 1 small bunch of fresh dill
  • 1 organic lemon
  • Sea salt to taste
  • Extra virgin olive oil
  • 1 clove of garlic – minced
  • 1 bag of spinach, fresh or frozen (aprox 4 cups)

Preheat the oven to 350°F.

Use a small amount of olive oil to grease a baking dish that is big enough to hold the fish fillets without them overlapping – you do not want too much space, but equally, you don’t want them lying on top of one another….  this picture is a good guide…

CBLD2

This picture was taken after cooking,and the fish has shrunk slightly… as a guide, the fish should fit snugly with no overlaps….

Lay the fish in the base of the dish and drizzle with a little more olive oil (This will help keep it moist and will also add flavour – remember, fat is flavour!).  Season it generously with the salt.

Now lay 2-3 entire sprigs of the dill (remove any really large stalks – aim to just use the tender, edible ones) on top of the fish.

Take the lemon slices and lay 3-4 on top of each fish fillet.

This will give the fish the amazing flavour you are after

Drizzle with a little more olive oil (remember, fat is flavour!) and put the dish in the preheated oven…

Bake for 15-20 minutes until the fish is opaque and flaking.  Thin fillets may need less time, thicker ones may need more, check and adjust the time accordingly.  Just don’t over cook the fish!

While the fish is cooking, in what you estimate to be the last 5 minutes of the cooking time, heat 1 tbsp of olive oil in a skillet and add the garlic.  Cook for 1-2 minutes until it it fragrant but not browned.

Now add the spinach to the skillet, season with a little sea salt and cook for 2-3 minutes until wilted and tender.

Pile the spinach on serving plates and place a fish fillet on top.

CBLD1

Serve at once.

Shared at:  Paleo AIP Recipe Roundtable, Full Plate Thursday

Turmeric Coconut Cod With Mushrooms

While shopping at the farmers market the other day I came across this:

Turm1

Fresh turmeric roots.  This is the stuff that is dried and then ground up into that yellow powder that you use in cooking.

Turmeric is the spice that gives curry it’s yellow colour, and it has been used in India as both a spice and a medicinal herb for thousands of years.

Turmeric contains curcumin, which is a powerful anti-inflammatory and it is also an antioxidant, meaning that it is something worth considering including in your diet.

I decided to use some of my turmeric roots in a sauce that I paired with cod that I had in the freezer.

This recipe is gluten and dairy free, and is Paleo and AIP-friendly.

Turmeric Coconut Cod with Mushrooms

serves 6

TCC6

  • 6 fillets of cod – thawed if frozen
  • 1 onion – chopped
  • 2 cups mushrooms – sliced
  • 3 cloves garlic – crushed
  • 2 tbsp coconut oil
  • 1 cup coconut milk
  • 1 oz fresh turmeric (if you only have dried turmeric use 1 tsp)
  • 2-3 tbsp chopped fresh parsley
  • sea salt

Preheat the oven to 175°C/350°F.

Heat the coconut oil in a skillet and add the onion.  Saute for a few minutes until it is starting to soften.  Add the mushrooms and garlic and continue cooking until the mushrooms and onion are tender.

Meanwhile, peel the turmeric and chop it up into small pieces – it will stain, so be careful.  Place the turmeric in a blender with the coconut milk and season it with some salt.  Blend until smooth and bright yellow in colour.

TCC8

Place the fish in a shallow oven-safe dish in one layer and season it with salt.

Once the mushrooms and onions are cooked, scatter them over the fish.

Pour the turmeric and coconut milk mixture evenly over the fish and scatter it with parsley.

TCC7

Bake in the preheated oven for 15-20 minutes until the fish is opaque and flakes easily.

Serve at once with the yellow sauce poured over.

TCC5

I served this on a bed of sauteed kale, along with sliced tomatoes and lacto-fermented carrots.  The tomatoes are not Elimination Stage AIP as they are a nightshade.  Tomatoes are a stage 4 reintroduction.  This was Hubby’s plate of food, and he is not AIP and has no problems with eating tomatoes.  If you cannot tolerate tomatoes, simply leave them off your plate.

TCC2

It was delicious, and looked so pretty on the plate.

Shared at Paleo AIP Recipe Roundtable #32

Shared at Full Plate Thursday

Shared at Real Food Wednesday

Shared at Waste Not Want Not Wednesday #78

Shared at Pennywise Platter Thursday 73

Baked Sole with Ginger and Garlic

I like to serve fish at least once a week, and I try to ring the changes and serve different kinds so that no one gets bored.

While grocery shopping the other day, I managed to get some wild-caught sole fillets for a great price ($10 for 3lb).

So this week’s fish was sole.

I like to cook my fish fairly simply, and I just baked this fish in the oven, flavouring it with thyme, ginger and garlic.

It was a very quick dish, perfect to cook after a day at work.

This recipe is a stage 1 reintroduction recipe because it contains black pepper.  If you are still in the elimination phase of AIP or are sensitive to black pepper, this recipe can be adapted by simply omitting the pepper.

When reintroducing foods on the AIP, I recommend this guide.

Baked Sole with Lemon, Ginger and Garlic

serves 4-6

sgg4

  • 1½lb wild caught sole fillets
  • 3 onions – sliced
  • 4 oz mushrooms – sliced
  • sea salt and freshly ground black pepper (omit the pepper if sensitive or strict AIP)
  • 3 cloves of garlic – crushed
  • 1″ piece root ginger – peeled and grated
  • 1 tsp dried thyme
  • 1 tbsp coconut oil
  • 1 tbsp olive oil

Preheat the oven to 190°/375°F.

Melt the coconut oil in a skillet and sautee the onions over a medium-low heat until softened – about 5 minutes.  Add the mushrooms and sautee until tender.

Transfer the contents of the skillet to an ovenproof dish.

Lay the sole fillets out over the top of the onions and mushrooms in a single layer.  Season well with sea salt and freshly ground black pepper.  Sprinkle over the crushed garlic and grated ginger.  Sprinkle on the dried thyme and drizzle with olive oil.

There is no reason to be afraid of cooking with olive oil – it doesn’t make the oil “bad” in any way, and it doesn’t turn it into a trans-fat.  The worst that can happen is that it might affect the flavour.  See this post and this post for more info.

Place the dish in the oven and bake for 10 minutes until the fish is white and opaque and flakes easily.  Do not overcook!

sgg3

I served this with some beet and carrot fries and some sauteed kale.

Shared at Allergy Free Wednesday #117

Shared at Waste Not Want Not Wednesday #72

Shared at Real Food Wednesday 5/14/14

Shared at Pennywise Platter

Cod with Beet Fries and Greens

I make a point of including some kind of wild-caught fish in our diet at least once a week.

This week’s fish was some cod fillets.  I like to cook my fish very simply – often just oven baked, grilled or pan-fried.  I don’t like fish messed around with too much.

In this case, I sprinkled the cod with plenty of herbs, drizzled over a little olive oil and baked it in the same oven that I was cooking the beet fries in.

The walnut pieces in the greens are an AIP stage 2 reintroduction.  If you need a 100% AIP recipe, just omit the walnuts.

When reintroducing foods on the AIP, I recommend this guide.

Cod with Beet Fries and Greens

serves 6

BF5

For the Beet Fries:

BF2

  • 6-8 large beets – peeled and cut into fries
  •  2 tbsp coconut oil
  • salt to taste
  • 1 tsp dried thyme

For the Fish:

BF4

  • 6 cod fillets weighing  4-6oz each (aprox 2lb of fish in total)
  • olive oil to drizzle
  • 1 lemon – sliced
  • 1 onion – peeled and sliced
  • 2 carrots – peeled and cut into matchsticks
  • 2 stalks of celery – cut into matchsticks
  • salt to taste
  • 1 tsp dried thyme
  • 1 tsp dried oregano
  • 1 tbsp dried rosemary
  • 1 tbsp garlic powder

For the greens:

BF1

  • 1 cup of walnut pieces (omit if 100% AIP)
  • 2 tbsp coconut oil
  • 283g (10 oz) bag of spinach leaves – washed
  • salt  to taste

Preheat the oven to 190°C/375°F.

Place the beet fries on a large, rimmed baking sheet and toss with the coconut oil, salt and thyme.  Bake in the top shelf of the oven for 30-40 minutes until the fries are tender and starting to crisp up a little.

Meanwhile, prepare the fish.

Place the onion, carrot and celery in a baking dish and top with the fish fillets.  Drizzle over a little olive oil and scatter the fish with the herbs and garlic and sprinkle with salt.  Now sit a slice of lemon on top of each fish.

Slide the baking dish into the oven underneath the fries and bake for 10-15 minutes until the flesh is opaque and flakes easily.  Do not over cook the fish or it will be dry.

While the fish is cooking, prepare the greens.  Put the walnuts in a large skillet along with the coconut oil and toss over a medium-high heat until they are toasted.  Add the greens and toss well until they are wilted and combined with the walnuts.

BF2

Serve the fish with the veggies it was cooked with and the beet fries and greens.

Seafood Chowder – Gluten Free, Dairy Free, AIP, Paleo

Tonight we had a seafood chowder for dinner, and it was gluten-free, dairy-free, AIP-friendly and Paleo….

How is that possible?  Doesn’t chowder contain potatoes and other non-paleo, non-AIP ingredients? And aren’t most chowders thickened with flour and laced with dairy products?

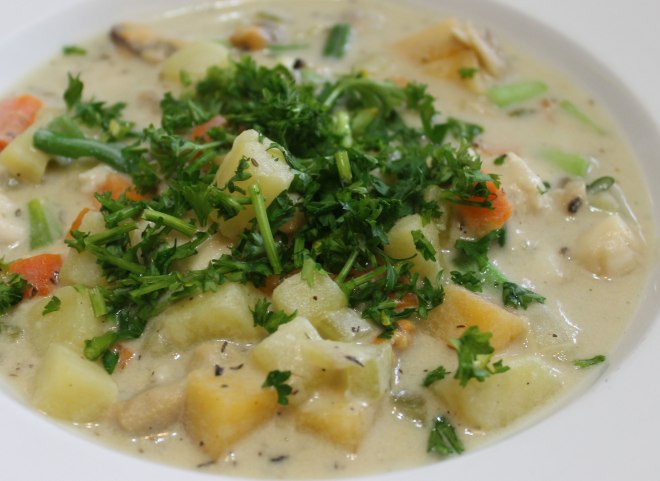
Well I managed it with some sneaky substitutions, and while this chowder does taste a little sweeter than most (thanks to the white sweet potatoes I used), it still has a delicious savoriness about it thanks to all the seafood and the fish broth.  It also has a wonderful creamy texture.

Seriously, this is one kick-ass chowder!

I made this for dinner and served it with my plantain muffins (can we say carb overload here?), but it would be equally good for lunch.  Next time, I might give the muffins a miss and serve it with a green salad for a less carby, lighter option.  But even so, I was really happy with the results

You can use any seafood you want as long as you keep the amounts the same – in this chowder I used a frozen seafood mixture that contained clams, mussels and scallops (aprox 1lb worth) along with 8oz of cod fillet.  But feel free to use all clams to make a clam chowder, all crabmeat to make a crab chowder or whatever floats your boat….  this is a very forgiving recipe and you can add whatever protein ingredient you like the most.

Seafood Chowder

serves 6

chow4

  • 2 tbsp coconut oil or fat of choice (this would be awesome made with bacon fat!)
  • 1 diced onion
  • 1 stick of celery – diced
  • 2 carrots – peeled and diced (aprox 1 cup)
  • 1 cup rutabaga (diced)
  • 4 cups of white sweet potato – divided into 2 (you could probably use an orange sweet potato in this but it would affect the colour)
  • 1 cup fish bone broth  (I also added the juices that had collected in the packet of my seafood mixture)
  • 2 cans of coconut milk – reserve half a can to blend the sweet potatoes
  • 2 bay leaves
  • 1 tsp dried thyme
  • sea salt
  • 1.5lb  mixed seafood of choice (I used a frozen seafood mix that contained clams, mussels and scallops along with some diced cod)
  • 1 bunch of green onions chopped
  • chopped parsley to garnish

First up you are going to heat your coconut oil or other fat in a large pan over a low heat.  Add the onion, celery, carrot and rutabaga and sautee for 10 minutes until tender.

Add 2 cups of the diced sweet potato along with the fish broth (if you have no fish broth substitute chicken broth along with a dash of fish sauce) and 1.5 cans of coconut milk.

Toss in the bay leaves and thyme and season to taste with sea salt.

Simmer over a low heat.

Add the remaining sweet potatoes to a separate pan and cover with water.   Simmer until tender.

Drain the sweet potatoes in the water and place in a blender with the reserved coconut milk.  Blend until smooth and creamy.

Pour the contents of the blender into the soup and bring back to a simmer.

Add the chopped green onions and the seafood and simmer until cooked through – no more than 2 minutes if your seafood is cooked (you are just reheating it in the soup) and no more than 5 minutes if the seafood is raw – we do not want overcooked tough seafood here folks!

chow2

Serve at once garnished with chopped parsley.

chow2

As I mentioned earlier I served it with plantain muffins but tbh, they were gilding the lily – the chowder was satisfying enough by itself.  The plantain muffins also contain whole eggs and are therefore a stage 2 reintroduction recipe.

pm4

Shared at the Paleo AIP Recipe Roundup 21

Shared at Allergy Free Wednesday #111

Shared at Gluten Free Wednesday 4-23-14

Shared at Simple Meals Friday #28

Shared at Wellness Wednesday

Shared at Five Friday Finds

Broiled Mackerel with Gremolata

I like to cook fish very simply – usually just grilled (broiled for those in the US) or pan-fried.  And I usually like to serve a simple sauce or garnish with it as well.

This time, I broiled my mackerel, which I had prepared using this method.  And I served it with gremolata this time.

Gremolata is a chopped herb garnish that is traditionally served with ossobuco, but it goes very well with fish as well.

This is a very quick meal (if your fish are already prepared/filleted, it can be fridge to table in less than 15 minutes depending on what you are planning on serving with it).  Perfect for a late night or after-work meal!

Grilled Mackerel with Gremolata

serves 6

mackerel2

  • 6 small mackerel
  • 1-2 tbsp coconut oil – melted
  • a few sprigs of fresh thyme
  • sea salt to taste

First of all, you are going to prepare your mackerel.  I used this method as my mackerel were quite small and I was planning on serving one per person.  If you had larger fish you could simply fillet them.  This is a good method to use.

Lay your mackerel out skin side down on a baking sheet, brush with the melted coconut oil and sprinkle it with fresh thyme leaves.  Season with salt.  Cook under a hot broiler for 5-10 minutes until the fish is cooked and just starting to flake.

Serve at once with gremolata.

For the gremolata:

  • zest of 2 lemons
  • 4 cloves garlic
  • ½ cup fresh parsley
  • 1 tbsp extra virgin olive oil
  • sea salt to taste

All you need to do is to take all the ingredients and put them in a food processor.  Pulse until they are evenly mixed, and the parsley and garlic is finely chopped.

Spoon over your mackerel fillet.

mackerel4

In addition to the gremolata, I served a simple salad dressed with lemon juice and olive oil and some oven roasted veggies (brussels sprouts, beets, sweet potato and red onion) with the fish.

mackerel1

Shared at the Paleo AIP Recipe Roundtable#14

How to prepare herrings and sardines

Oily fish is very good for you, there is no getting away from that.  Rich in heart and brain-healthy omega3 fatty acids, they can also be a cheap source of protein.

I can buy enough herrings to feed my family for just $5.99.  It would cost me 3 times that amount to buy salmon fillets

The only downside is that the fish need cleaning and preparing, and that can be a little daunting if you don’t know how to do it.

This is how I prepare these small fish.  I will warn you now, this is a very picture-dense post as Hubby was taking pictures as I was actually gutting and preparing the fish.

This exact same method can be used for any of the smaller oily fish – I prepare sardines, sprats, pilchard, herring and mackerel this way amongst others.  Even small trout can be prepared this way and it is much easier than the traditional method of filleting.  But in this post I am using herring.

The fish were frozen when I bought them – living in land-locked Alberta, it is very hard to buy unfrozen fresh sea-fish.  And these small oily fish go bad very quickly, so it is best for me to buy them frozen.   A 1kg (2.2lb) bag costs me $5.99, and usually contains around 12 fish…  2 per person, which makes for a very satisfying meal.
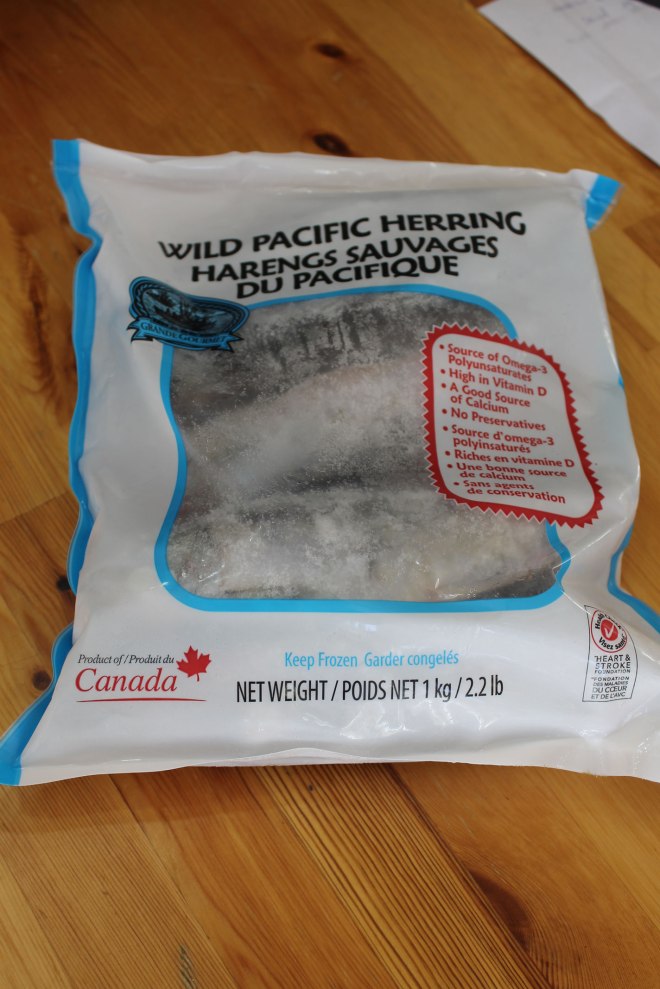
herr32

So I thawed the bag of fish out by leaving it in the refrigerator overnight (never thaw fish on the counter-top at room temperature!).  If you need to do a fast thaw, you can submerge the bag into cold running water, but don’t use warm/hot water either.  I also do not recommend that you attempt to thaw fish in the microwave – it tends to cook them as it is thawing them.

Once they are fully defrosted, take them out of the bag, discarding any liquid that is in the bag (there is nearly always some!).
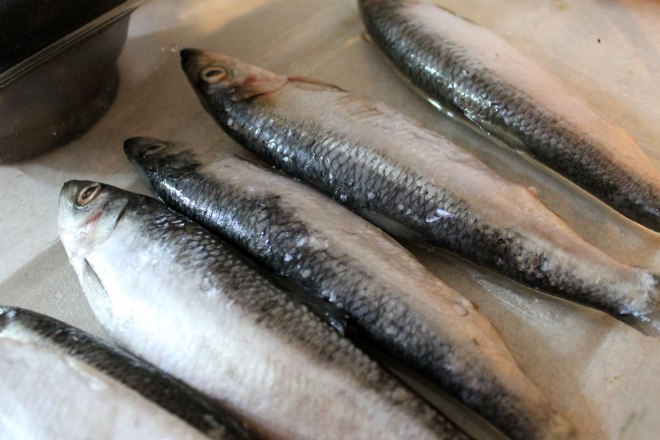
herr7

Obviously, if you are using fresh fish, there is no need to go through the above 2 steps, you can jump right in to cleaning them.

The first step is to descale them.  To do this, I use the back of a paring knife under a running tap (the non-sharp edge).  I just run the knife from tail to head (Against the grain of the scales) while the water is flowing over the fish.  Not all fish need descaling.  Herring almost always do, but mackerel don’t.
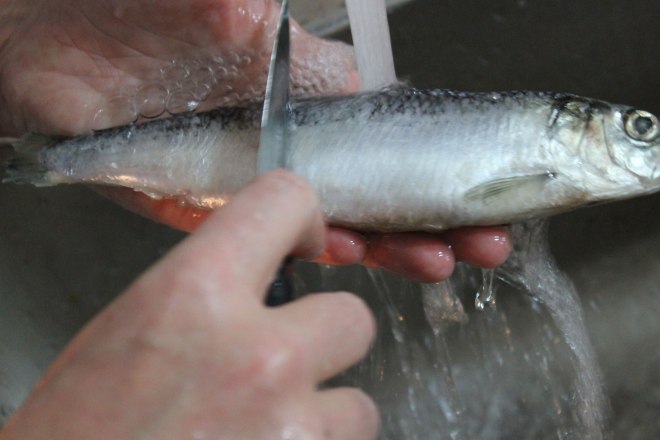
herr25

Make sure you get all the scales off – scales are not pleasant to eat!

Next you need to cut the heads and tails off.  Some people like to do this after gutting the fish, I prefer to do it before as most often, a lot of the guts will come out along with the head.  Simply cut with a knife right behind the gills as close as you can because you don’t want to waste any of the flesh.
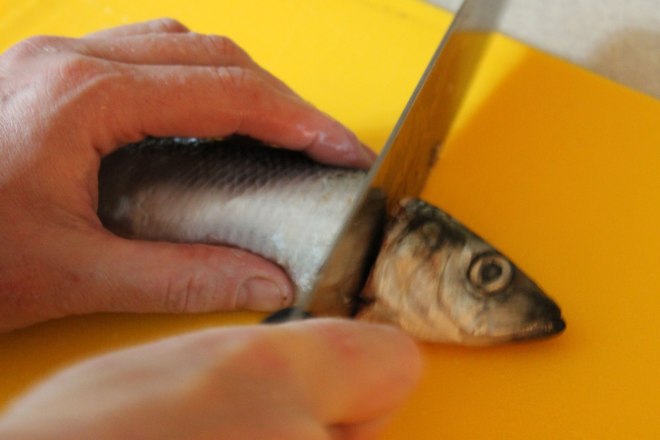
herr22

At the tail end, you simply cut close to the tail….  not so much flesh down that end to waste!  I like to use a french cooks knife for cutting heads and tails off, but I use a paring knife to actually gut the fish.
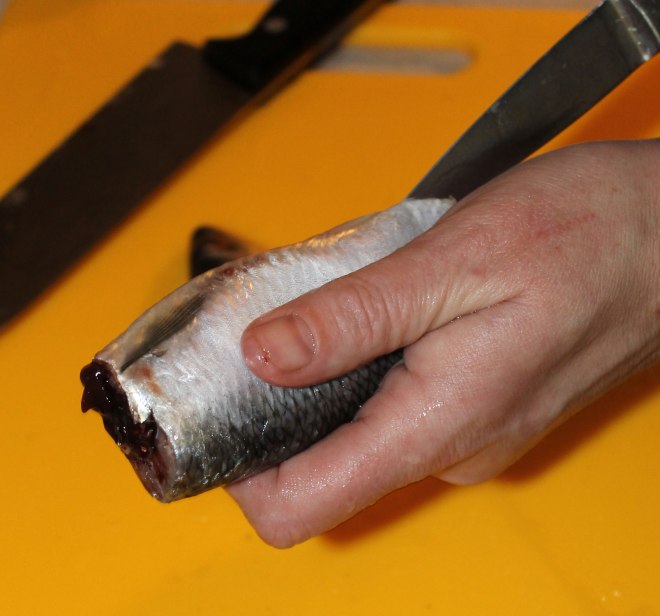
herr31

To remove the guts and open up the belly, you simply insert the point of your paring knife into the small opening on the fish’s belly and then run the knife up the underside of the fish towards the head end:
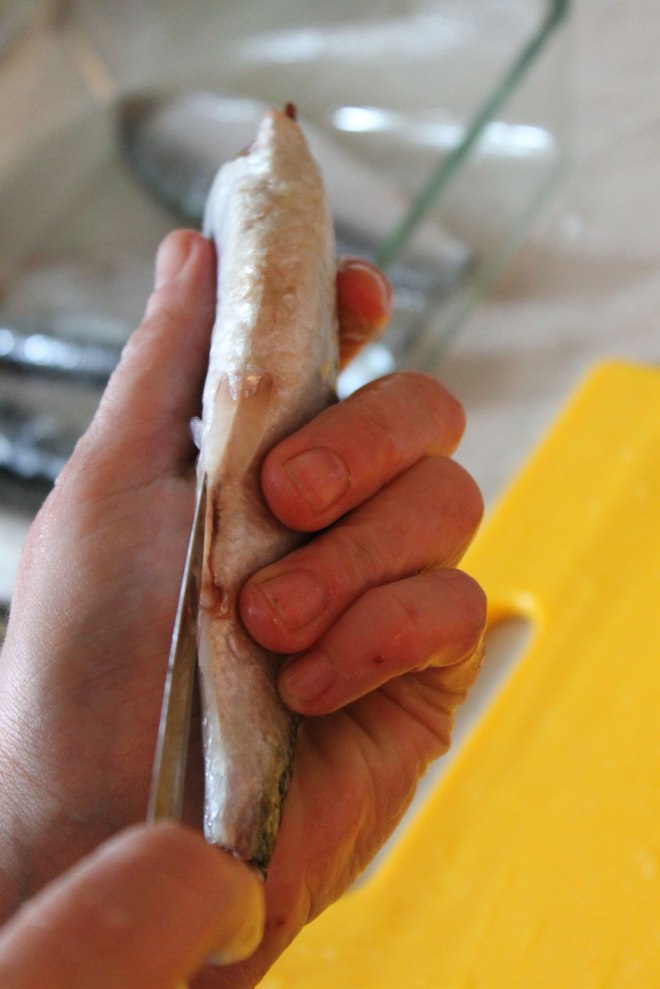
herr21

All the way up to where you cut the head off:
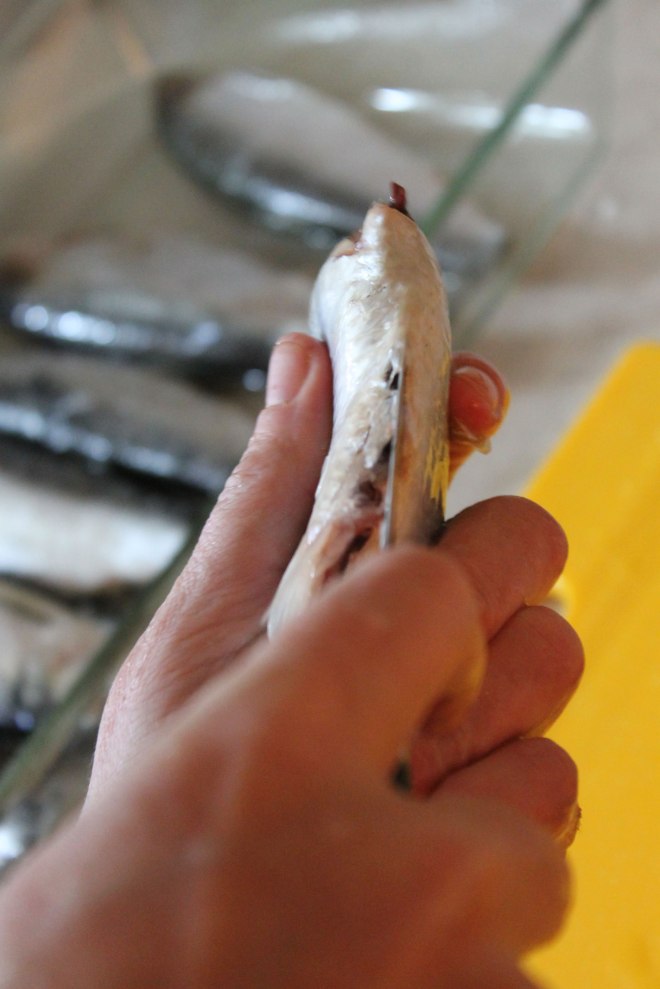
herr20

At this point you can remove the innards of the fish:
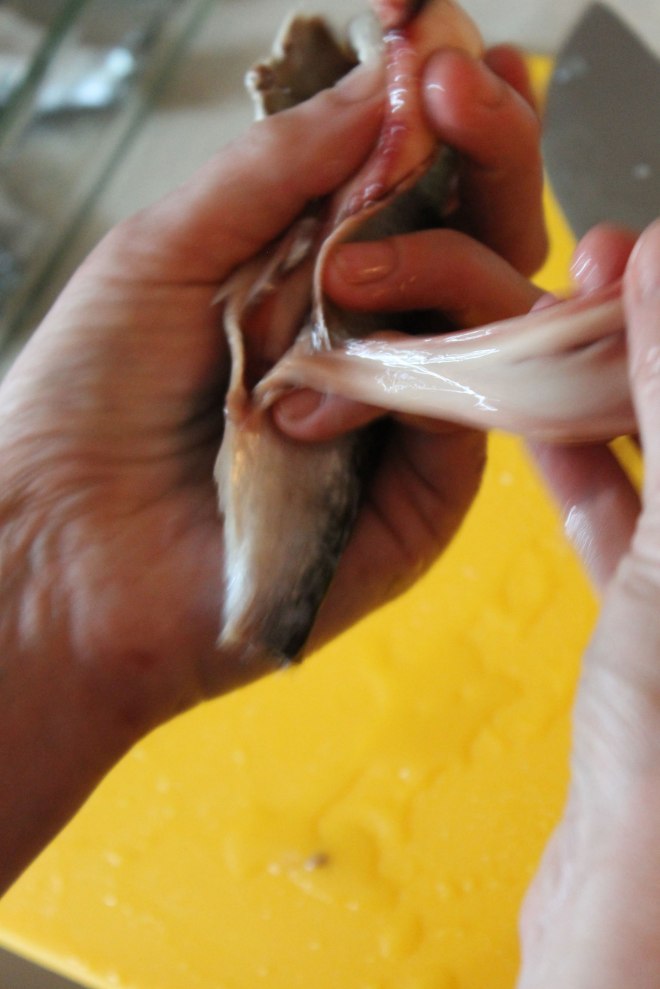
herr17

If you find any long creamy coloured sacs that look like what I am removing in the above photograph, these are the soft-roes (more properly called Milt) that are found in male fish.
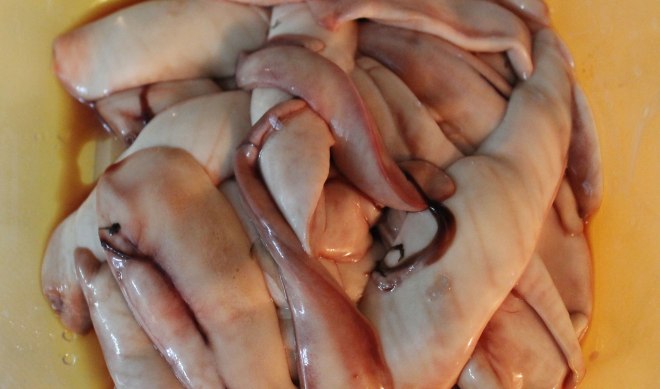
herr5

Put them to one side as they are delicious when fried in a little bacon fat.

You might also find some hard roes if you have female fish (sadly all of mine were male).  Female herring tend to be larger than the males.

Hard roes look like this:

herringroe

These are the true fish roes and are again contained in long sacs.  But unlike the soft roes, they have a grainy texture as they contain the fish-eggs.  In herring, they are an orangy-red colour.  The colour can vary depending on what species of fish you are cleaning however.  Like the soft-roes, you should also set these aside as they are not only delicious, they are very good for you.

I most often find roes in herring…. but sometimes you find them in other fish as well…  no matter what species of fish you are using, the roes are all edible and should not be wasted.  If you are going to get roes in your fish it really depends on the season in which they were caught.  With frozen fish this can be a bit hit or miss as you can never be sure how long the fish has been frozen for.  But with really fresh (never frozen) fish, you will only find the soft and hard roes during the times when they are spawning.

Rinse the roe under cold running water but be gentle with them – they are very delicate!

The remaining guts should be thrown away (although I did feed a fish-head and some of the guts to my raw-food fed cat!  He enjoyed them immensely.  I tried giving the dog a fish head and he just got confused and licked it a little then wagged his tail to show willing….  It goes to show that cats are smarter than dogs!  They know when food is good for them….

By the time your fish has been gutted, you should end up with something that looks like this:
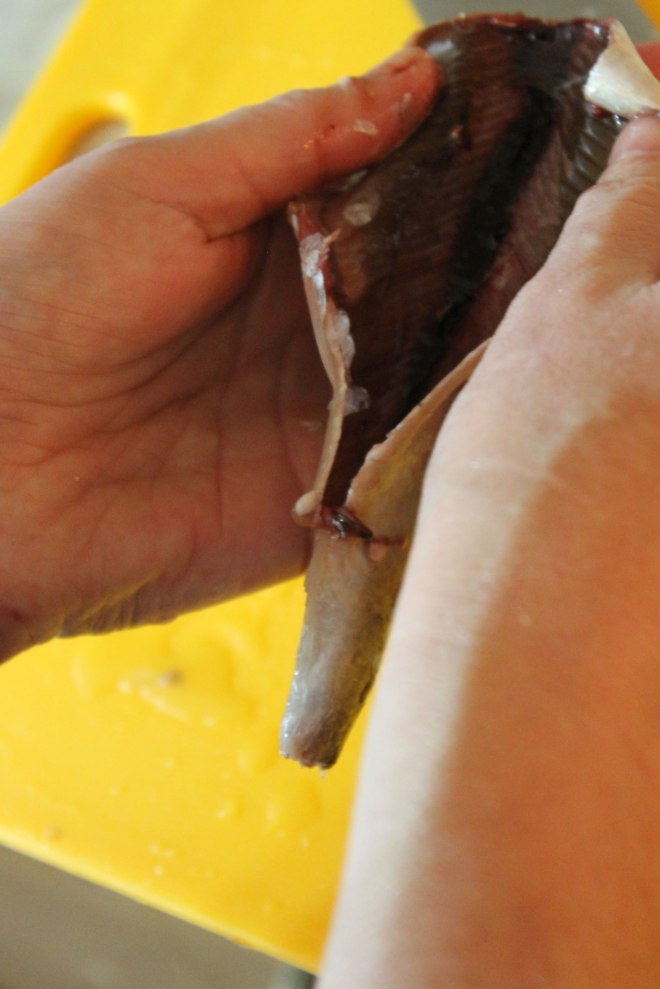
herr16

Now it is back to the sink to wash out the innards.  Make sure you rub inside well as there is a dark film lining the internal cavity.  Using a little salt on your fingers can help remove this.  Also make sure you scrape down towards the backbone to remove the blood-line (the main arteries in the fish) as these can taste bitter.  The running water will wash all this away.
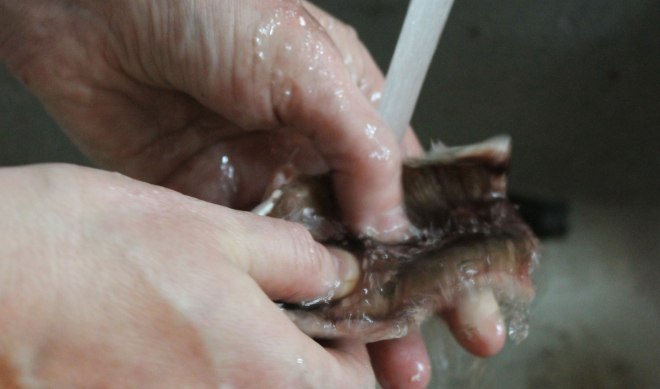
herr27

If you are wanting to serve your fish whole, that is all you need to do (Actually, you don’t even need to remove the head in this case…..  I do because I am not fond of my food looking at me when it is on the plate!).  In this case, you will simply move on to how you have decided to cook your fish…..

But in the case of the meal I was making, I wanted boneless  (or as nearly boneless as I can) split fish fillets.

So I took my fish and I used my paring knife to slit it down from the open cavity towards the tail, cutting right down to the backbone:
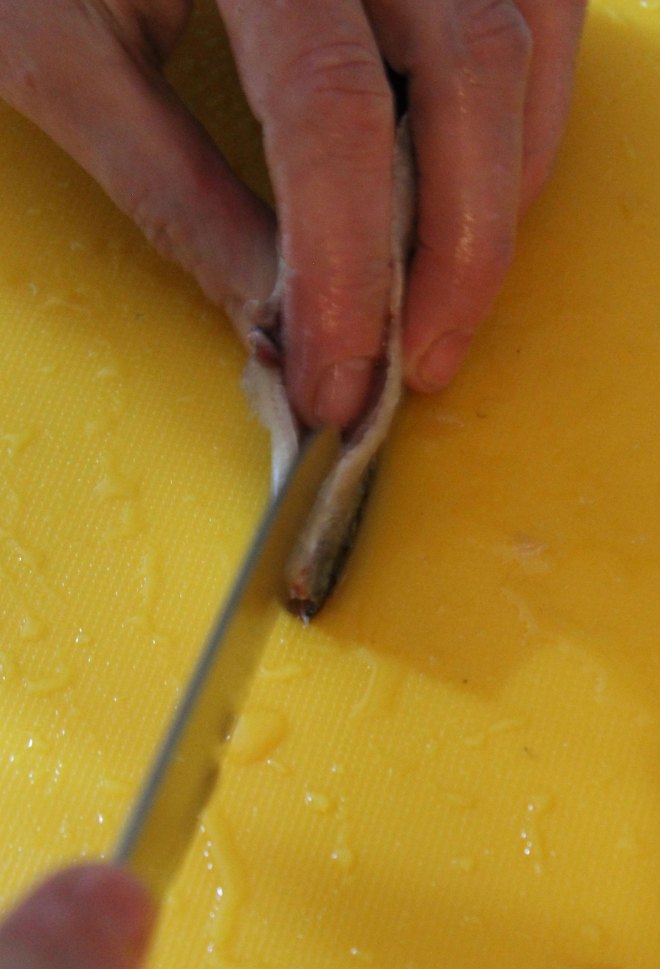
herr15

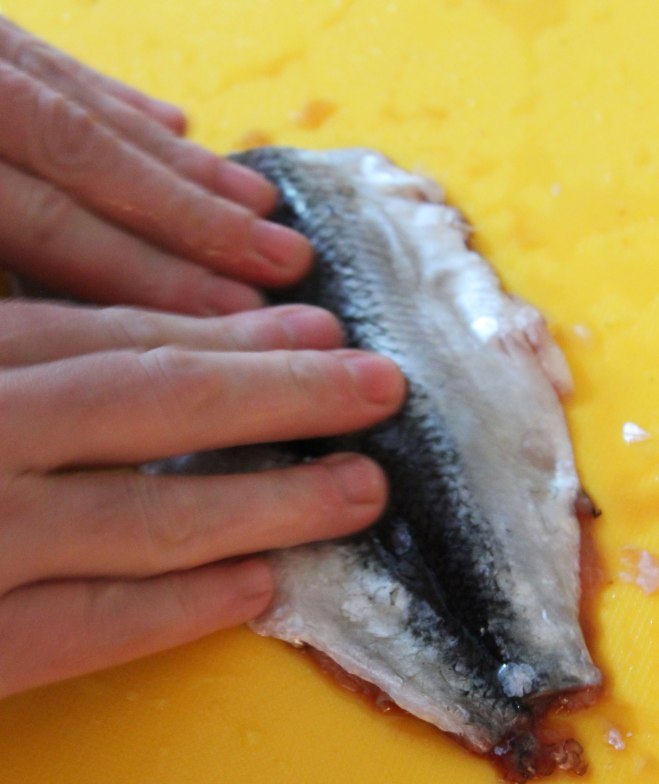
Then I inverted the fish so that it was belly-down on the cutting board and it’s stomach flaps were spread out.  Press down hard along the backbone of your fish, squashing it flat:
herr13

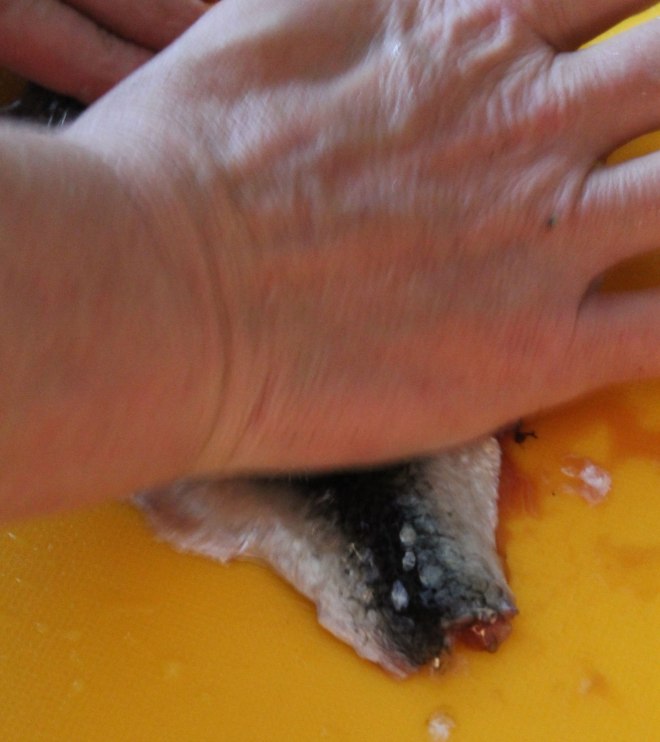
You might need to use the heel of your hand to do this:
herr14

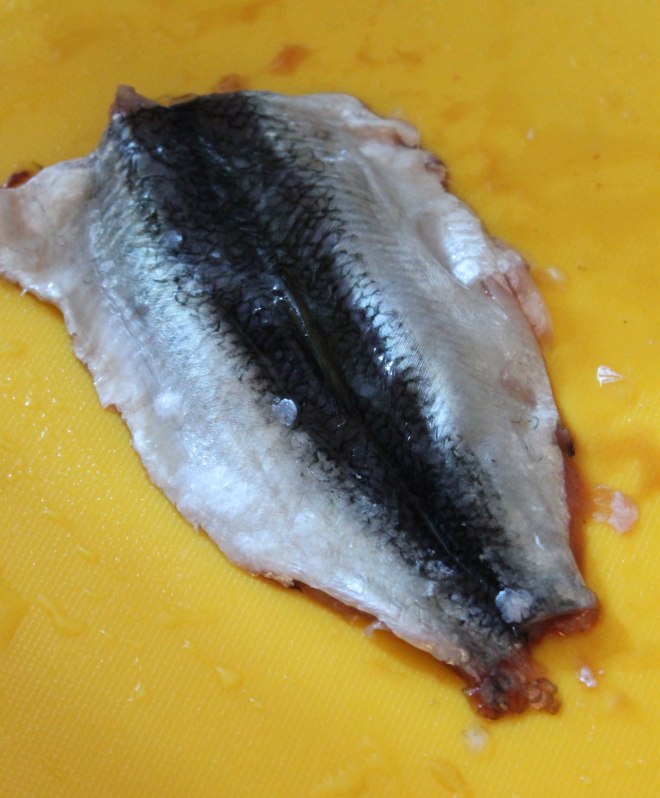
The flatter you get your fish, the easier it will be to remove the backbone:  Get it as flat as you can! Do you see those scales on the cutting board?  I obviously didn’t de-scale this fish well enough!
herr12

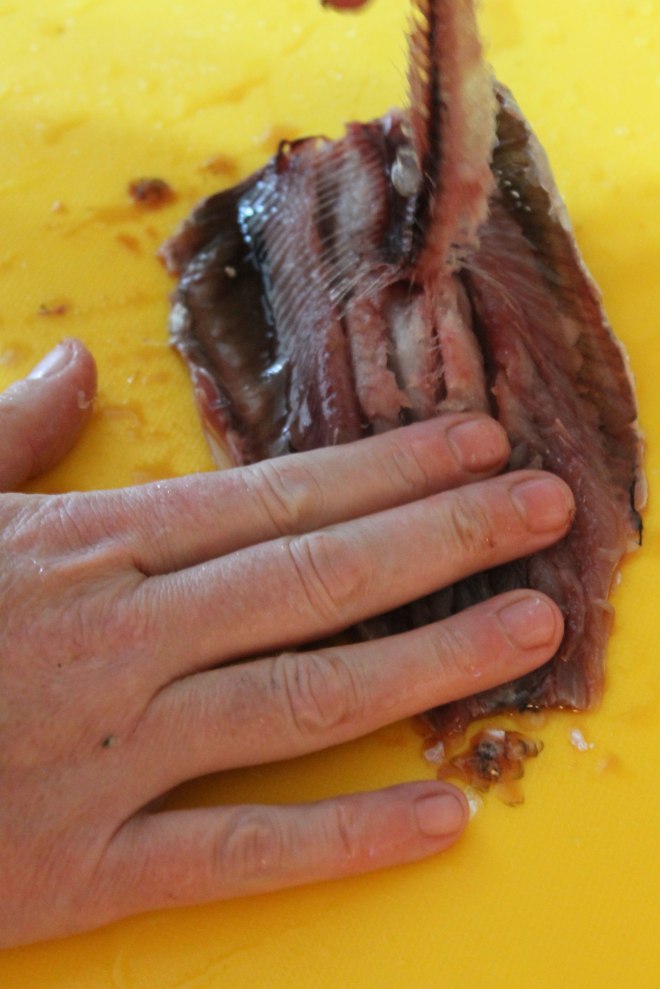
Now turn the fish over so the open side is uppermost.  Take hold of the tail end of the backbone and peel it out…  most of the ribs should come away with it.
herr11

If it does not come away easily, you didn’t squash the fish enough, so turn it back over and squish it some more!

What you will end up with is something that looks a bit like this:
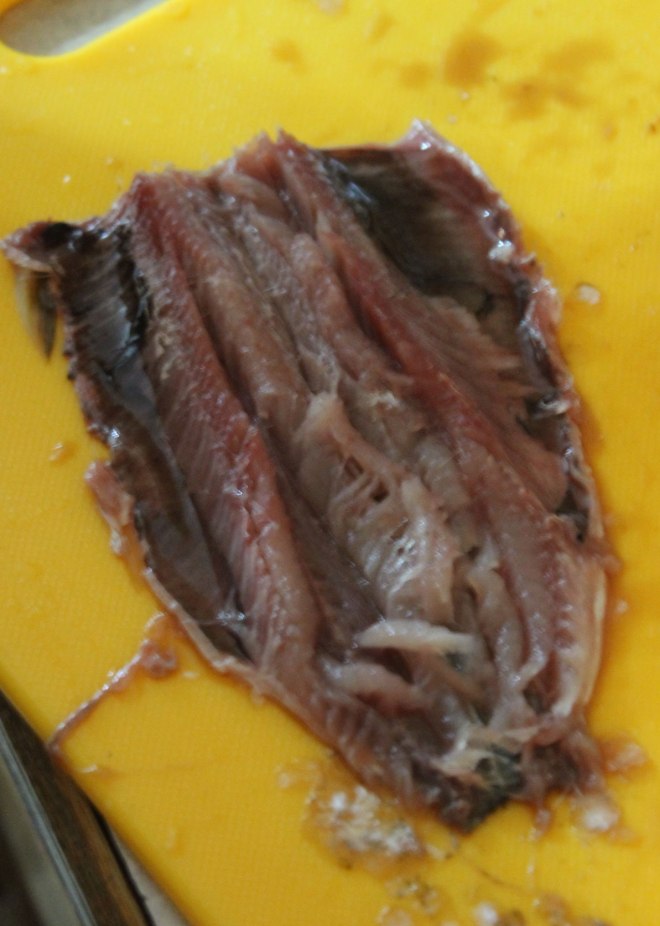
herr26

Now you just need to trim off any fins.  A pair of scissors is easiest for this.
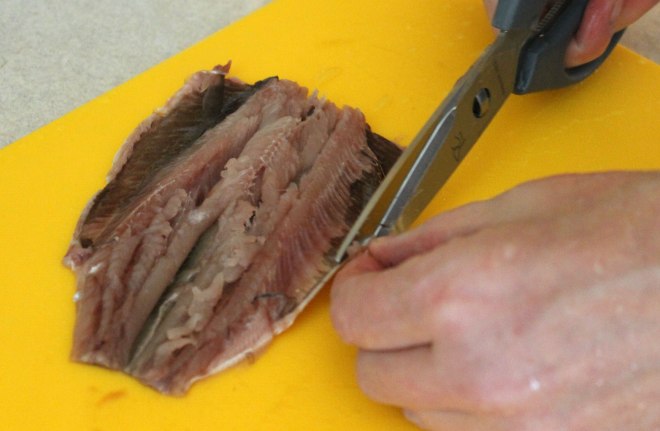
herr6

On herring, there are usually 2 sets left after you cut off the head – one set along the edges of the belly which I am removing in the picture above, and one set along the back, which I am removing in the picture below:
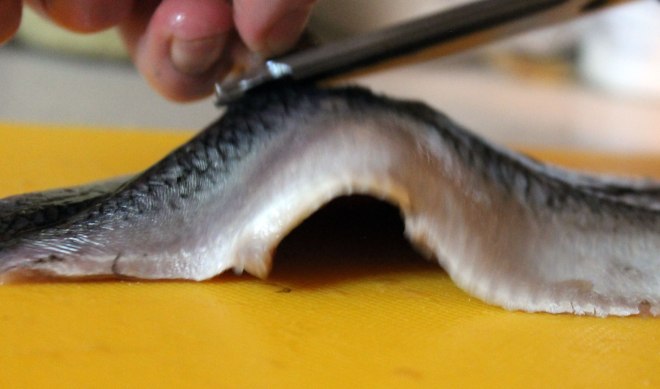
herr1

Give the entire fish a quick wash to make sure that there are no stray scales hanging around, and you are done!

If your fish is small, just leave it with the 2 halves attached, but if it is on the larger side, you can divide it into 2 fillets…  your choice….

Congratulations!  you have just prepared your first whole fish…..

Now cook and eat and enjoy!

I like my fish cooked very simply.  Most often I just fry them in a little coconut oil:
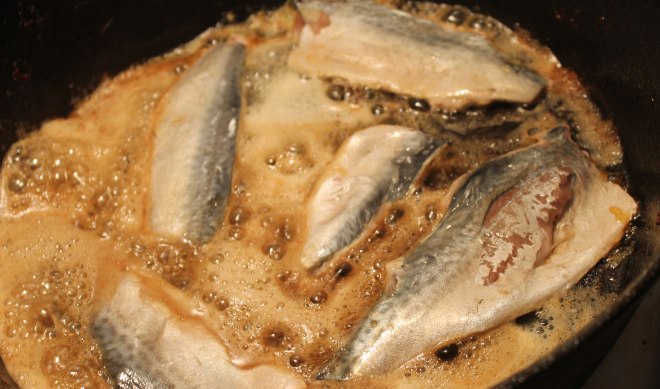
mack9

The fish in the picture above are actually mackerel.  I didn’t think to take a picture of the herring that I was cooking.

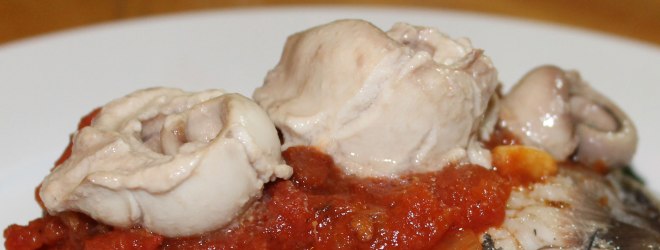
As far as the roe goes, soft roes (milt) I just briefly pan-fry in a little coconut oil.  They will curl up into a cute spiral shape and have a very creamy texture.  I serve these on top of the fish:
herr33

You could also save them and mix them into your scrambled eggs at breakfast.  That would be delicious!  But I am just not that organized.  I have considered blending them into a sauce as well…  I bet that would work well!

As far as the hard roes (or true roe) goes, I remove the membrane that surrounds the sac, and I just use them in anything that I would normally use fish eggs for (sushi, sashimi, stirred into scrambled egg).  I don’t tend to cook these, they are better raw so that you can appreciate that little “pop” and burst of fishy salty goodness as you bite into them.

I hope this post will give you the confidence to start gutting and prepping whole fish as it is really very easy if a little time-consuming.

And if your hands smell “fishy” afterwards, there is a really simple tip for getting rid of that….  just wash your hands in your stainless-steel sink and rub the surface of your hands all over the metal…  I don’t know why it works, but it does!   Sadly this will not work if you have a non-stainless-steel sink….

Cajun Salmon with Roasted Beets

This was an incredible meal.  The salmon was spicy, with just enough mouth-tingling heat.  The beets were sweet and delicious, and the perfect accompaniment to the spicy salmon.  I served this with a side of sauteed kale.

cajunsalmon3

The nightshade spices in this recipe are an AIP stage 4 reintroduction.  When reintroducing foods on the AIP, I recommend this guide.

Cajun Salmon with Roasted Beets

serves 6

cajunsalmon4

  • 6-8 Wild salmon fillets (aprox 4-6 oz each)
  • 2 tbsp paprika
  • 1 tbsp dried oregano
  • 1 tbsp dried thyme
  • 1 tbsp cayenne pepper
  • 1 tsp ground black pepper
  • 1 tsp garlic powder
  • 1/2 tsp sea salt
  • 8-10 small beets
  • 2 tbsp oil of your choice (I used coconut oil)
  • 2 tbsp balsamic vinegar
  • 1 tsp chopped dried rosemary
  • 1/2 tsp dried thyme

Preheat the oven to 180C/350F.

Mix together the paprika, oregano, thyme, cayenne, black pepper,  garlic powder and salt.

Lay the fish on a baking sheet and liberally sprinkle the top surface with the spice mixture.  Set aside in the fridge to rest while you prepare the beets.

Peel the beets and trim off the tops.  Cut into bite-size pieces.  Toss in a bowl with the oil, balsamic, rosemary and thyme.  Tip into a roasting pan and cover with foil.

Roast in the oven for 15 minutes, then remove the foil.  Toss well, and return to the oven for 45 minutes of uncovered roasting, tossing every 15 minutes or so.

10 minutes before the beets are done, slide the salmon into the oven and roast until cooked and the flesh flakes.

cajunsalmon1

Serve the salmon with the beets and a side of sauteed greens.

Yummy!

Olive Oil Poached Salmon with Peach Salsa

This meal was inspired by this post on Marks Daily Apple.

I was a little nervous at cooking fish in so much oil at a very low temperature, but it turned out perfectly – moist, flavourful and not at all greasy.

We paired this salmon with a peach salsa and stir-fried ruby chard.

The tomatoes in the salsa make this a stage 4 reintroduction recipe.  When reintroducing foods on the AIP, I recommend this guide.

Olive Oil Poached Salmon with Peach Salsa

serves 6

oliveoilpoachedsalmon3

For the fish:

6 skinned salmon fillets (ours weighed around 4oz each)

sea salt

olive oil to cover

3 cloves of garlic – smashed

2-3 sprigs rosemary

2-3 sprigs thyme

a few black peppercorns (omit if strict AIP)

For the peach salsa:

3 fresh, ripe peaches – diced

3 lg tomatoes – seeded and diced

3-4 green onions – chopped

1 tbsp fresh lime juice

1 tbsp olive oil (you could use some of the olive oil that the fish was poached in!)

1 handful fresh cilantro leaves – roughly chopped

sea salt

Instructions

Place the fish in a pot and lightly season with sea salt.  Cover with olive oil.  This is the olive oil that we use:

oliveoil

It is Tunisian and has a wonderful fruity flavour.  We buy this from Basha Foods.

Add the smashed garlic cloves (you don’t want to crush them, just squish them a little so that they break up), the rosemary and thyme sprigs and the black peppercorns (if using).

Put the pot of oil over a medium-low heat until very tiny bubbles form around the edges of the fish.  You don’t want the oil to get too hot.  I monitored the temperature of the oil by dipping my (clean!) little finger in it….  My aim was to keep the oil at a temperature where I could bear to do this.  If the heat is getting a bit high, turn the heat down to low.

You are poaching the fish very, very gently in warm rather than hot oil.  And believe me, it DOES cook at this temperature!

oliveoilpoachedsalmon2

I found that my fish took longer to cook than the 5-8 minutes stated in the original recipe – mine took slightly over 10 minutes.  I am not sure if this is because of altitude (food takes longer to cook at a high altitude) or if it was because my oil was not quite as hot.

Either way, my fish cooked in slightly over 10 minutes.

While the fish was cooking, I made the peach salsa

oliveoilpoachedsalmon1

All you do is to mix all the ingredients together, adding a little bit of the fish cooking oil.  Chill until the fish is cooked.

Serve the fish with the salsa on top and stir-fried greens such as ruby chard.

oliveoilpoachedsalmon4

And as I stated above, it was not greasy or oily, it was moist, flavourful and perfectly cooked!

I removed the fish from the oil and served it with a peach salsa and stir-fried ruby chard made using this recipe.

And I strained the oil and used it later in the week to make some homemade mayonnaise!  I also used a little bit of the oil in the peach salsa.