AIP Saskatoon Berry and Peach BBQ Sauce

BBQ sauce is a hard condiment to substitute for when you are following the Auto Immune Protocol – Tomatoes are out, chilli is out.  What can you eat with your ribs, burgers and wings?

I came up with this fruit based BBQ sauce that I served with ribs for one of the girls birthdays.

It was based on some frozen saskatoon berries and some frozen peaches that I had in the freezer.  If you cannot find saskatoon berries, you could substitute another type of berry – blueberries might make a good substitution.

This sauce does not have quite the same spicy tomato flavour as a traditional BBQ sauce, but it does have a wonderful fruity, slightly acidic flavour.  And it pairs really well with grilled meats.

This is a stage 1 AIP reintroduction recipe that calls for black pepper.  If you have not managed to successfully reintroduce black pepper, or you are still on the strict elimination phase of AIP, you can simply omit the black pepper to make this recipe 100% AIP compliant.

When reintroducing foods on the AIP, I recommend this guide.

AIP Saskatoon Berry and Peach BBQ Sauce

BBBQ1

  • 1 tbsp coconut oil or other fat of choice
  • 1 onion – finely chopped
  • 6 cloves of garlic – crushed
  • 3 cups chopped peaches (fresh or frozen)
  • 1 cup saskatoon berries – thawed if frozen (substitute blueberries if you cannot find saskatoon berries)
  • ¼ cup coconut aminos
  • ¼ cup maple syrup
  • ½ cup apple cider vinegar
  • 1 tsp sea salt
  • ½ tsp freshly ground black pepper (Omit the pepper if sensitive or strict AIP)
  • 1 tbsp grated root ginger
  • ½ tsp cinnamon

Melt the coconut oil in a pan and add the onion.  Cook gently over a low heat until the onion is softened.  Add the garlic and cook for a minute longer.

Now add the peaches and berries along with the maple syrup, vinegar, salt and pepper, ginger and cinnamon.

Simmer gently for 20 minutes until the peaches are starting to break down and the sauce has thickened slightly.

Blend until smooth and allow to cool.

Serve with your favourite grilled meats.

This sauce will keep for a week or two in a sealed jar in the fridge.  If you are wanting to store it for longer periods, I recommend that you freeze it.

Shared at Tasty Tuesdays #66

Shared at Paleo AIP Recipe Roundtable #33

Beef Jerky – Paleo/AIP

Jerky makes a great snack – tasty and protein rich, it fills you up.

But most of the jerky’s you can buy contain dubious ingredients like soy and MSG.  And they usually contain spices that are not AIP.

And then there is the cost – to buy jerky made with decent grass-fed beef costs a fortune – it is far cheaper to make it yourself.

This recipe contains no nightshade spices but it does have peppercorns – pepper is classed as a stage 1 reintroductoin.  If you know that you will react to it, or if you are strict AIP, simply leave it out.  The jerky will still taste AMAZING!

The good thing is that jerky is very easy to make.  If you have a dehydrator it is a breeze, but it is also possible to dry it out in the oven set at the lowest setting.

Black Pepper is a stage 1 reintroduction.  If you have not reintroduced it yet, or are in the elimination phase of the AIP simply omit it from the seasoning mix.  When reintroducing foods on the AIP, I recommend this guide.

Beef Jerky

makes aprox. ½lb jerky

BJ1

  • 2lb grass-fed beef (look for a lean cut – flank steak works well)
  • ¼ cup coconut aminos
  • 2 tsp sea salt
  • freshly ground black pepper to taste (omit if sensitive or strict AIP)
  • 2 tsp wasabi powder
  • 2 tsp garlic powder
  • 2 tsp onion powder
  • 1 tsp ginger powder

Trim off any visible fat, then slice as thinly as possible – ¼” thick or even less if you can manage it.  Chilling the meat in the freezer so that it is partially thawed can help with this.  Use a very sharp knife or a meat-slicer if you have one.

Place the meat in a glass bowl and add all the remaining ingredients – mix well so that all the meat is evenly coated.

Marinate in the fridge for 12-24 hours.

To dry the jerky using a dehydrator:

Arrange the slices of meat on the dehydrator tray, spacing them out evenly and making sure that no pieces overlap.

BJ3

I have an Excalibur 9 tray dehydrator which is amazing.  But you can use any dehydrator to make your jerky…

Set the temperature to the meat setting – 68°C/155°F for 3-5 hours until dry – it is ready when it is dry to the touch and shows white fibers when you bend it.

Cool and store in an airtight container in the fridge.

To dry the jerky using the oven:

Place a cooling rack on a cookie sheet, and arrange the slices of meat on top of the cooling rack.  You could also use a roasting rack and roasting pan for this if you have one.  The aim is to allow air circulation on all sides of the strips of meat so that they dry as fast as possible.

Set the oven temperature to the lowest possible setting – 68°C/155°F is ideal, but if your oven does not go this low just set it as low as you can.  If you have a fan oven use this setting as this increases air circulation and that will speed up the drying.

Place the trays of meat in the oven and prop the door open to allow more air to circulate – I use a wooden rolling pin to do this!

Allow the jerky to dehydrate for anything from 4-8 hours until it is dry to the touch and shows white fibres when you bend it.  It should still be slightly pliable, not crispy.

Allow the jerky to cool and store in an airtight container in the fridge.

BJ2

Shared at Paleo AIP Recipe Roundtable #32

Shared at Gluten Free Wednesday

The Easiest Mayo Recipe EVER!

A few months ago, I saw a post on IPMG about how to make mayo using a stick-blender and a mason jar.

Previously, I had been making my mayo either in my blender or the hard way with a mixing bowl and a hand whisk.

Put it this way, this method has literally changed my life!

It is so easy – rich, thick, additive-free mayonnaise without any hard work.  And the best bit is that it only takes seconds.

It works every time – the trick is to keep the stick-blender perfectly still until the mayonnaise has started to thicken.  If you move it before this it will go runny on you.

While not strict AIP (it contains egg yolks), this may be tolerated by anyone who has successfully reintroduced eggs or egg yolks (for the most part, it is the egg white that can be problematic for people with AIP issues).  This is also paleo, and free of all of the questionable additives that store-bought mayo contains.

And it is delicious!

This recipe contains egg yolks (stage 1 reintroduction).  When reintroducing foods on the AIP, I recommend this guide.

The Easiest Mayo Recipe EVER!

makes 1 cup

BM10

  • 1 large egg yolk
  • 1 tablespoon lemon juice 
  • ½ cup extra virgin olive oil
  • ½ cup avocado oil
  • sea salt and freshly ground black pepper

Place the egg yolk and lemon juice in a wide-mouthed mason jar.  Add the olive oil and avocado oil.  Season well with sea salt and freshly ground black pepper.

Place the stick blender in the mason jar and blend without moving the stick blender.  Once the mayonnaise is starting to form, you can move the blender up and down gently, but wait until it is starting to thicken before you do this.

Taste to check the seasoning and adjust by adding more salt or pepper as necessary.

BM9

This mayo will keep in the fridge for 1-2 weeks if it is stored in a sealed jar.

Use as you would use any mayonnaise.

Optional add-ins:

  • add 1-2 cloves of garlic before blending to make Aioli
  • add ½-1 tsp ready made mustard (mustard is an AIP stage 2 reintroduction).
  • add ½-1 tsp anchovy paste and a little nutritional yeast to make a paleo/aip version of ceasar salad dressing
  • add 1 canned sardine before blending to increase the omega 3 content
  • add any herbs you like along with some spinach to make a green dressing.
  • add a chilli pepper or even a chipotle chili in adobo to make a spicy chilli/chipotle salad dressing or dip. (chilli is a stage 4 reintroduction)

That is just 6 suggested add-ins, but really you could add anything you fancy to this

Go wild!  Experiment!  Have Fun!

Shared at Mostly Homemade Mondays #83

Parchment Baked Cod – AIP/Paleo

Cooking fish in parchment paper results in moist, tender, flakey fish.

It takes a bit of advance preparation, and can be a little fiddley the first time you do it, but the results are SO worth it.  The parchment protects the delicate fish from the heat of the oven, and the vegetables, herbs and lemon provide so much flavour.

I find it so easy to overcook fish, but this method is almost foolproof.

This is my favourite way to cook all kinds of fish, not just cod.  Try it with salmon or sole – it will be beautiful.

I chose to use cod for this dish.  Cod is always wild caught, and as long as you avoid North Sea cod, is not an endangered species.  Please do not eat North Sea cod – it has been very over-fished in the last few years and the fish-stock is threatened.  But Pacific cod and North Atlantic cod are thriving.  I am not too worried about the radiation in the pacific from Fukishima – see this post for the reasons why.

This recipe does contain a little white wine, but the alcohol will evaporate during the cooking leaving only the flavour.  If this is still a concern for you, replace the wine with bone broth (preferably a fish bone broth) or some lemon juice.

The black pepper makes this a stage 1 reintroduction recipe.  This can easily be omitted to make this recipe strict AIP compliant.  When reintroducing foods on the AIP, I recommend this guide.

This recipe is easy to scale down for just one or two people…  simply reduce the quantities you make.  I made this for 6 people because there are 6 people in our family.

Parchment Baked Cod

serves 6

cip1

  • 6 fillets of wild-caught cod
  • 3 zucchini
  • 3 carrots – peeled
  • 2 onions
  • 1 bunch of green onions
  • 3 lemons
  • 1 handful of Italian parsley
  • sea salt and freshly ground black pepper to taste (omit the pepper if sensitive to it or strict AIP)
  • white wine to moisten (optional – if strict AIP replace with bone broth (preferably fish bone broth) or lemon juice)
  • Avocado or olive oil to drizzle

The first thing you need to do is to preheat your oven to 190°/375°F.

Next you cut 6 pieces of parchment paper – you want squares around 12-14 inches on each side.

Take the zucchini and use a spiral cutter to cut them in to thick spiral shapes.  If you do not own a spiral cutter, you could grate them or cut them into thin julienne shreds.

Peel the carrots and treat them in the same way as the zucchini – either spiral slice them, grate them or julienne them.

Trim the root end from the green onions and chop into small pieces.

Peel the onions and slice as thinly as you can.

Slice the lemons into  thin slices.

Chop the parsley.

If the fish fillets are long, you may need to cut them in half.  Use your judgment.  They need to be a suitable size to fit in the parchment paper parcel.  If they are too big, cut them in half.

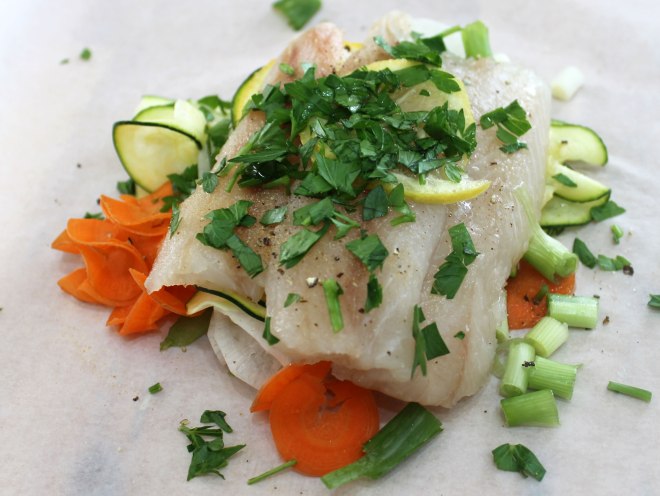
Pile the veggies on the parchment paper sheets, dividing them evenly.

Top the veggies with the lemon slices, reserving one slice to lay on top of the fish fillets.

Now sit the fish on top of all the veggies.  Lay a lemon slice on top of the fish, scatter with the parsley and season well with salt and pepper.

cip4

Pour a splash of white wine (if using ) over the fish – no more than 1 tbsp per parcel.  If you do not use wine, substitute fish bone broth or lemon juice.  Drizzle the fish with a little olive oil or avocado oil.

Fold the parchment in half so that opposite corners meet then start to roll the edges, twisting the corners and tucking them under to make a neat parcel.

cip6

Place the finished parcels on a baking sheet and then bake in the oven for 15-20 minutes until the fish is opaque and tender.

cip7

I recommend that you check one packet after 15 minutes and if it is not cooked, reseal and continue cooking.

Allow the fish to rest for 5 minutes then serve.

cip2

The diner opens their packet at the table releasing a delicious aroma.

I like to serve these with oven-baked vegetable fries.  No extra veggies are needed.

Shared at Paleo AIP Recipe Roundup #29

Shared at Gluten-free and DIY Tuesdays

Deconstructed Burger Salad

After the Music n’ Motion performance last Sunday, we needed a quick, easy meal as we all came back fairly late (6:30 pm by the time we got home), and I did not want to have to spend time messing around in the kitchen producing an elaborate meal.  Also, we were all STARVING!

So I whipped up this quick, deconstructed burger salad.  It contains all the ingredients you would usually find in your burger, on top of a pile of salad greens.  And no bun.

If you leave out the homemade mustard, mayo and ketchup, this could be 100% AIP compliant- of course if you have successfully re-introduced those items, feel free to use them.  Mustard is a stage 2 reintroduction as it contains seeds.  Mayo is a stage 1 reintroduction as it contains egg yolks, and ketchup is a stage 4 reintroduction as it contains tomatoes. You could also substitute AIP versions of all of these if you have them.

If you are strict AIP, you would have to omit the black pepper as this is a stage 1 reconstruction (and also not use mustard, mayo or ketchup).

The salsa would be a stage 4 reintroduction as it contains nightshades.  It can easily be omitted.

When reintroducing foods on the AIP, I recommend this guide.

I like to serve this family-style with every ingredient separate so everyone can make their own salad just the way they like it.  It makes it easy to deal with the “I don’t like” and allergies or intolerances that way.   Everyone can put what they want to eat on their plate and can ignore what they don’t like.  J, the mushroom-hater didn’t have any mushrooms, and I didn’t have any ketchup or mustard, but did have mayo (have successfully re-introduced eggs.)  They can also serve themselves with the amount of food that they think they will eat, which minimizes waste.

This was an incredibly filling meal that I was able to get on the table within 30 minutes of us walking in the door.

Deconstructed Burger Salad

serves 6

dbs4

  • 2lb ground beef (100% grass-fed is ideal)
  • Sea salt and freshly ground black pepper to taste (omit the pepper if sensitive to it or strict AIP)
  • coconut oil to cook
  • 1 tsp onion powder
  • ½ tsp garlic powder
  • 1 tsp dried thyme
  • 2 onions – sliced
  • 1lb mushrooms – sliced
  • 1 bunch watercress –  roughly chopped
  • 2 cups baby spinach
  • ½ green leaf lettuce  – shredded
  • pickles – I used my lacto-fermented cucumber relish and a lacto-fermented salsa (omit the salsa if strict AIP)
  • ketchup – I used a homemade one (omit if strict AIP)
  • Mustard – again I used a homemade one (omit if strict AIP)
  • Mayonnaise – homemade again (omit if strict AIP)
  • 2 avocados – peeled, stoned and chopped
  • Hot sauce if liked (omit if strict AIP)

dbs1

Melt a small amount of coconut oil in a skillet and add the ground beef.  Season well with salt and pepper and add the garlic and onion powder and the dried thyme.  Cook for 3-5 minutes, stirring, until cooked through.  Transfer to a dish and keep warm.

Melt a little more coconut oil in the skillet and add the onion.  Cook for a few minutes until it is starting to caramelize and is tender.  Transfer to a dish and keep warm

Melt a little more coconut oil in the skillet and add the mushrooms.  Cook for a few minutes until tender.  Transefer to a dish and keep warm until everything else is done.

Shred the lettuce and watercress and toss in a large bowl with the baby spinach.

Place any other ingredients you are using (pickles, mayo, avocado, mustard, hot sauce, avocado) and anything else you fancy (olives might be good!)  on the table with all the other ingredients.

Serve everything in separate bowls and let everyone serve themselves to what they want.  Add pickles, mustard, mayo, hot sauce as you see fit.

dbs2

I like to put a bed of the salad greens, then top it with the meat then pile all the other toppings on top.

It is VERY filling!

Baked Sole with Ginger and Garlic

I like to serve fish at least once a week, and I try to ring the changes and serve different kinds so that no one gets bored.

While grocery shopping the other day, I managed to get some wild-caught sole fillets for a great price ($10 for 3lb).

So this week’s fish was sole.

I like to cook my fish fairly simply, and I just baked this fish in the oven, flavouring it with thyme, ginger and garlic.

It was a very quick dish, perfect to cook after a day at work.

This recipe is a stage 1 reintroduction recipe because it contains black pepper.  If you are still in the elimination phase of AIP or are sensitive to black pepper, this recipe can be adapted by simply omitting the pepper.

When reintroducing foods on the AIP, I recommend this guide.

Baked Sole with Lemon, Ginger and Garlic

serves 4-6

sgg4

  • 1½lb wild caught sole fillets
  • 3 onions – sliced
  • 4 oz mushrooms – sliced
  • sea salt and freshly ground black pepper (omit the pepper if sensitive or strict AIP)
  • 3 cloves of garlic – crushed
  • 1″ piece root ginger – peeled and grated
  • 1 tsp dried thyme
  • 1 tbsp coconut oil
  • 1 tbsp olive oil

Preheat the oven to 190°/375°F.

Melt the coconut oil in a skillet and sautee the onions over a medium-low heat until softened – about 5 minutes.  Add the mushrooms and sautee until tender.

Transfer the contents of the skillet to an ovenproof dish.

Lay the sole fillets out over the top of the onions and mushrooms in a single layer.  Season well with sea salt and freshly ground black pepper.  Sprinkle over the crushed garlic and grated ginger.  Sprinkle on the dried thyme and drizzle with olive oil.

There is no reason to be afraid of cooking with olive oil – it doesn’t make the oil “bad” in any way, and it doesn’t turn it into a trans-fat.  The worst that can happen is that it might affect the flavour.  See this post and this post for more info.

Place the dish in the oven and bake for 10 minutes until the fish is white and opaque and flakes easily.  Do not overcook!

sgg3

I served this with some beet and carrot fries and some sauteed kale.

Shared at Allergy Free Wednesday #117

Shared at Waste Not Want Not Wednesday #72

Shared at Real Food Wednesday 5/14/14

Shared at Pennywise Platter

Honey-Mustard-Dill Sauce

This is a sauce that I often serve with Gravlax, but it goes equally well with any fish, and is just as good with chicken.

It is very simple to make and tastes just delicious.

Black pepper and mustard are AIP stage 1 reintroductions.  When reintroducing foods on the AIP, I recommend this guide.

Honey-Mustard-Dill Sauce

HDMS1

  • 4 tbsp Dijon mustard
  • 1½ tbsp apple cider vinegar
  • 2 tbsp honey
  • ½ cup olive oil
  • ¾ cup of dill – finely chopped
  • sea salt and ground black pepper to taste

To make this, you simply mix all the ingredients together.

This is great served with gravlax or any other fish.  It is also great served with chicken fingers or my bacon wrapped chicken.

Gravlax (Cured Salmon)

I love salmon, and one of my favourite ways to prepare it is as gravlax.

Gravlax is a Nordic (Norwegian and Swedish) cured salmon dish, where the fish is cured in a mixture of salt and sugar, usually with dill, and is then consumed raw.  If you love smoked salmon, you will most likely love this fish preparation as well.

The name gravlax means “buried salmon”.  In medieval times, and possibly even earlier, the raw fish (not just salmon, but also herrings and other oily fish) was buried in holes in the ground and left to ferment as a means of preserving the fish for consumption during the winter when food was scarce.

Modern gravlax is not buried in the ground, and is not fermented.  Instead it is cured in salt (and usually sugar), in the fridge for a few days.

It is very simple to make and tastes delicious.  Don’t be put off by the fact that is is served raw, it has a texture very similar to smoked salmon.  It is also safe to eat the fish raw as long as it has been frozen for a minimum of 7 days as this kills any parasites that may be in the flesh.  You could also buy sushi-grade salmon to be extra safe.

This recipe is AIP friendly, and because the fish has not been cooked, it is very rich in omega-3 fatty acids, so very good for you.

Use it just as you would smoked salmon.  It is excellent as an appetizer, as a light main-course and the leftovers are great for breakfast.  I often add leftover gravlax to scrambled eggs.

My recipe for gravlax is loosely based on a recipe in Cured by Lindy Wildsmith.  I cut out the sugar for this cure to make it Paleo/AIP and added a small amount of honey for a little sweetness.

To make this strict AIP, you would need to omit the black pepper which is a stage 1 reintroductoin.  If you have managed to reintroduce it and know you are not sensitive to it, it does add a touch of spice however.  When reintroducing foods on the AIP, I recommend this guide.

Gravlax

serves 12

grav5

  • 2 x 2¼lb (1kg) pieces of wild-caught salmon fillet (skin on) – previously frozen for a minimum of 7 days then defrosted
  • 4 tbsp coarse sea salt
  • 4 tsp ground black pepper (omit if sensitive or strict AIP)
  • 2 tbsp honey – preferably raw and local
  • 1 bunch of dill finely chopped

Thaw the salmon in the refrigerator, then check carefully for any pinbones, removing them with a pair of tweezers.

Mix the salt, pepper, honey and dill together.  You may need to warm your honey to make it liquid if it is the creamed, solid kind.

Place one piece of salmon skin-side down in a shallow dish and spread the salt mixture evenly over the flesh.

grav8

Top with the second piece of salmon, flesh side down.  Cover the dish and place in the refrigerator for 24 hours.

After 24 hours, turn the fish over so that the top piece is now on the bottom, recover and replace in the refrigerator for another 24 hours.

After this time, wipe off the salt mixture,

grav6

sprinkle the top of the fish with a little extra chopped dill, slice thinly on the diagonal, leaving the skin behind, and serve.

grav3

I served this with a green salad, roasted beets and carrots and some lactofermented cucumber relish.

If you want to serve fewer people than 12, you could halve the recipe, just using one piece of fish that you cut in half lengthwise to give 2 similarly shaped pieces of fish.  I usually make the recipe just as it is though as we love this fish so much that we will happily eat all of it.  Any leftover sliced fish will keep in the refrigerator for a couple of days.

Shared at Paleo AIP Recipe Roundtable #24

Shared at Real Food Fridays #36

Shared at Fight Back Friday May 2nd

Bacon Wrapped Chicken Breasts

We scored a great deal on some chicken breasts the other week, and they have been languishing in the freezer ever since.  I decided last night that it would be a good time to use them up.

Because boneless, skinless chicken breasts are often dry and tasteless when cooked (there is very little fat in them, and fat = moistness and flavour), I decided that I would wrap them in bacon.

OMG these were to DIE FOR!  Totally delicious.  The bacon crisped up wonderfully and contributed a lot of flavour to the dish.

They were also very quick to cook as well.

This recipe is a stage 1 AIP reintroduction recipe that calls for black pepper.  If you have not managed to successfully reintroduce black pepper, or you are still on the elimination phase of AIP you can simply omit the pepper.  When reintroducing foods on the AIP, I recommend this guide.

Bacon Wrapped Chicken Breasts

serves 6

CBB2

  • 6 chicken breasts – preferably pastured/organic
  • 12 rashers of bacon – preferably from pastured pigs
  • 1 tsp poultry seasoning (I use one that is a mix of parsley, sage, thyme, rosemary and marjoram)
  • sea salt and freshly ground black pepper to taste (omit the pepper if sensitive or strict AIP)

This is such a simple recipe!

cbb3

Preheat the oven to 190°C/375°F.

While the oven is heating, season the chicken breasts well with the poultry seasoning.

Wrap each chicken breast in 2 rashers of bacon.

Place them in a roasting tin and season with sea salt and black pepper – you probably won’t need to use much salt if your bacon is salty. But the pepper really helps the flavour.

Bake in the oven for 30-35 minutes until the bacon is crispy and the chicken has reached an internal temperature of 82°C/180°F.

Remove from the oven and leave to rest for 5 minutes while preparing the sides.

CBB1

I served this with some sauteed ruby chard and oven-roasted carrot and beet fries.

Shared at the Paleo AIP Recipe Roundtable #23

Shared at Allergy Free Wednesday #113

Shared at Gluten Free Wednesdays 4-16-14

Shared at Real Food Friday #35

Shared at Simple Meals Friday #28

Hidden Liver Meatloaf & Simple Gravy

I am trying to make an effort to include more organ meat/offal in our diets simply because it is so good for us.  It is also very cheap, and a great way to keep the grocery budget under control.

I have been reading a lot lately on IPMG about people grinding up liver and hiding it in other foods, usually because either they don’t like the taste, or to hide the “yuck” factor so that kids will eat it.  I am lucky in that my kids will willingly eat liver, and Hubby and I both love it, but sometimes it is nice to have a change.

I was already planning on making one of Hubby’s favourite meals – Meatloaf, so I decided that I could add the liver to that.

Here is a warning – when you grind liver in the food processor it goes very sloppy.  I just mixed that sloppy, wet mess into my regular meatloaf recipe.  It made the mixture a little wetter than normal, but it cooked up OK.

The liver in the meatloaf along with the ground beef, pork and bacon was delicious!  It really enhanced the flavour, although I don’t think it was really “Hidden”.  I could tell from the flavour that it was in there, but that could be because I left the liver just a little bit chunky instead of blending it until it was smooth.

This recipe is a stage 2 reintroduction because it contains flaxmeal (stage 2 reintroduction) and black pepper (stage 1 reintroduction).  When reintroducing foods on the AIP, I recommend this guide.

To make this recipe 100% AIP compliant simply leave out the flaxmeal and black pepper.

Hidden Liver Meatloaf

Makes 2 – each serves 4

HLML3 - Copy

  • 1lb ground beef
  • 1lb ground pork
  • 1lb beef liver
  • 6 rashers of bacon
  • 2 sticks of celery
  • 2 carrots
  • 1 large onion
  • 2 tbsp fat of choice (I used some bacon fat in this, but you could use coconut oil, tallow or lard)
  • 4 cloves of garlic
  • 2 tbsp fresh parsley – chopped
  • 1 tsp dried thyme
  • 1 tsp dried oregano
  • 1 tsp dried basil
  • salt and freshly ground black pepper (omit the pepper if sensitive to it or strict AIP)
  • 2 tbsp coconut aminos
  • ¼ cup flax seed meal (omit if strict AIP)

The first thing you do is to dice up all the veggies.  I chop them in the food processor until coarsely chopped.  Don’t let them get to a puree though.

Melt the fat in a skillet and add the chopped veggies, and cook over a medium heat until tender and starting to brown.  Now add the garlic and herbs.  Season well with salt and pepper.

While the veggies are cooking grind up the liver in the food processor.  As I mentioned earlier, it will get very sloppy.  I left mine just a little chunky.

Transfer the liver to a mixing bowl along with the ground pork and beef, and use the food processor to grind up the bacon.  If you try to do this with the liver, the liver will be over-ground before the bacon is ground up small enough.

Add the bacon to the mixing bowl along with the veggies.  Season well with salt, pepper, coconut aminos and fish sauce.  Stir in the flax seed meal if using it.  It can easily be left out if you want to make this recipe AIP, but it does help the meatloaf to firm up, and it thickens the mixture a little.

Mix the ingredients together – I find this is easiest with my hands.  Then transfer the mixture to 2 large loaf tins.

Preheat the oven to 190°C/375°F.  Cook the meatloaves in the oven for 1 – 1½hours until cooked through.  Check the temperature using a meat thermometer if you are not sure.  You want the internal temperature to be 70°C (160°F).

Take the meatloaf out of the oven and allow to rest for a few minutes while you make the gravy.

HLML5

As far as I am concerned, good meatloaf NEEDS gravy!  As well as the gravy (recipe below), I also served mashed rutabaga and sauteed kale with this.

Simple Gravy

RC1

  • 2 onions  – diced
  • 2 tbsp fat of choice – I used some leftover bacon fat
  • 1 cup good bone broth
  • Any pan juices or drippings from the meat (I used the juice out of the meatloaf)
  • salt and freshly ground black pepper to taste (omit the pepper if sensitive to it or strict AIP)
  • 1 tbsp coconut aminos
  • 1 – 2 tsp tapioca flour –  optional

Take the onions and cook them over a medium heat in the fat until they are very soft and caremelized.  Don’t stint on the browning as this is what gives colour to the gravy.

Once the onions are browned to your satisfaction, add the bone broth and any meat juices you have available, season well with salt and freshly ground black pepper and add the coconut aminos.  Simmer for 5 minutes, then blend with an imersion blender.  The blended onions help to thicken the gravy as well as adding flavour.  If you feel it needs a little extra thickening, add the tapioca flour, mix well and simmer for a couple of minutes.

Serve at once.

This gravy is great to serve with any meats – you don’t even need the pan juices if you don’t have any.