First CSA of the Year – and why you should use a CSA

I haven’t posted in a while, but I just HAD to share with you all my little haul from the first CSA of the year.

FMH1

I went with a CSA (Community Supported Agriculture) from Eagle Creek Farms.

In case you have never heard of a CSA and do not know how it works, this is a basic description.

Prior to the start of the growing season, you sign up for the CSA – either a half share (which is what I did – designed to feed 2-3 people) or a full share, or any combination of these.  What you will need will depend very much on how many veggies you eat and how big your family is.

The farmers then start growing their crops based on the number of people who have signed up for a CSA.

Basically, you are providing the funds up front to enable the farmer to buy the necessary seeds and to pay for the labour needed to bring that crop to harvest.  Essentially you are buying shares in the crops that they will be harvesting in the future, and come time when they are ripe, you get a share of those crops, usually in a weekly or bi-weekly delivery, depending on the particular CSA you signed up for.

BTW did you know that there are CSA’s for everything from fresh veggies (the kind I signed up for) through to fruit ones.  There are even CSA’s for grass-fed meat, dairy produce (raw dairy included in areas where it is legal), eggs and grains (if you eat them)….  google CSA [your local area] to find ones local to you!   Obviously not all of these CSA’s may be seasonal, but many are.  There are also Winter CSA shares that you can buy that rely on stored root veggies and the few winter crops that can be grown (seasonality depends on location).

And some CSA’s include non-perishable items like fermented veggies or preserves.  The one I use includes the occasional bunch of flowers which is always nice to receive.  The bunch I collected today is in my bedroom where I can enjoy if without the cats destroying it!

So the downside of a CSA?

There is some risk with this – crops can and do fail.  But it is very unusual for a farmer who offers a CSA to only grow one crop.  And if one fails (for example the carrot harvest), others are likely to make up for it.  They also often carry out subsequent plantings of seeds, so that if one crop fails, a later one may succeed and provide a good harvest.

In addition, often you do not get much choice as you get what is ripe and ready to harvest when you go to the pick-up point.  (very few CSA’s deliver to your house, although some do.  The ones I have seen local to me all have pick-up/drop-off points at various farmers markets around the city).  Some do offer a limited choice – the one I use does.  It works on the simple method of “take one item from each bin”, and where there is a choice, the bin will contain one or more items that you can choose from.  If you are strict AIP, you will almost certainly receive some items you cannot eat yourself….  but then again, you may also be able to trade or gift them with someone (a neighbour, a friend or a family member)

Also, because this is a seasonal thing, you are only going to receive those veggies that are actually in season and ripe at the time.  This means in early summer you get a TON of greens, but in the fall/autumn you will get a TON of roots – plan accordingly!  We cannot cheat Mother Nature!

So if there are risks involved, why should you sign up for a CSA?

Well first of all, it is supporting local farmers.  Usually, the produce you will be receiving will be either organic, or grown in a sustainable fashion, but either way, it is locally grown, and you can bet that it is always in season.  And then there is the chance to go to the farmers market/collection point and actually MEET your farmer…

And these veggies are so fresh because they were picked if not that morning, probably the day before. Some of them may even be still “living” and have the roots intact or still planted in a pot! (Winter CSA’s are often different here, as they often involved stored veggies.)  And then when you add in the fact that you do not always know what you are going to be receiving, there is the element of surprise.

And it is FUN – you get to try veggies that you never knew would exist!  You can experiment!

As I said, today was the first CSA collection of the season (a week late because of the rain, hail and other bad weather we have been having in the Calgary region these last few weeks).  So I headed to Northland Mall to their Farmers Market to pick up my half-share.

For me, a half share works perfectly – for the most part I feed just myself due to my dietary issues,.  But I do like to share my bounty with my 2 wonderful housemates, so having a little bit extra works well.  I also eat far more veggies than the average person so a 2-3 person share probably means a 1-2 person share when it includes me!

This half share cost me $355, which I paid for back in March, and is designed to feed 2-3 people each week…  I figured that I would most likely spend more than $355 over the 16 weeks that this CSA will run – it only works out at around $22 a week.  I don’t know about you, but I normally spend FAR more than $22 a week on fresh produce!  And that is just for myself….  as the half-share I bought is designed to feed 2-3 people, I will have some leftover to share with my 2 housemates to earn myself a little bit of good-will (goodness knows I NEED it! – I OWE them a bundle for their boundless and freely given support)

And if all else fails, I will ferment, dry, freeze or otherwise preserve the veggies before they go bad.

So what did I get in my first CSA share (bear in mind, this is early in the season and only designed to feed 2-3 people for 1 week – this is a half-share, a full-share gets double this amount):

FMH1


Now this is a TON of nutrient dense greens!

At the back, we have a bunch of flowers (there was a choice of 2 different bunches – a welcome non-edible addition that made my heart sing!).  And also a small potted basil plant.

Then working from the far left-hand corner in a clockwise direction, I received:

  • a large bag of pea shoots
  • a small bag of lambs quarters greens
  • horseradish greens (with itty, bitty baby horseradish roots attached)
  • garlic scrapes
  • cilantro
  • purple kale (this was a HUGE bunch!)

Lots of greens as you can see, which is hardly surprising seeing that this is very early in the growing season in Calgary.  This is what I mean when I say that you have very little control or choice because you are getting what is ready and seasonal at the time of collection.  And at this point in the growing season, in Calgary, that means greens.

But I seriously LOVE greens, so all is good in my world!

For what it is worth, I could choose between the garlic scrapes and a single bulb of young garlic (I chose garlic scrapes simply because I have never eaten them and am always open to new fthings), and between the kale and collard greens (I went with the kale because it was a bigger bunch!)

There are some very new items here – some I have never eaten but am excited to try.  I have never had lambs quarters, horseradish greens or garlic scrapes.

I will need to test out the pea-shoots, but I suspect that they will be OK – I ate a few on the bus on the way home (they just looked so fresh, tasty and appetizing!) and I have had no reaction to them 5 hours later.

The flowers and the basil plant (small, but he will grow!) were a welcome surprise.

After collecting these, I went for a walk around the market and bought myself a few other bits:

FMH2

At the back – organic strawberries

Then clockwise from the far left:

  • organic arugula
  • the cutest, freshest radishes (I plan to use both the greens and the radishes)
  • some of the most flavourful blueberries I have ever tasted
  • a huge bag of wondefully ripe cherries

These last purchases cost me less than $20, so I am one happy bunny….

So that is my farmers market haul…

total costs:

  • CSA share (divided between 16 weeks) – $22
  • extra items – $17:50 (the stuff in the second picture)

Not bad as all of this will be shared beween 3 people!

So will anyone tell me that eating local is not affordable try visiting your local farmers

Dirty Dozen and Clean Fifteen 2015

The EWG has just published it’s list of the Dirty Dozen and Clean Fifteen fruits and veggies for 2015…

When you are trying to do AIP on a budget as I am, you cannot always afford to buy every single item of produce as organic, so knowing which ones “MUST” be organic (the dirty dozen) and which ones you can get away with being non-organic (the clean fifteen) is important.

Despite this, I would recommend that you still buy as much as you can as local and seasonal produce as it will be fresher and far more nutritious.  And lets face it, when we are eating an AIP diet to heal our bodies, nutrient density is very important.  And not only that, local, seasonal produce does tend to be cheaper as well.

Not everything on these lists is AIP-compliant however.  Those that are not 100% AIP are marked with an asterisk (*)

The Dirty Dozen (these should always be purchased as organic)

  • Apples
  • Celery
  • Cherry Tomatoes*
  • Cucumber
  • Grapes
  • Nectarines
  • Peaches
  • Potatoes*
  • Snap-Peas*
  • Spinach
  • Strawberries
  • Sweet Bell Peppers*
  • Hot Peppers*
  • Kale/Collard Greens

The Clean Fifteen (you can get away with purchasing non-organic versions of these)

  • Asparagus
  • Avocado
  • Cabbage
  • Cantaloup
  • Cauliflower
  • Eggplant*
  • Grapefruit
  • Kiwi
  • Mangoes
  • Onions
  • Papaya
  • Pineapple
  • Sweet Corn*
  • Sweet Peas (frozen)*
  • Sweet Potatoes

Hopefully this list may help keep your grocery budget under control…

Pallets for the Garden

We are hoping to build some raised beds in our back yard this summer so that we can carry out Square Foot Gardening.

The aim is for us to grow as many vegetables as we can in the most economical way.

So in order to save some money on actually building the beds, we decided to get the timber as cheap as possible, and if at all possible for free.

So today, Hubby and I went out to pick up 2 loads of this:

pallets2

There are 30 pallets there, all full of useable timber.

pallets1

And the best bit is that they were totally free – we answered an ad on Kijiji and went and picked them up.

Now we have to take them apart, and then we can get on with making our beds.

Coconut Chicken Soup

This is another great leftovers meal that makes a fantastic lunch and a filling, economical dinner.

I make this with leftover chicken or turkey, and both taste great.  If you have no leftovers, you could cook some chicken breasts or thighs and then shred the meat to make this instead.

This recipe is AIP compliant.

CCS1

If we are eating this as a main course meal, I like to serve these with a starchy side or a side-salad.  I will often use a simple green salad dressed with a lemon-juice vinagrette, but sometimes I will make plantain muffins or tostones or other starchy sides.

This is a perfect meal for a cold winter night and even better because it uses up a lot of leftovers.  And all the ingredients are AIP approved as well which is a bonus because it does not aggravate my autoimmune conditions.

Don’t be tempted to leave out the garlic, lemongrass or ginger – they give this soup it’s wonderful flavour and aroma.  I buy whole lemongrass stalks and they cost me around $0.44 for 2…

Coconut Chicken Soup

serves 4-6

CCS3

  • 1½lb leftover cooked chicken (or 2lb chicken breast or thighs – cooked)
  • sea salt
  • 1 tbsp coconut oil
  • 1 onion – finely chopped
  • 8oz mushrooms – sliced
  • 2 cups greens (use kale, chard or spinach depending on preference) – shredded
  • 1 stalk of lemongrass
  • 2 tbsp grated root ginger
  • 2 cloves garlic – peeled
  • 1 can coconut milk (ensure that it contains nothing but coconut and water – no gums, fillers or emulsifiers)
  • 3-4 cups chicken bone broth
  • 2 tbsp fish sauce (try to find one that only contains AIP ingredients – fish, salt and water)
  • 1 lime – zest and juice
  • 1 bunch green onions – sliced
  • 1 kefir lime leaf – sliced as thinly as you can
  • ¼ cup basil – sliced (use thai basil if you can find it, regular basil will work fine though)
  • ¼ cup cilantro – chopped

If not using leftover chicken, you need to cook your chicken thighs/breasts.  I suggest you poach them in the bone broth, then remove, cool, and shred, discarding any bones and skin (save those to add to bone broth in the future – store in the freezer until you have enough).

If using leftover chicken, shred the cold chicken finely, discarding any bones and skin and saving as above to make bone broth.

Melt the coconut oil in a pan and add the mushrooms and onion and cook gently until tender and the mushrooms are starting to look translucent.

Meanwhile, take the lemongrass stalk and cut of the dry woody end.  Using a meat tenderizer, a mallet or a rolling pin, bash the heck out of this sucker.  You want to break down as many fibers as you can as this will release the flavour.  Slice it thinly.  Now put the beaten up and sliced lemon grass in your blender with the garlic and ginger and 1 cup of the bone broth.  Blend until there are no large chunks.

Once the mushrooms and onions are tender, add the lemongrass/broth mixture to the pan along with the rest of the broth and the can of coconut milk.  Taste and adjust seasonings..  Simmer gently for around 30 minutes.  Now add your shredded chicken and greens and simmer for 5 minutes to allow the chicken to heat through and the greens to wilt..

Stir in the lime zest and juice, fish sauce, lime zest and juice, basil and cilantro.  Taste again and adjust the seasonings one final time.

CCS4

We like to serve these with a starchy side such as my plantain muffins or Tostones

Serve hot.

Chicken Liver Pate

I love eating liver, which is a good thing because it is so good for you.  And not only that, it is cheap to buy.  If you are struggling to make ends meet while eating paleo, definitely consider adding more organ meats to your diet.  Liver, and especially chicken livers are really economical.  I do recommend that you use pastured and/or organically reared chicken liver when possible.

Some people express concern about the possiblity of toxins in liver, and think that it is not a good idea to eat it because it is a detox organ.  While this is true that the liver does remove toxins from the body, it simply breaks them down so that they can be excreted by other organs.  The liver does not store any of these toxins and in a healthy animal is perfectly safe to eat.

Liver is one of the most nutrient dense foods you can buy.   It is a good source of Thiamin, Zinc, Copper and Manganese, and a very good source of Protein, Vitamin A, Vitamin C, Riboflavin, Niacin, Vitamin B6, Folate, Vitamin B12, Pantothenic Acid, Iron, Phosphorus and Selenium.  While liver is high in cholesterol, it has been shown that dietary cholesterol has very little bearing on blood cholesterol (1, 2, 3), and not only that, you actually NEED cholesterol to make a lot of the steroid hormones that your body relies on.  Your brain also relies on cholesterol to function  There have been studies that have shown that cholesterol is vital for memory.  And if you don’t eat enough of it your body will simply make more.

One of my favourite ways to eat liver, especially in the case of chicken livers, is to make a pate.

Smooth, creamy and rich, this barely tastes like liver.  And making it into a pate, paste or spread removes most of the “ick” factor that people have when faced with a hunk of liver.  Instead of that hunk of what is obviously an internal organ, you have this rich, creamy spread.  This is a good way to get kids to eat liver…  my girls love dipping veggies in the creamy meatiness.

I know what you are thinking though….  Pate should be served on toast.  And toast is not Paleo or AIP-friendly.

If you ate bread (even paleo bread), you could make toast and spread a generous amount of this pate onto it.  But seriously, it is just as good with celery sticks, baby carrots and cucumber slices.

CLP2

I will often spread it into the hollow center of a celery stick and make a savory version of “ants on a log”.  YUM!

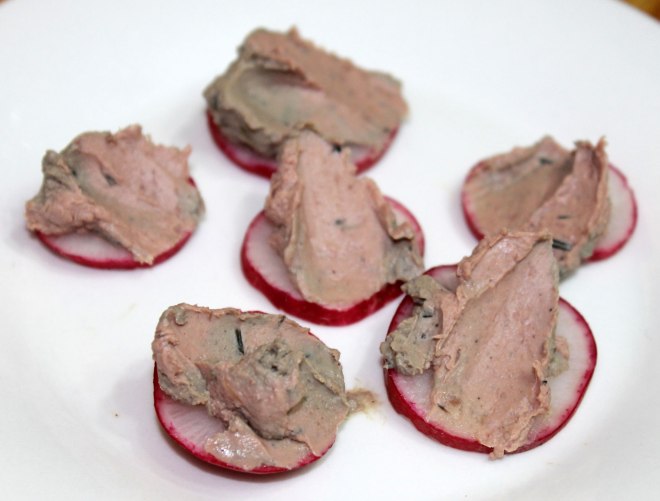
This makes a great appetizer or snack, but it could also be a quick lunch.  And I have been known to eat it for breakfast as well!  In this snack that I prepared for B, the radish slices take the place of crackers.

PR1

And if you don’t have chicken livers, you could use any other liver you can get your hands on.  Calves liver makes a delicious pate, but even beef or pigs liver would work.  The flavour would not be so delicate, but it would be very nutritious, and would still taste good.

Chicken Liver Pate

CLP3

  • 1½lb chicken livers (or any other liver you care to use), trimmed
  • 1 shallot – chopped finely
  • 2 cloves garlic – crushed
  • 1 tsp dried sage
  • 1 tsp dried rosemary
  • 1 tsp dried thyme
  • 1 bay leaf
  • ⅓ cup bone broth
  • Sea salt to taste
  • pinch of ground cloves
  • 3 tbsp coconut cream (the thick layer from the top of a can of coconut milk)
  • ½ cup of good quality cooking fat (you can use anything that works with your diet – lard, tallow, coconut oil, bacon drippings, even ghee or butter as long as you are not sensitive to it)

Melt 2 tbsp of the cooking fat in a skillet and add the shallot and garlic.  Cook over a low heat until softened.  Add the sage, rosemary, thyme and bayleaf and continue cooking for about 10 minutes.

Meanwhile trim your liver and if large pieces, cut into chunks.

Add the liver to the pan and cook, stirring until it is browned on the outside but still pink in the middle.  Add the bone broth and bring to the boil.  Simmer for 5 minutes, then remove the bay leaf.

Transfer the contents of the skillet to a food processor or blender.  Add the coconut milk and remaining ingredients, including the leftover cooking fat.

Pulse until everything is smooth, creamy and evenly blended.

Pour into a serving dish and refrigerate until cold.

pate1

To serve, scoop out the amount required, and serve.

CLP4

If you want to be able to turn the finished pate out and slice it, you will need to line a loaf tin with parchment paper before pouring in the pate.

This will keep for at least a week in the fridge.

Happy New Year! And a packed lunch.

Happy New Year everyone!

I took a break from posting over the holiday period so that I could spend time with the family…  but we did have a fantastic time.  Lots of good (paleo) food, and lots of family time.

I will post photos later on once I have had a chance to sort them out.  And I will post about the food as well.

But for today, this is the first packed lunch of 2014 that I made for Hubby to take to work today (I don’t start back until tomorrow and the kids go back to school on Monday).

lunch01-02-14

Clockwise from the top left-hand corner I packed:

  • Leftover Cranberry sauce in the little dipper with some date bites (essentially chopped up energy bars) below
  • 2 mini mandarin oranges and some red pepper sticks
  • Green leaf lettuce with leftover turkey thigh cut into bite-size pieces
  • leftover roasted roots (rutabaga and sweet potato) and brussels sprouts stirfried with bacon.

A  lot of this (the cranberry sauce, the turkey, the roasted roots and the brussels were leftover from the turkey dinner we ate yesterday.

This roast dinner used a GIANT 20lb organic turkey

turkey10

that I bought on special from the grocery-store for just $10 a few days after Christmas (I stashed it in the freezer to keep it fresh)…  I LOVE some of the bargains you can get at this time of year!

There is loads and loads of leftovers from this bird that I will stash in the freezer to be used for packed lunches or other meals, and of course I will make bone broth from the carcass.

All in all, that is a VERY frugal purchase.

How to make coconut milk and coconut flour

Coconut milk and coconut flour are used by most people eating a Paleo diet.

You can buy them, but it is just as easy to make them yourself.  And it usually works out far cheaper as well.

Packs of unsweetened coconut are readily available and very cost effective to buy.  Coconut flour is EXPENSIVE!  And while canned coconut milk is fairly cheap, the vast majority of brands contain questionable ingredients such as guar gum and carageenan, both of which can irritate your gut.

When you make your own coconut milk, you know exactly what has gone into it…  And the coconut flour is a buy-product of the coconut-milk making process.

Homemade Coconut Milk

makes aprox 4 cups

  • 2 cups unsweetened coconut (make sure you read the packet to make sure it does not contain any sugar)
  • 4 cups boiling water

The first thing you need to do is to put your coconut in a heat-proof container and add the boiling water.  I do not recommend you do this in your blender even if it claims that the glass jar is heat-proof…  I have had one break by doing just this!  I always use a pyrex jug to soak the coconut.

coco8

Leave it for half an hour to soak, then tip the mixture into your blender.  Blend on the highest heat setting for 5 minutes.  The longer you blend this, the more of the coconutty goodness you will extract.

You now need to strain out the coconut pulp.  For this, you need either a jelly or nut-milk bag or several thicknesses of muslin.  Line a sieve with whatever you are using to strain the milk, and place it over a bowl or jug.  Tip the contents of the blender in to the lined sieve.  Now you need to hang the bag somewhere and allow the coconut milk to drain out.  I usually hang it from one of the kitchen cupboard doors with the jug I am collecting the milk in underneath.  Hang it until the milk is no longer dripping out, then give the bag a good squeeze to extract as much liquid as possible.

The liquid you have extracted is coconut milk…

Pour it into a jar and store it in the fridge.

coco6

You may find that your coconut milk separates into a thick layer with a watery layer underneath…  this is perfectly OK and is because your homemade milk has no additives or thickeners added (this is what the guar gum and carageenan is added for).  Just stir the 2 layers back together before using.  Or you can use the thick creamy layer as coconut cream and add the thinner layer to smoothies.

You can make a second, thinner batch that is idea as a milk-replacement beverage with the pulp if you like by repeating this process.  I do sometimes, but this time I did not bother.

Don’t throw out the coconut residue… this is what you are going to make coconut flour from.

Homemade Coconut Flour

makes aprox 1 cup

To make this, you take the residue from the coconut milk that you have just made and dry it.

coco7

To do this, you can either use a food dehydrator as I do (line the trays with a paraflexx sheet, a silpat mat or a sheet of baking parchment first), or you can spread it out on a rimmed baking sheet and dry it in the oven at the lowest setting possible.  Watch it like a hawk if drying in the oven – it burns very easily!

coco4

Once your coconut residue is dry (this takes around 6 hours in my dehydrator), tip it into your blender and blend at high speed until you have a fine powder…

coco3

This is your coconut flour.

coco1

Use in any recipes that call for it just as you would use purchased coconut flour.

Dog Booties

We have been having problems with walking the dog during the cold weather because his feet get too cold and it becomes painful for him.   So we decided that because he does need a lot of walking, we needed to get some dog booties.

Hubby was doing some searching the other day and found this video on how to make dog booties on YouTube.

It seemed very straightforward, and he decided that he could make them himself…

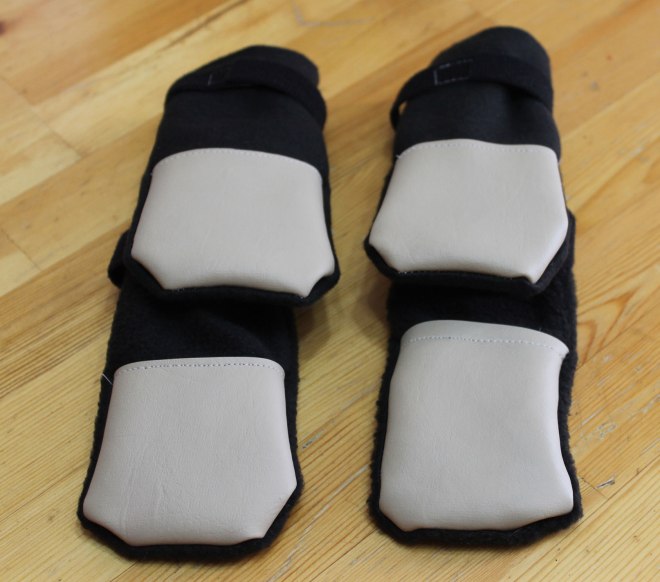
A quick trip to Fabricland produced some remenants of black fleece and some cream coloured vinyl (we couldn’t find any faux suede as recommended in the video.  We also picked up some double sided velcro.

Back at home, we measured Casesar’s feet and Hubby got my sewing machine out…

dogboot4

The first attempt was a bit of a disaster – they were not long enough.  But a quick adjustment to the pattern and about 2 hours of work resulted in 4 nice looking dog booties.

dogboot5

They are a little tricky to get on him due to the snug fit, but they do fit really well.

dogboot1

These work really well…

dogboot3

they dry quickly, and despite there being quite deep snow, Ceasar’s feet were still warm and dry when he came back from his walk and he seemed to have no problems with them.

The total cost of the fabric and the velcro was less than $15, and we have enough fabric leftover to make several more pairs…  so it certainly worked out cheaper than buying ready made dog-boots from the pet-store.

We will be making him more pairs of these for certain!

Pickles!

I can’t claim to make these pickles…

pickles1

A very kind person at work gave them to me.

I have no idea of the ingredients, and I suspect that they contain sugar (the juice does taste sweet).  And they are very obviously not lacto-fermented, so they must contain vinegar.

But despite this, they are tasty…  and I am not about to refuse free food!

My “pickle-monster” C loves them.

Because the patient at work wants her jars back, I have been using these and serving them with several meals this week.

pickles2

The quick dinner I made with the purchased burgers, and the shrimp and avocado salad were just 2 of them.

Turkey Leftovers

After eating turkey yesterday for our Thanksgiving Dinner, I processed the rest of the turkey today.

This was what I was working with:

turkey9

As you can see, we ate little more than one complete breast (and even so, we were all STUFFED!).

So the first thing I did after dinner was cleared away was to put the entire thing in the fridge, where it sat overnight.  And the next day (today) I set about dismembering the remains.

I pulled off the legs, drumsticks and wings and removed as much meat as I could. I then cut off the second breast and cut that into pieces.  And finally I picked as much of the little bits of meat from the bones, resulting in an entire dish of dark and light meat that will be used for several recipes this week (buffalo frittatas for lunch, Turkey and Vegetable Soup and a Turkey and Avocado salad wraps.  I also served a turkey salad for lunch today, and plan on using it several more times in the lunch boxes.  Any that is left at the end of the week will be bagged up and frozen for use later on.

turkey7

I also removed all the skin, but that went into the pan with the bones, and used it to make bone broth.  I like turkey skin (and chicken skin too) when it is crisp and hot, but not once it goes cold and slightly soggy.  Instead, I put the leftover skin in the bone broth that I make so that we do benefit from the nutrients in it.

All the bones, skin, gristly bits went into the biggest pan that I own, along with the onion, garlic and herbs that were inside the cavity.  I discarded the orange however as simmering that can make the broth get a bitter taste.  I also added a big glug of apple cider vinegar, a chopped carrot and a chopped celery stick. This is essentially the same method that I use to make chicken bone broth, it is just the fact that turkey bones are very much larger.

turkey8

Then I topped it up with water and simmered it for hours and hours and hours.  I like to simmer my bone broths for at least 12 hours, preferably longer.  Normally, I let them cook in the slow-cooker, but in this case, the carcass was too big to fit (besides, I have pulled pork in mine at the moment!).  So this broth is being simmered on the stove-top, and I won’t leave the ring on overnight, so it will get no more than around 15 hours of simmering time.  If I make bone broth in the slow cooker I tend to leave it for at least 24 hours.

Once done, I will strain off the broth, remove the fat using my gravy separator and pack the resultant bone broth in glass jars for storage.

hambroth

Usually after straining, I put the bones back in the pan, add more water, more carrot, onion, celery, herbs etc and another glug of vinegar and simmer it for another 15-14 hours, which results in yet more broth.  I repeat this for as long as the bones are holding together, with each repeated batch of broth becoming less flavourful, but no less nutrient packed.  I want to extract as much nutrition out of those bones as I can!  I tend to make the subsequent batches in the slow cooker (the turkey bones have cooked down and will fit after the first batch!), so they usually get a longer cooking period – at least 24 hours.

I don’t even waste the fat.  The fatty, rich bone broth that I have separated off will be chilled in the fridge, and tomorrow I will be able to separate the 2 layers, pack the turkey fat in jars to be used for cooking and add the jellied broth to the rest of the bone broth.

This is one reason why I LOVE cooking turkeys – it might take time, but you end up with loads of leftovers, lots of bone broth and lots of fat that can be used for other things…  I suspect that even by paying for a higher priced free-range turkey I save because I utilize every single scrap of that bird.