Artichokes with AIP Bagna Cauda (Instant Pot/Steamer)

I seem to have a real problem – I have become totally addicted to artichokes!

ACBC1

Artichokes are an edible variety of thistle.  They are high in fiber, and are a good source of niacin, potassium, phosphorus, copper, vitamin C, vitamin K, folate and manganese.  They have a large number of health benefits – they are very high in fiber, and contain more antioxidants than most fruits and vegetables.  They are reputed to be able to prevent cancer and to be good for the heart.  They can help to reduce blood pressure and can function as a liver tonic.  These are just a few of this amazing vegetables benefits – they truly are a wonderful vegetable that everyone should be eating!

The first time you cook or eat one of these spiky looking vegetables, they can be very intimidating.  How are you supposed to get down to the delicious tender heart.  What do you do with all the spiky thorns that may be present on the ends of the leaves.  How are you supposed to cook it?  And more importantly, how are you supposed to eat it?

Don’t be afraid – once you know how, they are very easy to cook.

You can cook them in a steamer or an Instant Pot (which is what I did) I will give you full instructions on how to do this in the recipe below.  It is very simple.

To eat them, you pull off a leaf, dip the base in a tasty dip – I used Bagna Cauda in this recipe, and then you scrape off the fleshy part of the base with your teeth, discarding the rest of the leaf.  As you get closer and closer to the center, more of the leaf is edible.  Once you get to the center, you will find the hairy “choke”.  This part is not edible.  Use a spoon to scrape it all off, and what you have left is the delicious choke.  This can be cut up,  dipped in the dip and eaten.  You can eat the stem – it is a personal preference.  It can taste a little bitter, so some prefer to trim it off.  I like to keep it on my artichokes and nibble at it to see how bitter it is – it can also be very fibrous, so even if you leave it on, you may need to discard it anyway.

It always surprises me that you end up with a HUGE pile of leftovers after eating artichokes!

When selecting artichokes, try to buy ones that are tightly closed – if the leaves have started to open they are old and will not taste as good.

This gets messy fast – drippy, oily – expect it to drip on your clothes and your chin…..  lots of napkins are recommended!  Maybe even finger bowls if serving to “company”!  There is no “dignified” way to eat artichokes!

This is a very hands-on, tactile, sense-driven way of eating – something that I absolutely LOVE!


ACleftovers1


Bagna Cauda is Italian in origin, and translates to mean “Hot Dip” or “Hot Bath” depending on which website you believe.  It is a blend of Olive oil, butter, garlic and anchovies, that is served warm.  Obviously, because it contains butter the original recipe for Bagna Cauda is not AIP unless you have successfully reintroduced butter – and given my anaphalactic dairy allergy, this is something that I will never be able to do.  So I decided to come up with an AIP version of this deliciously savoury dip.

Don’t just keep Bagna Cauda for artichokes – it is delicious with all vegetables – dip steamed carrots, fennel, celery, asparagus and anything else you can think of into this warm, delicious and salty bath.  Or drizzle it over a perfectly cooked, rare, sliced steak.  Have fun with it and be adventurous.!

This recipe serves 2 as an appetizer or side dish, but I am a greedy piggie, and I ate it all to myself!  You can share the bagna cauda from the same dish if you like or divide it between 2 separate small ramekins or dishes.  It is also easily multiplied up to feed more than 2 people – in-fact, if you are feeding a crowd, with an instant pot this would make the simplest appetizer!


Artichokes with Bagna Cauda (AIP)

(serves 2 unless as greedy as me!)

ACBC2

Ingredients

For the Artichokes:

  • 2 artichokes
  • 2 cloves of garlic
  • 1 bay leaf
  • 1/4 of a lemon
  • a lemon cut in half

For the Bagna Cauda:

  • 1/4 cup Extra Virgin olive oil
  • 1/4 cup AIP approved fat – I used bone-marrow fat for this recipe, but bacon fat would make a delicious substitute.  You could also use a good quality coconut oil or home-rendered lard.
  • 3 anchovy fillets (read ingredients to ensure they are preserved in an AIP approved oil if canned.  If salted, rinse the excess salt off)
  • 3 cloves of garlic

Method

The first thing that you need to doo is to trim your artichokes as these are going to take the longest time.  Take the artichoke and cut off the end of the stem – I do recommend that you leave some stem on, because while it can taste bitter and can be fibrous it can be edible, and you cannot tell if it is until after it is cooked).  Take a vegetable peeler and peel the stem around all its girth, removing any small and loose leaves.

Next, put the artichoke flat on a cutting board and using a very sharp knife cut an inch off the top of the artichoke – this removes a lot of the spiky bits that may be present.  Check the remaing  leaves for sharp points and if you find them, but them off with a pair of scissors.  Rub all the exposed areas with a cut lemon to prevent browning.

If you are using an Instant Pot, put the trivet in the bottom.  Add 1 cup of water, the bay leaves, the lemon and the garlic. Add the trimmed and prepared artichokes.  Turn on your instant pot and select Manual.  Press the + button to 20.  Let it run for 20 minutes, the  do a quick release of pressure.  Remove the cooked artichokes and test for done-ness by pulling off a leaf – if it does noBat pull off with minimal pressure/strength cook for 5 mins longer.  Keep warm until the Bagna Cauda is ready.

If you do not have an Instant pot, put the lemon, bay and garlic in a pot with a cup or two of water.  Place a steamer basket over the top and add the trimmed artichoke hearts. cover with a lid, and cook for 45 minutes.

Once the cooking time is done, if using an Instant Pot, do a fast steam release (I like to put a cloth over the vent to stop any damage to my ceiling and kitchen cabinets). check that the  artichokes are cooked by pulling a leaf out.  It should pull out easily – if it is not cooked, you need to give it 5-10 minutes more.

Keep the artichokes warm and make the sauce.

To make the Bagna Cauda, put all the ingredients in a blender or food processor and blend until smooth.  Transfer to a pan and heat up.  Simmer for 2 minutes (do not worry if it appears to curdle that is because of the protein in the anchovies).  Transfer to heated serving dishes (ramekins for single servings, a heated fondue pot for larger portions if you have multiplied up).

Serve at once as a dip…..

Shared at: Paleo AIP Recipe Roundtable

———————————————————————-

This blog-entry does contain affiliate links that help support my blogging activities.  If you click on a link, you will never be charged more than the regular price for the item, but I may receive a small reward as a result.  Please rest assured that all of the items or ingredients I recommend in this post I have used personally.


Lacto-fermented Garlic and Dill Pickles

I ended up with a bunch of pickling cucumbers in my CSA box a week or two ago, so decided that it was time to make some pickles.

I like to enjoy some probiotic rich food with every meal if I can, and these pickles fit the bill perfectly….

2 Chicken drumsticks, collard greens with bacon, half a sliced avocado and some pickles

2 Chicken drumsticks, collard greens with bacon, half a sliced avocado and some pickles

Because the cucumbers I received were not very even in size, I decided to slice them this time and make pickle slices.  You could easily make whole cucumber pickles or even use cucumbers cut lengthwise into spears.  Whole cucumbers may take a little longer depending on the size, but the process is exactly the same.

In order to keep the cucumber pickles crunchy, you need to use a source of tannin – some people use grape leaves, but I decided to use green tea because that is what I have handy for making my kombucha.

Lacto-Fermented Garlic and Dill Pickles

Makes 1 pint jar

pick2

Place the teabag and the salt in the 2 cups of boiling water and leave to stand until at room temperature.  Stir well to dissolve the salt.

Meanwhile slice the cucumbers into ¼” thick slices.

Peel the garlic but leave the cloves whole.  Place the garlic and dill in the bottom of the jar and then fill the jar with the cucumber slices.

Once the tea/brine has cooled to room temperature, pour this in the jar until they are covered with the brine. You probably will not need all the brine, but it is better to have made too much!

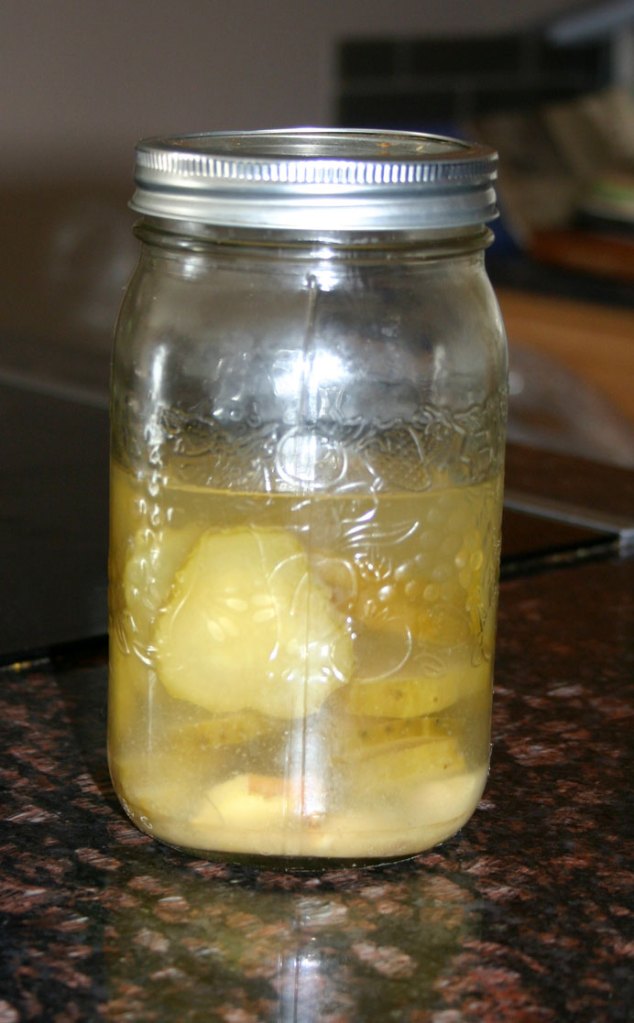
Now you need to weigh them down.  As you can see in the picture above, I used a smaller mason jar that fit nicely inside the mouth of the larger jar.  Other people use clean, boiled river-rocks, glass marbles or even a food-grade plastic bag filled with more brine.  Anything will work as long as it is non-toxic, will fit inside the jar, and will hold the pickles under the brine.  A glass jar just works well for me.

pick2

Cover the jar and any weights with a clean, densely woven cloth.  I like to use a tea-cloth as they wash well in case of any accidental brine spillage, yet they are densely woven enough to keep bugs out.  Do NOT try to use the cheap, loosely woven “Cheesecloth” sold in grocery stores – the weave is far too loose on this, and even with multiple layers fruit-flies and other bugs will get into your pickles!  Hold the cloth in place with either string tied tightly round the jar or an elastic band.

pick1

Leave your pickles on the counter for 4-6 days at room temperature.  I like to stand the jar in a dish to catch any brine that might spill over the edge of the jar – it makes less of a mess on the counter.

After 4 days, taste one of the pickles and see if it is to your liking.  If it is, now is the time to put a lid on the jar and stash them in the fridge.

pick7

If not, leave them on the counter-top for an extra day or two.

Serve cold with your favourite meals….

pick4

If using small whole pickles, they may take an extra 3-4 days depending on size.  Really large whole pickles might take up to a week or two to get properly pickled.

When making whole pickles I will sometimes use a crock or a large pot – in this case a baked bean pot that I will never use for cooking beans…

pick6

Just scale up the recipe, remembering to use 2 cloves of garlic and 2 sprigs of dill for every cup of brine you are making up, and using 1 TBSP of salt and 1 green teabag per cup of brine.

Place the garlic and dill at the bottom of the crock, then pack the cucumbers on top:

pick5

Pour over the brine, and then weight down with something that will keep the pickles under the surface of the brine.  In the case of my bean-pot, because of the shape and the narrow neck, I use a ziplock bag filled with brine.  If you are using a straight sided crock, you could use an appropriately sized dinner plate or anything else that fits.

Cover the crock tightly with a lid or a cloth (I like to put a piece of clingwrap over the mouth of my bean pot, and then place the lid on top to make sure no insects get in.

Ferment for 1-2 weeks depending on the size of the pickles before transferring them to smaller jars and storing in the fridge.

Shared at:  Paleo AIP Recipe Roundtable

Farmers Market Fruit Crumble – AIP/Paleo/Vegan/Gluten-Free

I went a little bit overboard the other day while at the farmers market and bought a TON of fruit…  far more than I could reasonably eat before it all went soft and over-ripe.  And in addition to everything I bought (apricots, strawberries, saskatoon berries and blackberries) I also had a bunch of rhubarb in my CSA veggie box.

I was at a little bit of a loss as to what to do with all this fruit, and then I remembered that I had a pot-luck to attend the next day.

Normally, I make savoury contributions to potlucks as there is usually very little that I can eat apart from what I provide.  But this time I decided to make a dessert using all this delicious fruit.

FC2

The fruit I used was everything that I had got from the farmers market – apricots, strawberries, blackberries, saskatoon berries and the rhubarb.  But you could use any fruit you have that is seasonal.  It could also be made with frozen fruit.  Just keep the quantities to 5 cups of assorted fruits or even 5 cups of one single fruit (It would be delicious made with just apples for example).

It was an absolutely delicious crumble – tangy, and not too sweet.

Remember, even though this dessert contains minimal added sugar/sweeteners, fruit still contains a lot of fructose.  The aim on the AIP is to keep your fructose levels under 20g a day.  In addition, sugar in any form is very inflammatory, and for those people with Autoimmune Disorders, this can cause a setback in the healing process, or could even trigger a flare.  Keep desserts and sweet treats like this to a once in a while “treat” rather than an every day indulgence.

This dessert is also made to be shared – it is ideal to make as a dessert when you are having the family over for Sunday lunch, less so as a regular dessert after your meals each day.  Keep the portions small and you should not have too many problems with sugar consumption.

Farmers Market Fruit Crumble

serves 8

fc1

For the fruit filling:

  • 5 cups assorted fresh or frozen fruit (I used 1 cup each of diced apricots, chopped rhubarb, halved strawberries and blackberries and saskatoon berries )  Feel free to use whatever fruit you have available.
  • 1 tbsp tapioca flour or arrowroot starch
  • 2 tbsp pure maple syrup

For the crumble topping:

Preheat the oven to 350°F (175°C).

Mix the fruit together in a bowl and toss with the tapioca flour or arrowroot starch.  Pour into a 9″ square baking dish.  Drizzle the maple syrup over the fruit, aiming to get it as evenly distributed as possible.  If you are using frozen fruit, there is no need to thaw it first.

Put all the ingredients for the crumble topping in a food processor and pulse until it resembles breadcrumbs.  If you do not have a food processor, you can easily do this by hand.  Simply mix all the dry ingredients together and rub the coconut oil into the flours using your fingertips.  Then mix in the vanilla and maple syrup.

Sprinkle the crumble topping over the fruit, aiming to get an even layer.

Bake the crumble in the preheated oven for 30-40 minutes until the fruit is bubbly and the crumble topping is nicely browned.

FC4

This can be served hot, warm or cold depending on preference.  It is even easy to reheat – simply place the crumble in a preheated 350°F (175°C) oven for 10-15 minutes until heated through.

fc5

I like to serve this with whipped coconut cream

cc6

Mmmmmmmm  delicious!

Shared at: Paleo AIP Recipe Roundtable

Cauliflower-Kale “Rice”

Cauliflower makes a great rice substitute, but being white, it can look a bit bland.  I like to add some extra colour and nutrition by adding greens.

Kale pairs really well with cauliflower, and is one of my favourites.

This recipe is not only paleo, it is gluten and grain-free and also AIP-friendly.

Cauliflower-Kale “Rice”

serves 4

ckr

  • 1 large head of cauliflower
  • 1 large bunch of kale
  • 1 onion
  • 2 cloves of garlic
  • 1-2 tbsp fat of choice (lard, tallow, bacon-fat or coconut oil are all good choices)
  • ¼ cup of bone-broth – preferably homemade from grass-fed/pastured bones
  • sea salt to taste

The first thing you need to do is to turn your cauliflower into “rice”.  The easiest (and least messy) way to do this is to use a food processor.  Cut the cauliflower into florets and place these in your food processor.  Pulse it until it resembles grains of rice.  You may need to do this in batches.

If you do not have a food processor, you can still make cauliflower “rice”, but it is a messy process – take a box grater and grate the cauliflower florets.

Take the tough stems out of the kale, and shred the green parts finely.

Peel and chop the onion.  Peel and crush the garlic and chop finely.

Melt the fat you are using in a large skillet or a wok (I actually use a wok for this as it is bigger than my skillet).

Add the onion and cook over a medium heat until softened.  Do not let the onion brown or burn.  Toss in the garlic and add the kale.  Now add the bone broth, and steam-saute the kale until it is tender.

Add the cauliflower and season well with salt.

Cook, tossing constantly until the cauliflower is heated through and is tender – about 5 minutes.

Serve at once.

This is a wonderful side dish that goes with pretty much anything.

.

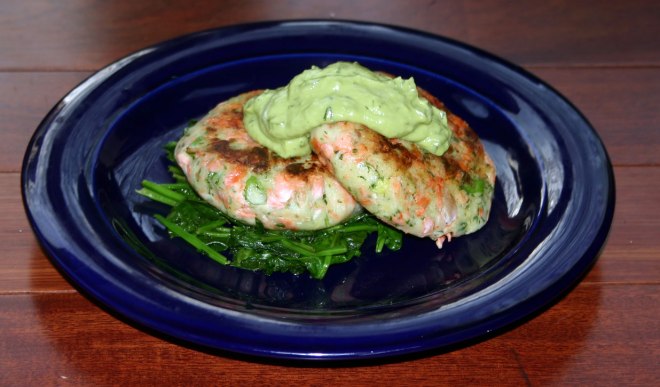
AIP Salmon Cakes With Avocado Aioli

Because I am cooking for myself a lot of the time now, I tend to make a lot of single person meals.

The only exceptions to this are when I am also cooking for my 2 housemates, or I am making something that will keep in the fridge for a few days and is easily reheated.

This recipe is one of my “single person” meals, although it would easily be doubled or tripled if you needed to feed more people.

SFC2

Salmon is a fish that is very good for us because it is an oily fish that is high in the anti-inflammatory Omega 3 fatty acids.

I usually have some wild-caught salmon fillets in the freezer that I can pull out and thaw when I need to make a quick meal just for me.

I used white (Japanese) sweet potatoes here, which are slightly less sweet than the familiar orange ones.  This recipe would work just as well with the regular sweet potatoes however…

There will be more avocado Aioli than you need for one person – just cover the remainder tightly with clingwrap, ensuring that the clingwrap is in contact with the surface of the sauce.  It will keep for another day in the fridge and can be used as a dip with veggies for your lunch.

AIP Salmon Cakes with Avocado Aioli

serves 1

SFC1

For the Salmon Cakes

  • 1 fillet fresh or frozen salmon 4-6oz (thawed if frozen)
  • 1 small sweet potato
  • 1 green onion – chopped
  • 1 tsp capers – rinsed and drained
  • 1 tbsp fresh parsley – chopped
  • pink Himalayan salt to taste
  • arrowroot flour to dust
  • 2 TBSP coconut oil – divided

For the Avocado Aioli

Prick the sweet potato all over and then cook it in the microwave for 5 minutes until it is fork tender. Depending on the power of your microwave, it may take more or less time than this.

If you do not want to use a microwave, you can also bake the sweet potato in the oven – wrap it in foil after pricking it, and bake for 30-40 minutes in a 350°F (175°C) oven until it is fork tender.

While the sweet potato is cooking, melt 1 tbsp of the coconut oil in a small skillet.  Add the fish and cook for 3 minutes per side until it is opaque and flaking.  do not over cook the fish!

Once the sweet potato is cooked, use a spoon to scoop the flesh out of the skin into a small mixing bowl and mash it well.

Flake the fish into the bowl, discarding any skin.  Add the green onion, capers and parsley, and season to taste with the salt.  Mix well.

Dust your hands with some arrowroot flour and shape the mixture into 2 patties, 1″ thick.  Dust the outside of the patties with more arrowroot flour.

Melt the remaining tbsp of coconut oil in the same skillet that you used to cook the fish.  Add the salmon cakes and cook for 5 minutes per side until heated through and golden brown.

While the salmon cakes are cooking make the avocado aioli.

Place all the aioli ingredients in a food processor and puree till smooth.  Taste and adjust the seasoning, adding more salt and necessary.

AA1

Serve the salmon cakes on top of a bed of sauteed spinach with some of the avocado aioli on top.

SFC3

Store any remaining aioli tightly covered in the fridge for up to 24 hours.

Shared at:  Paleo AIP Recipe Roundtable

AIP Pork Belly “Ramen” – Paleo/Gluten-Free

I am a huge fan of Japanese food, and one of my favourites is Ramen.  Not the icky, cheap, packets of ramen you can buy in the grocery store, that are really nothing more than a chemical-shit-storm in a packet.  I am talking REAL ramen….

PBR4

The problem is that ramen noodles are made with wheat.  And the broth usually contains soy.  2 things I cannot eat…

The solution is to make my own using spiralized zucchini as the noodles, and a rich flavourful pork bone broth infused with AIP friendly Asian flavourings.  The broth is made with a pigs foot, and has that sticky, rich quality that you only get from a gelatin rich bone broth…

The pork belly is a simpler form of the AIP Crispy Pork Belly that I have posted about in the past.  The only difference in this case was that the pork belly I had happened to buy was not in one piece and I did not marinate the pork before cooking it as I felt that the finished dish would be flavourful enough without it…

pbr6

This recipe does take a fair bit of forward planning if you are going to make the broth, but if you had some chicken bone broth stashed in the freezer you could always use that instead….  it probably would not be quite as good as if you made this broth, but it will still be very good!

Don’t be dismayed by the long list of ingredients or the time that this takes to make – the results are worth it!

PBR1


You will most probably have far too much broth – that is OK, just store it in a mason-jar in the fridge or freeze it for another time.

AIP Pork Belly “Ramen”

Serves 2

PBR2

For the Asian Pork Broth:

  • 1 pigs foot – split in half
  • 1lb meaty pork neck or back bones
  • 1 onion – halved (no need to peel)
  • 1 stick celery – chopped
  • Trimmings from 1 fennel bulb (optional – this provides a slight aniseed flavour not unlike star anise)
  • ¼ cup dried shiitake mushrooms
  • 3 garlic cloves – peeled but left whole
  • 1″ chunk of root ginger – peeled and sliced into discs
  • a piece of Kombu (Dried kelp), 3″ x 1″ – optional
  • Stems from parsley and cilantro
  • 1 TBSP apple cider vinegar

For the Pork Belly:

For the Ramen Noodle Soup:

  • 2 medium sized zucchini – spiralized using the finest blade (I use this spiralizer)
  • 2oz crimini/baby bella mushrooms – sliced
  • 2oz enoki mushrooms – trimmed
  • 2oz sliced bamboo shoots
  • 2 green onions – chopped
  • 1 cup baby spinach
  • ¼ cup fresh cilantro
  • Coconut Aminos to taste

To make the broth:

The first thing that needs to be done is to get the pork broth made.  This is best started a day or two ahead of when you plan to make the ramen.

Soak the shiitake mushrooms in some boiling water for 1 hour.

While this is happening, place the pigs foot and the pork bones in a large pan and cover with cold water.  Bring the water just to a simmer but do not allow the water to boil.  Skim off any scum that forms on the surface of the broth.  Do not skip this step as this helps to make the broth nice and clear.  Boiling the broth will allow the impurities in the scum to mix back in with the broth, and this will make it cloudy.  After about 20 minutes of simmering, no more scum should be forming.

Now add the mushrooms and the soaking liquid, and all the remaining broth ingredients to the pot.  Return to a simmer, and continue to cook for around 8 hours, topping up the liquid as necessary to keep the bones covered.

Strain out any solids, and transfer the broth to the fridge to cool, where it should set to a firm jelly with a thick layer of fat on top.  Remove the solidified fat from the top of the broth, and save it for cooking, or use it to cook the pork belly.

Cooking the pork belly:

The next step is to cook the pork belly.  This also needs to be started the day before you plan to serve the Ramen Noodle Soup.

Take the pork belly and score the skin with a very sharp knife, taking care not to cut into the flesh.  It does not matter if your pork belly is all in one piece or is in several small pieces as mine was.

Place the pork, skin-side up on a rack over the skin and pour over a kettle-full of boiling water.  This firms and contracts the skin and is the secret to getting it really crispy.

Place the pork belly in the fridge and allow it to dry out overnight.  Don’t skip this step – it is essential that the skin is really dry before it is placed in the oven or it will not crisp!

An hour or two before you plan on serving the soup, you need to cook the pork belly.

Preheat the oven to 400°F (200°C).

Melt the lard, coconut oil (or the fat you skimmed off the top of the pork broth), and rub this well into the skin-side of the pork belly.  Sprinkle the skin with salt and rub it in to the scores you cut.

Place the pork belly, skin-side up on a rack over a roasting tin, and place in the oven.

Roast for 30 minutes, then reduce the heat to 350°F (175°C).  Continue to cook the pork for 15-20 minutes more until it is cooked through, and the juices run clear when pierced with a sharp knife.  At this stage, you can decide if the pork skin is crispy enough for your liking

pbr6

If you want it extra crispy, preheat the broiler to high, and broil the pork, skin side up for 30-60 seconds until it is crisp but not burned.

Remove the pork belly, cool slightly and slice into thin slices.

To assemble the ramen noodle soup:

Cut the ends off the zucchini and spiralize them using the smallest blade on a spiralizer.  I have this one.

Place 3-4 cups of the pork broth that you made a day or two earlier in a pan and bring to a simmer.  Taste it, and add coconut aminos as necessary until it tastes just right for you.  Don’t add so much that it is very salty however!

Add the zucchini noodles to the broth and simmer for 3-5 minutes until the noodles are just cooked but not mushy.

Remove the noodles from the broth and divide them beteween 2 soup bowls.

Add the sliced crimini mushrooms and the bamboo shoots to the broth and simmer for 2 minutes to heat through and just cook the mushrooms.

Meanwhile, divide the spinach, cilantro and enoki mushrooms between the 2 bowls.  Pour over sufficient broth to cover the noodles, adding the mushrooms and bamboo shoots.  Add the sliced pork belly on the top and serve at once.

PBR5


Eat with chopsticks, using a spoon to slurp up all that delicious broth!

Shared at:  Paleo AIP Recipe Roundtable


Coconut Whipped Cream

This is a wonderful topping for any AIP or Paleo desserts.  It is 100% dairy free.

Light and creamy, it really does resemble whipped cream in texture

I use this a lot to top fresh berries as a simple dessert, but I have also used it to top my Choco-Nanacado Mousse and my Avocado-Nana Raspberry Parfait.  It is also wonderful spooned over fresh berries to make a simple dessert or snack.

CBM4

Sometimes, just that little bit of creaminess makes all the difference.us

You do need to plan in advance to make this as you need to chill both the bowl and the coconut milk in the fridge.

This cream is made from the thick layer that separates out at the top of the coconut milk when it is stored in the fridge.

If you are using homemade coconut milk, this will happen naturally.

If you are using a can of coconut milk, you will need to ensure that it does not contain any gums or emulsifiers as these will prevent the thick layer from separating.  You also need full fat coconut milk.

Coconut Whipped Cream

cwc1

  • 1 batch of homemade coconut milk or 1 can of full fat coconut milk
  • 1 tsp honey or maple syrup (optional)
  • 1/2 tsp alcohol-free vanilla extract or 1/4 tsp vanilla powder (optional)

Place the coconut milk in the fridge for at least 4 hours to chill and to let the thick creamy layer separate out.  At the same time, chill the bowl you intend to mix this in.

Carefully scoop the thick layer off the top of the more watery layer underneath.  The watery layer can be saved to add to smoothies.

If using canned coconut milk, it is easier to open the bottom of the can and pour the watery layer off and then scoop out the thick creamy layer.

Place the coconut cream in the chilled bowl, and add the optional sweetener and vanilla if using it.  Whisk using a hand mixer for 1-2 minutes until light and fluffy.

Chill in the fridge for 1 hour before using.

cc6

Serve spooned over whatever takes your fancy….  it is even good to top coffee (if you have managed to reintroduce it – Coffee is a stage 1 reintroduction).  I also use it on top of a carob hot “chocolate”.

Tapioca Pudding With Blueberry Compote – AIP/Paleo/Vegan

One thing that I really miss with being AIP is rice pudding.  For years, it was my go-to comfort food.  But white rice is not strict AIP.

I was browsing in the grocery store the other day, when I saw some tapioca pearls.  And then it hit me – Tapioca Pudding!

This was a regular dessert on the school lunch menu when I was in Junior School….  Everyone hated it, and called it “Frogs-spawn”.  But I loved it!

I used the tapioca pearls and made a minimally sweetened pudding using coconut milk.  And then, remembering how my Mum used to serve rice pudding with a blob of jam on top, I made a blueberry compote to serve with it.

tp1

This is not an overly sweet dessert, but remember, desserts, even ones like this, should be once in a while treat and not an every day indulgence.  Eating too many sweet treats can cause inflammation levels to rise, and can result in a set-back in the healing process.

Tapioca Pudding with Blueberry Compote

Serves 4

TP3

For the Tapioca Pudding:

  • ⅓ cup small tapioca pearls
  • 1 cup water
  • 1 can full fat coconut milk
  • 2 TBSP pure maple syrup
  • 1 tsp pure vanilla extract
  • pinch of salt

For the Blueberry Compote:

  • 3 cups fresh or frozen blueberries
  • 4 TBSP pure maple syrup
  • 2 TBSP water
  • ½ tsp pure vanilla extract

First make the tapioca pudding.

Put the tapioca pearls in the water and leave to soak for around 1 hour.

After this, put all the pudding ingredients in a small pan with the water and soaked tapioca pearls.  Bring to a simmer, and cook for around 20 min until the pudding is thick and creamy, and the tapioca pearls are opaque.  Stir occasionally to prevent burning.

Divide the cooked pudding between 4 small dishes or jars, cool and then chill in the fridge.

While the pudding is chilling, make the blueberry compote.

Mix 2 cups of blueberries in a pan with the maple syrup, water and vanilla.  Bring to a simmer and cook for 10 minutes, stirring occasionally.  Add the remaining blueberries, and cook for a further 10 minutes.

Allow to cool slightly until warm but not hot.

Top the chilled tapioca pudding with a spoonful of the warm compote and serve.

TP2

The compote recipe will make far more than you need, so store it in the fridge for a few days and use over icecream, waffles, pancakes or anything else that you think it would be good with.  Hint – it is AMAZING with duck breast!  The compote is very concentrated and rich, and a little goes a long way.


Edit.  I have had a lot of people asking me what they could do to make this recipe coconut free.   The simplest way would be to use Tigernut milk in place of the coconut milk.  Here is a recipe for tigernut milk.    I believe that it can also be purchased in some healthfood stores.    Another suggestion that I have found that I suspect would be delicous is Avocado milk.   Here is a recipe I have found for this.  A final suggestion if you cannot use either of these would be BananaMilk.   In the case of this last one, you may want to add some additional fat to the pudding to compensate for the lack of fat in the banana milk.  I have also found a link for sweet potato milk which is essentially a juiced sweet potato.  In this recipe they use purple sweet potatoes, but I am sure any, no matter what the colour, would work.  Again, you might want to add additional fat to the recipe.

Shared at:  Paleo AIP Recipe Roundtable, Full Plate Thursday, Waste Not Want Not Wednesday

Cod Baked With Lemon And Dill – AIP/Paleo

I try to eat fish fairly frequently – at least 2-3 times a week because it is so good for you.

I managed to get some frozen cod fillets at a really good price the other day, and this is what I made with them:

CBLD3

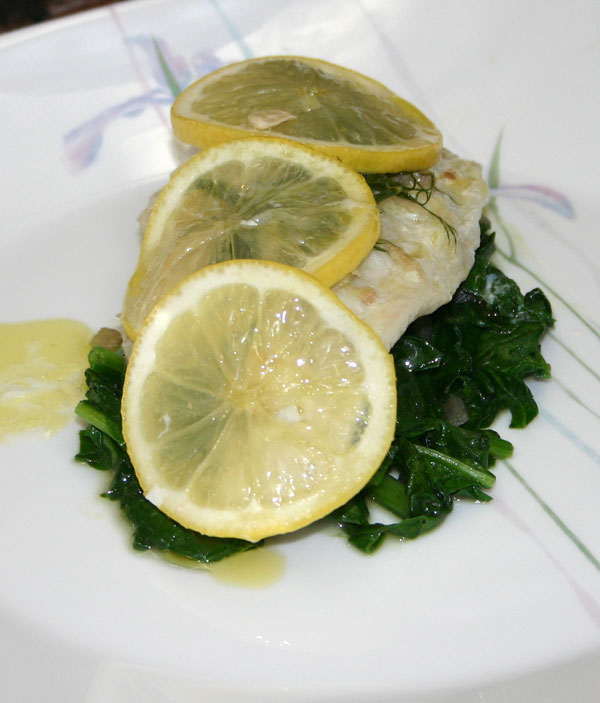
This is a simple dish to make – cod fillets baked in the oven with sea salt, olive oil, lemons and fresh dill to provide flavour.  Once cooked, I sat the fish on some spinach that had been simply cooked with a little olive oil and some sea salt.

I am not fond of overly fancy fish (what my mother would have called “fish messed around with”) – I like to keep it simple.  Baked, grilled, broiled or fried…  I love fish and like the flavour to shine, and I find that if you add too many ingredients, you do not get the real flavour of the fish.

And in this dish the flavour really really DID shine!

You don’t have to eat the lemon slices – they are really there to provide flavour as the fish cooks.  I actually did eat them, because I like lemon slices… and if you cut them thinly enough they become tender enough to eat.

When buying cod, make sure it comes from a sustainable source.  Alaskan Cod is what is currently recommended as the most sustainable.  Frozen fish is fine to eat on the AIP – in fact, unless you live on the coast, frozen fish may actually be better quality than fresh fish.  And this is certainly the case in land-locked Alberta where I live.

Also, do not be afraid to use frozen spinach – quite often it is cheaper than the fresh stuff, and it can even be fresher because it is frozen soon after picking.  The fresh spinach may often be shipped long distances and stored in grocery store warehouses for a few days before you can even purchase it.  That means that it’s nutritional value has diminished.  Of course if you can access fresh local spinach from a farmer’s market or CSA that is better still…  But no matter whether it is fresh or frozen, leafy greens like spinach are on the EWG’s Dirty Dozen list and should always be organic.

The lemon should also be organic because you will be using the skin.  I would also give it a good scrub to remove any waxes or finishes that may have been added to make it keep for longer.

This recipe is 100% AIP friendly because it was cooked so simply with minimal ingredients.

Cod Baked With Lemon And Dill

serves 2

CBLD4

  • 2 fresh or frozen cod fillets – aprox 6oz each – thawed if frozen
  • 1 small bunch of fresh dill
  • 1 organic lemon
  • Sea salt to taste
  • Extra virgin olive oil
  • 1 clove of garlic – minced
  • 1 bag of spinach, fresh or frozen (aprox 4 cups)

Preheat the oven to 350°F.

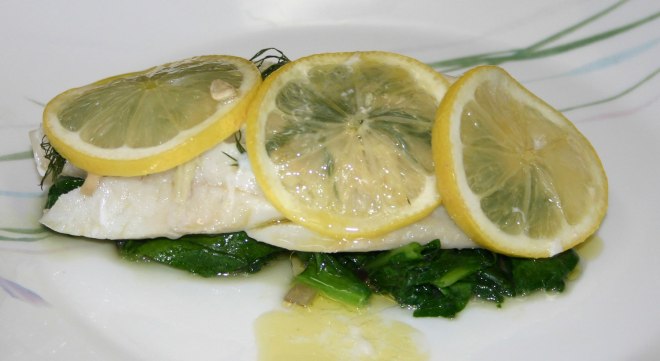
Use a small amount of olive oil to grease a baking dish that is big enough to hold the fish fillets without them overlapping – you do not want too much space, but equally, you don’t want them lying on top of one another….  this picture is a good guide…

CBLD2

This picture was taken after cooking,and the fish has shrunk slightly… as a guide, the fish should fit snugly with no overlaps….

Lay the fish in the base of the dish and drizzle with a little more olive oil (This will help keep it moist and will also add flavour – remember, fat is flavour!).  Season it generously with the salt.

Now lay 2-3 entire sprigs of the dill (remove any really large stalks – aim to just use the tender, edible ones) on top of the fish.

Take the lemon slices and lay 3-4 on top of each fish fillet.

This will give the fish the amazing flavour you are after

Drizzle with a little more olive oil (remember, fat is flavour!) and put the dish in the preheated oven…

Bake for 15-20 minutes until the fish is opaque and flaking.  Thin fillets may need less time, thicker ones may need more, check and adjust the time accordingly.  Just don’t over cook the fish!

While the fish is cooking, in what you estimate to be the last 5 minutes of the cooking time, heat 1 tbsp of olive oil in a skillet and add the garlic.  Cook for 1-2 minutes until it it fragrant but not browned.

Now add the spinach to the skillet, season with a little sea salt and cook for 2-3 minutes until wilted and tender.

Pile the spinach on serving plates and place a fish fillet on top.

CBLD1

Serve at once.

Shared at:  Paleo AIP Recipe Roundtable, Full Plate Thursday

Moroccan Cauliflower “Couscous” Salad – AIP/Paleo/Vegan

This is yet another dish that I made for a pot-luck.

CCS2

I try to make fairly substantial food when I take something to an event like this as it is incredibly rare that there are other foods that I can eat – nearly everything contains gluten, or dairy, or both.

This is a hearty, filling salad that would be really good paired with kebabs or grilled meat, and would be ideal to take to a BBQ or picnic, and the leftovers are perfect for a packed lunch the next day.  It is also ideal to serve as a side dish with my Moroccan Lemon and Herb Chicken.

I used riced cauliflower to stand in for the couscous, and used seasonings and herbs that give this salad a slightly Moroccan feel.

This salad is 100% AIP compliant, but if you can tolerate seeds, some pine-nuts would be a good addition to provide some protein.  Pine nuts are actually a seed, not a nut.  This dish is also vegan.

I apologize for the poor quality pictures and the paper plate – I forgot to take a photograph before it was served, and quickly had to snap a couple using my phone.  While the pictures do not do this dish justice, it is incredibly tasty.

Moroccan Cauliflower “Couscous” Salad

serves 6-8 as a side dish, or lots as a pot-luck contribution

CCS1

Separate the cauliflower into florets and pulse them in a food processor until it resembles small grains.  If you do not have a food processor you could use a box grater, but be warned, it is very messy doing it this way!

Peel and finely chop the onion and garlic.  Peel and grate the ginger.

Chop the dried apricots, parsley, cilantro and green onions.  Zest and juice the orange.

If using the optional pine nuts (not for strict AIP), toss them in a dry pan until they smell toasted and are turning a pale golden brown.  They burn in a flash, so watch them like a hawk!

Heat the coconut oil in a large pan over a medium heat.  Add the onion and cook gently for 5 minutes until it is just translucent.  Add the garlic and ginger and cook for a few more minutes until fragrant.

Add the cauliflower, salt, cinnamon and turmeric, and cook, tossing frequently until the cauliflower is tender but not mushy.  This will take about 5 minutes.

Remove from the heat and place the cauliflower in a large bowl.

Stir in the dried apricots, raisins, orange zest, parsley, cilantro and green onions.  If using the optional toasted pine nuts, add them at this stage.

Mix the orange juice, vinegar ad olive oil in a small bowl, the pour the dressing over the salad.

Mix well until everything is evenly coated.

Chill in the fridge for at least 1 hour before serving to allow the flavours develop.

Shared at: Paleo AIP Recipe Roundtable