Back to School Packed Lunches 2

The other day, I made some suggestions about how you can make sending a packed lunch to school easier and less stressful.

Today I am going to make suggestions as to what you can actually put in that lunch box.

I am not going to suggest quantities to send, you know your child best, and know how much he or she will eat…  and besides, my 9 and 11 yr old eat far more than my 15 year old does.  And I am sure that a teen boy who is playing sports would eat more than all 4 of my girls combined!  And a tiny pre-schooler will eat not much more than a few bites of any one thing.  If the lunchbox comes back empty and your child is starving at the end of the day, you know to send in more.  If they left half their lunch, try sending in a bit less….

I suggested the other day that you cook extra the night before and send the leftovers for lunches.  In general, that will be a fairly balanced meal depending on what you have leftover.  Don’t forget, soups and chilli and many other dishes can be reheated and sent in an insulted food jar.  Others could be sent in a microwave safe container if your child has access to a microwave.  And some are just as good cold as hot.  If you would eat it cold out of the fridge, why not try sending it to school as a lunch?

Sandwich Substitutes

Just because you and your children don’t eat bread doesn’t mean that sandwiches and wraps are off the menu.

Try some of these suggestions:

  • Use hollowed out cucumber or celery sticks as the “bread” and fill with sliced meat and salad veggies as in this great recipe.
  • Apple slices make a great bread substitute when using nut butter.  Make sure you dip the apple in a mix of lemon juice and water to prevent them from browning.
  • Red Bell Peppers can also be used in place of a “bun” as in this recipe.
  • Portabello mushrooms have been used as the bun for burgers many times.  Why not use them in place of bread in a lunchbox sandwich?
  • Or you could simply make a paleo bread and use that for sandwiches occasionally.  There are many paleo bread recipes out there.  Some low carb others quite high in carbs but gluten free.  Given that most kids need extra carbs, I favour this recipe.  You do have to pay for it, but I figure that $3.95 is pretty cheap for such a versatile recipe!

Another alternative to sandwiches is to make a wrap.  You can buy paleo-friendly wraps, but why not consider some of these suggestions:

  • Use lettuce leaves to contain taco meat or other shredded meats such as pulled pork.  You could also fill them with egg salad or tuna salad made with homemade mayonnaise
  • Use deli meats as a wrap for veggies like in this recipe.  Another suggestion is to use thinly sliced roast beef, spread with a little mustard and horseradish and then rolled around veggies.  Avocado would be especially good!
  • Use the Magic Dough recipe I mentioned earlier to make tortillas to use as a wrap.
  • Make a thin omelette or crepe and use that to wrap veggies and meats.

But you don’t just have to send sandwiches or sandwich substitutes.  Consider going down the bento box formula and sending a protein ingredient with a couple of sides and maybe a treat or some fruit….

Aim for one protein, a couple of sides (veggies), some fruit and an occasional treat.  Make sure that there are plenty of good fats (eggs, avocado, coconut, nuts and nut butter, olives, olive oil, oily fish even cold cooked bacon) as it is the fat that will help keep them full until home-time.

Protein

Suggested protein ingredients that I have sent to school with my kids are:

avoeggs3

  • Cold cooked meat – this could be leftovers from the night before or cooked especially for the lunchbox.  Cooked chicken is wonderful when cold – wings, legs especially so, but even leftover breast meat is good.  Paleo versions of chicken nuggets are also popular especially if you provide something to dip them in.  Leftover ribs are tasty, especially if you supply some of the BBQ sauce for dipping, as is cold sliced beef.  Use some sliced deli meat if you can find some that is nitrate and sugar free.  You could even cook a ham or roast some beef specially for lunches.  And don’t forget cold cooked sausage or bacon.  Cooked burgers or meatballs (with or without a sauce) are another suggestion  provide a dip if you think it would work.  Home-made kebabs are another alternative that are fun to eat.  And speaking of kebabs, these are a fun choice, alternating deli meats with veggies on a skewer.  Something most kids are sure to love!  If you include dairy in your child’s diet you could add cheese cubes as well!
  • Jerkey (make sure it does not contain any non-paleo ingredients) – preferably made from grass-fed beef.  And don’t forget about “wild meat” jerkey such as elk, bison, venison…
  • Fish – yes fish can be served cold.  You could send in a can of tuna or sardines with older kids, and for the younger ones make tuna salad with homemade mayo.  Even leftover Paleo Fish Sticks could work well cold with a tartar sauce made with homemade mayo or Paleo ketchup.
  • Nut butter and nuts will provide some protein and healthy fats if your school is not nut-free.  Otherwise, just send in a small amount of nuts.  Remember that nuts, with the exception of macadamia nuts, are very high in omega 6 fatty acids, and should be more of a condiment…  if you cannot obtain macadamia nuts, consider walnuts – they have a better omega 6 : omega 3 profile than most other nuts.   Spread nut butters on a paleo friendly cracker and top it with another one to make a paleo version of PB sandwich…  or try these apple-sandwiches with nut butter between 2 apple rings.    You can also use nut butter as a dip for veggies such as carrot sticks and apple slices.  Try spreading various nut butters in celery sticks and top with raisins or dried cranberries for ants on a log.  And if your school is nut-free, consider using Sun-butter as an alternative.
image courtesy of www.makeandtakes.com

image courtesy of http://www.makeandtakes.com

  • Dairy – if your child tolerates dairy well, this could be a good source of protein in their lunch.  Consider sending in cheese cubes or sticks.  Cheese on a skewer with fruit is wonderful – that sweet and savory thing…  just make sure that it is not highly processed cheese.  And for preference go for organic, and pastured dairy…  if you live in an area where you can purchase raw cheeses (not possible in much of Canada), do that…  it is surprising what kids will eat.  Mine LOVE stinky cheese and those with big flavours, feta, brie Camembert, Gorgonzola…  don’t assume you have to buy cheap flavourless processed cheese to appeal to a child’s palate.  And like everything else, read labels…  Cream cheese can be spread on celery sticks and topped with dried fruit to make a nut-free version of ants on a log.

Sides

Aim to send in at least 2 side dishes.  These could include the following:

  • Cold cooked veggies, leftover from the night before.  Sweet potato wedges/fries are especially good, but don’t forget about other roasted veggies (beets, carrots even parsnips).  Cold broccoli and cauliflower tastes good, especially with a dipping sauce.  Even cooked asparagus would work.
  • Raw veggies with a dip.  Choose from carrot sticks, baby cucumber, cherry tomatoes, celery, bell peppers, broccoli, cauliflower, cucumber, radishes and anything else that you think your child would eat.
  • Salads are also a good side, and pair especially well with chicken, eggs and sliced meats.  Send the dressing in separately in a small pot or jar so that the leafy salad veg does not go limp.
  • A fermented side such as lacto-fermented pickles, sauerkraut or kimchi tastes good and provides some healthy gut-friendly bacteria.
  • Stuff tuna or egg salad into a de-seeded bell pepper or a hollowed out tomato.

Dips

Kids love dipping food into dips.  And it has been shown in a recent piece of research that this is a good way to get children to eat more veggies…

Suggested dips include:

Fruit

Fresh fruit is a great addition to the lunch box.  Pretty much any fruit that your child likes can be included whole or sliced.  If slicing apples, remember to dip them in a mixture of lemon juice and water to prevent them from browning.

Sweet Treats

Kids almost always love these, but they are not usually all that great, so include them only occasionally.

Consider sending:

  • Dried fruits – dried apples, dried mango, dates (stoneless are best), raisins, cranberries, apricots.  Check to ensure that the fruits have not been dipped in sugar – a surprisingly large amount are, which is crazy seeing how sweet dried fruit is anyway!
  • Chips – try kale chips, plantain chips, sweet potato chips, or any other home-made veggie chip that you can think of.  They are easy to make, slice the veggies as thinly as you can (for kale chips, rip into small pieces) and bake the veggies in a low oven until they are crisp…  add seasonings as you feel necessary.  Kale chips will take only a short while (less than half an hour), sweet potato or plantain chips may take upward of 2 hours depending on how thick they are.  Watch them carefully so that they do not burn.
  • A small square of dark chocolate or a few chocolate coated raisins or almonds.  Aim for 85% cocoa solids or better in the chocolate.
  • Berries and coconut cream
  • coconut yoghurt
  • plain greek yoghurt with some fruits (this is primal, not paleo)
  • Homemade fruit/energy bars
  • grain-free granola
  • grain-free muffins, cookies or cakes
  • pudding such as my chia puddings. You can flavour these with any fruits you like.

Drinks

The best thing you can send for lunch is plain water.  If your child won’t drink that, try flavouring it with lemon juice or even making a flavoured fruit water.  Another suggestion is to send cold milk in a thermos – use cows milk if your child tolerates that, but also consider almond milk as an alternative.  Older children might like unsweetened iced tea or herbal teas (hot or cold), and if they have access to hot water you could even send an unbreakable mug such as a travel mug and a couple of tea bags.
Applogies

I apologize for not posting the “what to pack in a Paleo paced lunch” post that I had promised I would post yesterday…  due to a family matter that needed resolving I simply did not have time to write it.

I will attempt to get it up as soon as possible.

Back to School Packed Lunches 1

image courtesy of http://www.cbe.ab.ca/

image courtesy of http://www.cbe.ab.ca/

It is that time of year again – when the kids are heading back to school and you are thinking about what they are going to eat at lunchtime.

image courtesy of mirror.co.uk

image courtesy of mirror.co.uk

If you are anything like me, or are at all interested in providing them with a healthy lunch-time meal, you will not even consider letting them have what the school cafeteria has to offer. Even with the drive to improve the quality of school lunches, most are not what I would consider to be healthy. They are too high in salt and sugars for the most part. And they are not usually gluten or grain free. Then adding that a very limited supply of fruit and vegetables are on offer…..

No thanks!

image courtesy of www.telegraph.co.uk

image courtesy of http://www.telegraph.co.uk

So that leaves you with no choice but to send in a packed lunch. And if you are new to Paleo or Primal eating that can seem like a daunting task.

What are you going to give them in place of the sandwiches? What about the cereal bars? The cakes and cookies? The chips? And what about a drink? Are juice boxes and chocolate milk Paleo/Primal? And will the kids even eat what you pack?

Here are my tips for packing a healthy school lunch that your kids will love, without you tearing your hair out with stress.

Buy good quality food containers
There is nothing more stressful than rummaging in a cupboard desperately trying to match up plastic tubs with their lids first thing in the morning. Get some quality lunch containers (one for each kid that you will be packing lunch for and one for you and your partner too if you work outside the home). Yes it will be expensive, but for the reduction in stress it is worth it. There is a really good review of the various lunchbox options at 100 Days of Real Food. We bought Planet boxes for our kids (and for Hubby and me), 6 of the full Rover Systems, including the carry cases and the big and little dippers.  Believe me, it was NOT cheap!  But a good quality lunch box will last for years.

You get what you pay for, and if you buy cheap, it costs you more in the long run.  (See the Sam Vimes “Boots” Theory of Economic Injustice – invented by Terry Pratchett, inventor of the Discworld).

Make sure that in addition to a lunch box you also get an insulated food jar so that you can send a hot meal. And consider a Thermos to send hot or cold drinks as well.

And while we are at it, cutlery…. I found that if I was buying cheap disposable plastic spoons and forks, the kids would throw them away even if I told them to bring them home and wash them. I don’t know about you, but I don’t want to contribute to environmental pollution in that way, and I dislike wasting money either. The solution we went with was to buy the kids sporks. They bring them home each day and they go through the dishwasher with the lunch boxes.

Get a metal or BPA-free plastic water bottle so that you can send in water instead of juice or disposable water bottles.

And don’t forget the re-freezable ice pack to keep it all cold.

And the minute they come home from school, make them fetch their lunch boxes and other lunch items out of their bags so that they can be washed or put through the dishwasher…  that way, they are ready for the next day!  No if’s or but’s, no excuses of “But I must do my homework”, fetching their lunch containers takes seconds!

Keep it simple
Aim to use lots of leftovers and consider cooking for the week ahead over the weekend. Either send the leftovers in cold to be eaten cold (even stews and chilli can be surprisingly tasty when served cold!) or reheat them in the morning and pack in an insulated food jar. If your child’s school has a microwave for the kids use (a surprising number do now, especially for older kids) you could send the food in in a microwave safe container for your child to heat up.

If planning on cooking for the week ahead, cook chicken legs and wings, meat such as a beef or ham joint that can be sliced, make soups, stews and chillies and freeze them in single serving containers ready to be used later on.  Maybe even consider making some paleo-friendly treats such as my energy bars or chia pudding.

Stock up on fruits and veggies that can be eaten raw, nuts, seeds and dried fruit and jerkey and other Paleo friendly snacks.  If your kids eat dairy, buy some cheese to cube or cut in sticks and consider these silicone molds that can be filled with natural yoghurt.

Make sure you include something that contains healthy fats – olives (if your kids will eat them), avocado, nuts or nut butter (as long as the school is not nut-free), coconut chips, full-fat dairy (if you allow your kids to eat it), even cold cooked bacon…  The fat will give them plenty of energy and help keep them full.

Then enlist the kids to help. Older kids should be able to pack most of their lunches themselves, and even tiniest can assist with making choices (“carrots or celery? Apple or banana?). You want to be able to pack the entire lunch in 5-10 minutes if not less.

Don’t experiment
You want the kids to eat their lunch, so the lunch-box is not the place to experiment with new unfamiliar foods. Stick to what you know they love, and save the experimentation for the weekends.

Don’t pack junk food
This should go without saying. Send in real food. Things that your great-grandma would recognize. So no packets of chips, cookies or crackers. No yoghurt tubes, cereal bars and cakes, even if it is organic. Just because something is organic does not mean that it is good for you!

Instead send in fruit, sliced or whole, fresh veggies, home made (peanut free) trail mix and 85% or better cocoa solid chocolate as treats.

Instead of a juice box (which is really just vitamin enriched sugar water) and sugar-laden chocolate milk send In plain water to drink. Or consider using a Thermos and send in fresh, cold milk.

Don’t worry too much!

The final thing to stress is not to obsess too much over the lunches – if the lunch you send in is a little light in protein (or your child does not eat the protein you provide!), just give them some extra protein at dinner…  think whole day nutrition rather than a single meal.  It is OK to send a meal that consists of a load of veggies and dips with a few nuts if you are all out of protein ingredients, as long as you make up for it at dinner time (and possibly breakfast if you know the lunch is lacking).  And the same goes for anything else that you put in the lunchbox.  If your child does not eat it and is lacking in something you consider essential, just give it to them in another form later in the day…  didn’t eat the veggies?  give them some extra veggies for dinner or as a snack.  Didn’t eat the fruit? give them some fruit as a bed-time snack….  also consider letting them snack on the remainders of their lunch once they get home as long as you consider it safe for them to do so (eggs or meat kept at room temperature for an afternoon might not be quite so safe to eat!  Just sayin….)

So, what could you pack in the lunch box?

I will write a post about that tomorrow…

Paleo Foods

I know there are a lot of other Paleo Food Lists out there, but why not make one up of my own?

These are foods that you can eat as much as you want of

Spices and Herbs – can be freely used.  This includes garlic and ginger.

Most vegetables – remember, corn is a grain, not a vegetable even if it is eaten like one.  Also avoid the starchy vegetables such as potatoes and sweet potatoes.  Aim to buy seasonally, organic and local for preference.

Artichokes

Arugula (Rocket)

Asparagus

Avocado

Beets including the tops

Bell Peppers

Bok Choy and other asian greens such as Gai-lan

Broccoli

Brussels Sprouts

Cabbage

Carrots

Cauliflower

Celery

Chicory

Chili Peppers

Collard Greens

Cucumber

Dandelion greens

Eggplant

Endive

Fennel

Green Beans – technically a legume but can be eaten raw, and low in the anti-nutrients that most legumes contain.

Green Onions

Jerusalem Artichokes

Jicama

Kale

Kohlrabi

Leeks

Lettuce

Mushrooms (All Kinds)

Mustard Greens

Okra

Onions

Parsley

Parsnips

Pea-pods (mange-tout/snap-peas) – technically a legume, but can be eaten raw and are low in the anti-nutrients that most legumes contain.

Pumpkin

Radicchio

Radish

Rapini

Seaweed

Spaghetti Squash

Spinach

Squash (all kinds)

Swiss Chard

Tomatoes

Turnip Greens

Watercress

Yellow Summer Squash

Zucchini

Fruits – most fruits are high in sugar and should be eaten in moderation.  These are the ones that are best to eat.  Aim to buy seasonally, organic and local for preference.

Berries (all types)

Coconut

Melon (all types)

Meat – if possible buy only grass-fed/pastured/wild meats.  Eat the fat and the skin where possible as well and consider nose to tail eating including the organ meats.  If you are having to buy meat that is not grass-fed/pastured (most standard grocery store meat), choose the leanest cuts possible and trim the excess fat as it will be very high in inflammatory-causing omega 6 fats.

Alligator

Beef

Bison

Chicken

Deer

Duck

Elk

Goat

Goose

Lamb

Moose

Pheasant

Pork

Quail

Rabbit

Reindeer

Sheep

Turkey

Veal

Wild Boar

Blood

Brains

Heart

Liver

Kidney

Bone Marrow

Sweetbreads

Testicles

Tongue

Tripe

Fish and Seafood –  choose sustainable wild-caught fish and seafood where possible.  Avoid farmed fish such as salmon as the flesh will be low in omega 3 and relatively high in omega 6.  Consider eating the roe (eggs/caviar) from fish.

Anchovies

Bass

Black Cod (Sablefish)

Cod

Eel

Haddock

Halibut

Mackerel

Mahi Mahi

Orange Roughy

Perch

Red Snapper

Rockfish

Salmon

Sardines

Tuna

Sole

Grouper

Turbot

Trout

Abalone

Clams

Crab

Lobster

Mussels

Oysters

Shrimp

Scallops

Caviar (fish eggs/roe) – avoid sturgeon caviar as they are rapidly becoming an endangered species.  Choose caviar from other fish instead and consider eating the roe/eggs you find in your fish when gutting it.

Eggs – The eggs of all birds are Paleo.  Where possible eat only pastured eggs or omega 3 enriched eggs.  If necessary, eat organic eggs as a third choice.  Avoid standard grocery store eggs as they will be laid by unhealthy hens that are raised in very overcrowded conditions.

Cooking Oils/Fats  – Avoid the grain based oils, most nut and seed oils and “vegetable oil”.  Also avoid all trans-fats (including margarine).  Where possible use only animal fats that are pastured/grass-fed/free-range.  Consider saving the fat that renders out of the meat you are cooking.

Avocado Oil

Coconut Oil

Lard (pork fat)

Tallow (mutton/lamb fat)

Schmaltz (chicken fat)

Beef Dripping

Suet (ok if you can find it where it has not been tossed with flour) – this is the rendered fat from around the kidneys

Olive Oil

Macadamia Oil

Palm Oil

Duck Fat

These Foods Should Be Eaten In Moderation

Vegetables – these are the more carb-heavy vegetables.  Best avoided or eaten in moderation if you are wanting to loose weight.  Aim to buy seasonally, organic and local for preference.

Cassava

Sweet Potato

Taro

Turnips

Yam

Potato

Fruits – these fruits are higher in sugar, so limit your consumption, especially if you want to loose weight.  Remember, drying fruits concentrates the sugar, and each dried fruit counts as one whole fruit.  Eat your fruit as whole fruits not fruit juice as that way you get the benefit of the fiber.  Aim to buy seasonally.  Organic and local for preference.

Apples

Apricot

Bananas

Cherries

Dates

Figs

Goji Berry

Grapefruit

Grapes

Guava

Kiwi

Lemon

Lime

Lychee

Mango

Nectarines

Oranges

Papaya

Passion Fruit

Peaches

Pears

Persimmon

Pineapple

Plums

Pomegranates

Rhubarb

Star Fruit

Tangerine

Nuts and Seeds – these should be considered more of a condiment.  Nuts and seeds, with the exception of macadamia nuts are very high in Omega 6 and chestnuts are very starchy and high in carbs.

Almonds

Brazil Nuts

Chia Seeds

Flax Seeds

Hazelnuts

Macadamias

Pecans

Pine Nuts

Pistachios

Pumpkin Seeds

Sesame Seeds

Sunflower Seeds

Walnuts

Chestnuts

Meats and Fats  – these are ok to eat in moderation as long as you can source quality bacon/ham that has been cured without sugar.  For preference choose meats that are nitrate free and made from pastured pork.

Bacon

Ham

Bacon Fat

Ham Fat

Dairy – These foods are Primal rather than Paleo.  For some people they can be problematic, others will have no issue with them.  Where possible, buy only organic or pastured dairy.  If raw unpasteurized dairy is available buy that as a first preference.   (Not possible in Canada where it is illegal to sell raw dairy).

Butter

Ghee

Milk

Kefir

Full-Fat Yogurt

Cheese

Sweeteners –  these natural sweeteners can still cause a spike in insulin levels, so keep the use to a minimum.  Their saving grace is that they contain some trace nutrients.

Fruit juice (may be used in moderation as sweetener. It contains none of the fiber from the original fruits and is essentially sugar-water)

Raw Honey

Real Maple Syrup

Stevia – sugar free, but can contribute to maintaining a “sweet-tooth”.

Other Foods – some of these foods can cause a problem for some people, others don’t have a problem with them at all.

Dark Chocolate (choose types with 85% cocoa solids)

Coffee

Alcohol – dry wines and spirits not made from grains  (tequila, wheat free vodka, brandy).  Use only club-soda/soda water as a mixer with a little citrus juice for flavour

Salt

Vinegars

Avoid These Foods

Oils and Fats –

corn oil

canola oil

vegetable oil

soybean oil

shortening

sunflower oil

safflower oil

cottonseed oil

grapeseed oil

peanut oil

margarine

Grains – low in nutrients, high in carbs and anti-nutrients, these are best avoided.

Wheat

Barley

Buckwheat

Corn

Millet

Oats

Quinoa

Rice

Rye

Sorghum

Spelt

Any Pasta

Any Bread

Any Crackers

Anything made from flour from any of the above grains

Legumes – the only exceptions I make to these are green beans and pea-pods.  While technically still legumes, these do not contain many of the anti-nutrients that the rest of the legumes contain.  They can also be consumed raw.

Garbanzo Beans

Black Beans

Kidney Beans

Mung Beans

Lima Beans

Chickpeas

Black-Eyed Peas

Lentils

Peanuts

Soybeans

Tofu

Soymilk

White Beans

Pinto Beans

Fava Beans

Red Beans

Sweeteners – these foods contain mostly empty calories and will cause a spike in your blood sugar, with a resulting rise in your insulin levels.

Sugar (all forms)

Coconut Sugar

Dextrose (glucose)

Fructose (fruit sugar)

High Fructose Corn Syrup (may be listed on labels as glucose/fructose)

Artificial Sweeteners (all types)

Agave

Maltodextrin

Corn Syrup

Molasses

Rice Syrup

Any Soda (with the exception of soda water/club soda)

Any Candy

Other Foods

Beer and spirits made from grains (Whisky, Rum, Vodka etc), sweet wines.

Most condiments and relishes (read the labels)

Highly Processed Meats (Hot dogs, most deli meats, salami etc)

And finally all highly processed food.  If your great-grandma would not recognize it as food don’t eat it.  Read the labels.  If it contains any ingredients listed in the “Do not eat” category above, do not eat it.  If there are more than 5 ingredients on the label don’t eat it (most processed foods contain far more than 5 ingredients).  If it contains ingredients that you don’t recognize or cannot pronounce don’t eat it.

Peach-Coconut Chia Pudding

This makes a fantastic breakfast, snack or desert – It is also great as a treat for kids!  It would also be a fantastic addition to a Paleo lunchbox.  For older kids and adults you could send it in the mason jar I have depicted below…  for younger kids just package it in a plastic or metal container- or even leave out the extra peach chunks and use one of these great silicone icepop tubes that are fantastic for smoothies as well (if doing this, I would blend the entire peach rather than just half).

And this is what I took for lunch at work today!

peachchiapud2

It is incredibly satisfying (all that coconut milk provides healthy fats).   This plus one banana and one apple kept me going from breakfast (2 eggs, 2 slices of bacon, one satsuma) until dinner (a pork salad).  And remember that I do a VERY physically demanding job…

It is rich, thick, slightly sweet and delicious.  And the Chia seeds naturally thicken the coconut milk giving a smooth creamy consistency – it really does have the same mouthfeel as a pudding – but with no starch or grains at all!

Not only that, Chia seeds are the richest natural plant source of Omega 3 fatty acids.  And then add in that the 2 tbsp of Chia seeds in this recipe can double your fiber intake, providing 25% of your recommended fiber in one fell swoop.  And they are also packed with protein – which also makes this recipe VERY satisfying. Over 23% of the calories in Chia seeds comes from protein.  When you add that to all the good fats in this recipe, is it so surprising that it is so very filling?

But it is also very healthy…..

This recipe will fill one small mason jar – perfect for an “in jar” snack or desert in your packed lunch for work!

Chia seeds are an AIP stage 2 reintroduction.  When reintroducing foods on the AIP, I recommend this guide.

Peach-Coconut Chia Pudding

serves 1

peachchiapud2

1 cup full-fat coconut milk (if using canned, read the ingredients – you want one that contains nothing but coconut and water).

1 peach – cut in half and stoned.  I bought my peaches from the Symons Valley Ranch Farmers Market.

1 tsp raw honey (I use honey from Buzz Honey).  This is optional.  It will make the pudding slightly less sweet if you leave it out.

2 tbsp Chia seeds

1/4 tsp vanilla extract

1/4 tsp cinnamon

1/4 tsp ground ginger

Take your halved peach and toss one half into a blender or jar with the coconut milk, honey, vanilla, cinnamon and ginger.  Blend until smooth.

Transfer the mixture to your mason jar and add the chia seeds.  Mix well.

Finely dice the remaining half of the peach and use to top your pudding.

After a few minutes it should have thickened.

Seal and take to work (or nom immediately! It won’t be as thick if you eat it straight away but it will still taste as good and will still pack the same nutritional punch).

If you leave it for half an hour or more it will thicken up to the consistency of pudding….  I made mine around 9am, and ate it around 12pm…  by that stage it was pretty thick.

You could use pretty much any fruit you fancied as a substitute for the peaches…  I just have an overabundance of them which is why I used them!

You also don’t have to serve it out of a mason jar – a small, pretty bowl works just as well…

peachchiapud3

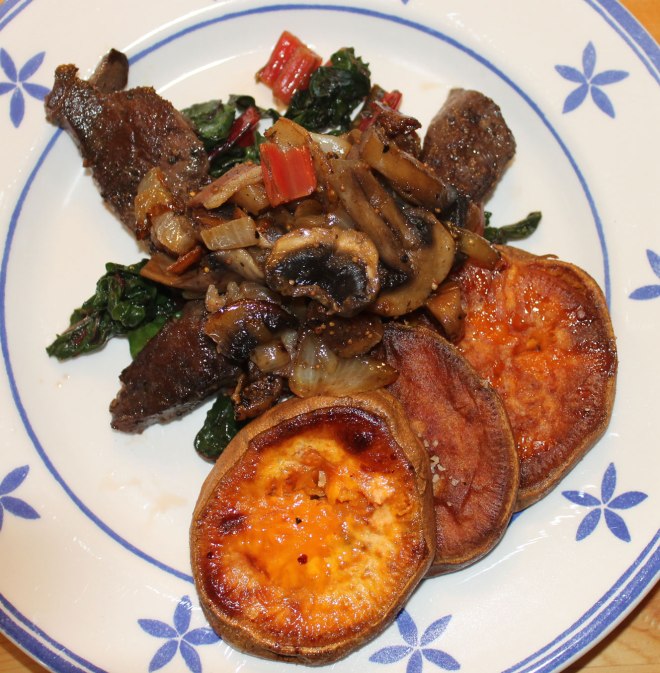
Elk Heart with Greens and Oven Roasted Sweet Potato Rounds

We eat a lot of organ meat – it is very good for you.  In fact it is some of the most nutrient dense food that you can put in your bodies.

As a family, we love to eat elk organ meat that we buy from Wapiti Ways at the Calgary Farmers Market.

It is delicious, it is very economical, and a little goes a long way because it is so nutrient dense.

For this particular meal, I cooked Elk Heart.  Unlike a lot of organ meats, heart is not “squishy” and it does not taste “livery”.  It has the texture of very finely grained meat, and tastes almost like steak.

Because heart can be tough it needs to either be stewed for a very long time to tenderize it, or it needs to be served very rare – I always go for the very rare option – I don’t want to ruin the wonderful stuff.  And really, it is almost like the best steak you have ever eaten.

Elk Heart with Greens and Sweet Potato rounds

serves 6

elkhearrt2

For the elk heart:

1 pack of thinly sliced elk heart (thin slices of the hearts from other animals could also be used but cooking times may differ)

sea salt

4 slices of pastured bacon – chopped

2 large onions – sliced

200g (7-8oz) sliced mushrooms

2 sprigs fresh sage – chopped

2 tbsp balsamic vinegar

1/4 cup water

elkheart20

As you can see, the pack of elk heart I used weighed only 3/4 of a pound – and it was a very cheap meal in that the main protein ingredient cost less than $10…  And seriously, this was enough to feed all 6 of us.  Granted there were not a lot of leftovers (just some greens and a couple of sweet potato rounds), but no one left the table feeling hungry.

elkheart19

First of all, take your elk heart out of the packet and season it with salt. If you need to, trim off the excess fat.  I didn’t bother with my heart.

Leave it sitting in the fridge while you prepare the mushroom and caramelized onion topping.

Take your bacon and toss it into a small skillet.  Cook over a medium heat until most of the fat has run out and the bacon is crispy.  Remove the bacon with a slotted spoon and set aside.  Transfer half of the bacon fat to a larger skillet to be used for cooking the elk heart and reserve 1 tbsp to cook the greens.  The remaining bacon fat will be used to cook the onion and mushroom topping.

Add the onions, season well with salt and pepper and allow to cook slowly until golden brown and caramelized.  This will take anything from 10 to 30 minutes.  Don’t try to hurry it or have the heat too high or they will burn – Patience you must have my young Padawan….  oops sorry I may have geeked out a little there!

Once the onions are soft and golden brown add the mushrooms and cook until the mushrooms are tender.  Add back the bacon, taste and season if necessary.  You probably won’t need any salt because of the bacon.

elkheart14

Now cook the liver.  You are going to cook it as if it was the finest steak – as rare as you can bear to eat it.

Heat the bacon-fat in a large skillet over a high heat.  Add the heart in a single layer and cook briefly until browned – no more than 2 minutes per side.  Less if you can.  Ideally you just want to sear it.  Turn and cook the second side.

elkheart8

Allow to rest for 5 minutes then serve topped with the bacon, onion and mushroom mixture.

For the oven roasted sweet potato rounds:

elkheart2

2 large sweet potatoes, sliced in to rounds

2 tbsp fat of your choice (I used coconut oil)

sea salt

Ideally, you will have started these before starting to cook the heart as they will take 40-50 minutes to cook.

Preheat the oven to 375F/190C.  Place a rimmed baking tray in the oven with 2 tbsp fat of your choice.  While that is heating and the fat is melting, slice the sweet potatoes in to 1/2 inch thick rounds – no need to peel them unless you want to.

Once the fat is melted, sit the sweet potato rounds on the tray in a single layer.  Sprinkle with a little salt.

Pop in the oven and bake for around 20-25 minutes until the bottom of each slice is golden brown.  Turn and repeat with the other side which may not take as long to brown as the first side.

They are cooked when both sides are golden brown and the insides are tender.  Total cooking time – 40-50 minutes.

elkheart1

For the greens:

2 large bunches of ruby chard

1 tbsp fat of your choice (I used bacon fat)

sea salt

1/2 cup bone broth (I used chicken bone broth)

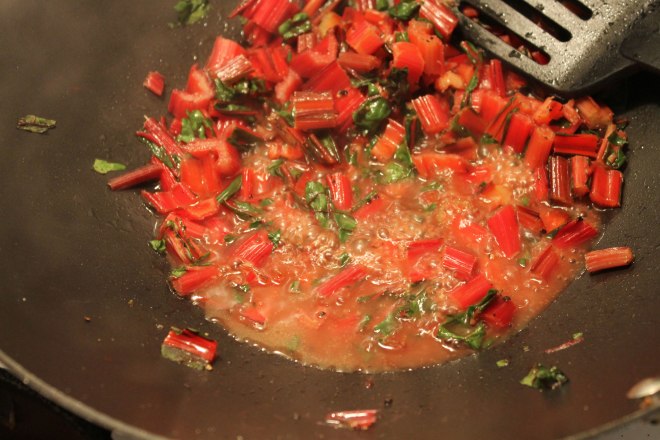
For the greens, trim the bottoms of the gorgeously red stems and cut off the green parts.  Don’t discard the stems  – we are going to cook those too.

Melt the fat in a pan (I like to use a wok to cook greens) and while that is melting slice the stems into small bite-sized pieces.

elkheart16

Throw in the pan with the fat and stir briefly.  Then add the bone broth and allow to bubble.  What you are essentially doing is steam-sauteeing the stems to tenderize them.

elkheart13

When the liquid in the pan is reduced to almost nothing, season to taste with a little salt,  and then toss in the greens.

elkheart12

Toss and stir-fry until there is no liquid in the pan and the greens are wilted and tender.

elkheart10

Serve at once.

I put a bed of the cooked greens in the center of each plate and topped it with some of the elk heart.  And then I put a big spoonful of the caramelized onion/bacon/mushroom topping on top.

elkheart7

And finally I put 3 of the sweet potato rounds on each plate.

elkheart3

And as for J – what did she do about the mushrooms?  She was told to pick them out and leave them on the side of her plate, which she did with a disgusted look.

The Paleo-Vegan – a contradiction in terms!

Several times this week I have encountered people who are claiming to be both Paleo AND Vegan.

The first was a 14 year old girl.  She was celiac, so she would not be eating any wheat.  But she was getting all her protein requirements from pulses….  HELLO?  Pulses are NOT Paleo!  What she is is a grain free vegan or a celiac vegan.  What she is NOT is a Paleo-vegan.

And there have been others like her.

I am sorry, but it is impossible to be a Paleo-vegan.

You just cannot do it.  If you are vegan, you get your protein from soy, pulses and grains – all plant based sources because you do not eat any animal products.

If you are paleo, you get your protein from animal based products – meat, fish and eggs and you avoid soy, pulses and grains.

The 2 are simply not compatible.

I think even being a paleo vegetarian would be very hard to do – while you can eat eggs, dairy is not Paleo.  So you would have to get your entire daily protein allowance from eggs.   And I think you would get sick of eggs mighty fast in this case.   It might be slightly easier if you were primal and ate some dairy as well, but even then it would still be very hard going.

A pescatarian might be able to do it though.  They eat fish, so you could limit your food choices to fish and seafoods, eggs, veggies and the good fats…  and a diet high in wild caught oily fish would be very healthy.

But for me, I choose not to limit the animal protein I eat, but I do avoid grains, pulses, dairy and mass-produced food.  I eat lots of veggies with moderate amounts of fish, meat and eggs, along with some healthy fats (avocado, coconut, olive oil etc).

And that is what makes me Paleo.

So why do they claim to be Paleo when they are so blatantly not?

I have no real idea, but I suspect it is because Paleo is becoming more and more popular.  Veganism has always been seen as hip and trendy.  They are jumping on bandwagons…

But they are failing to understand what Paleo is….

Garlic, Leek And Watercress Soup

Yet another soup that I made for lunch…  I am not kidding when I say that it is the thing that I make most commonly for that meal!

This post on Marks Daily Apple made me remember how hubby and I used to eat garlic soup after a night of drinking down at the Student Union when we were at university.  I know, drinking is not good for you  but actually due to limited budgets we didn’t drink all that much.

I didn’t have any chives to make the chive oil, and J, with her horror of mushrooms, would have refused to eat it if I had included those. So I couldn’t recreate the soup I linked to above.

So I decided to attempt to re-create the creamy garlicky soup that we used to eat way back then, just using more Paleo-friendly ingredients.

The watercress was a bit of an afterthought – I saw it in the fridge while rummaging for ingredients and decided to use it on a whim.  Our original soup was garlic, onions, leeks and thickened with potato.  Obviously I was not going to use potato to thicken an AIP soup, so I substituted cauliflower.  And I used coconut milk in place of the cows milk that I would have used back in Leeds.

That resulted in the following recipe, which was delicious.

Garlic, Leek and Watercress soup

Serves 6 with leftovers for the next day

garlicleekwatercresssoup

1 tbsp fat of your choice (I used coconut oil)

1 onion – chopped

1 leek – chopped (wash the leek well, they often have grit trapped in the layers.  Gritty soup is not pleasant!)

2 whole bulbs of garlic (around 15-20 cloves) – crushed

1 bunch green onions – chopped

1/2 head of cauliflower – chopped

1 1/2 jars bone broth (this was a chicken bone broth made from a leftover chicken carcass)

1 tsp fresh thyme – chopped

1 tsp fresh sage – chopped

1 tbsp fresh parsley – chopped

salt to taste

1 bunch watercress – chopped

1 can coconut milk (make sure it does not contain any non-AIP ingredients – read the label.  You want a can that only contains coconut and water).

Melt the fat in the largest pot you own…  Add the onion and leek and cook gently for 3-5 minutes until the onion is soft and translucent – you want the heat to be no more than medium.

The throw in the garlic, green onions and cauliflower.  Toss it all around for a couple of minutes and tip in the bone broth.  Season to taste, but remember it will reduce slightly so don’t add too much salt.

Add the fresh herbs (back in Leeds I would have used a tsp or two of mixed dried herbs – I didn’t have the luxury of having fresh herbs growing in the garden!).

Let it all simmer gently for 20-30 minutes until everything is soft.

Add the watercress and the coconut milk and blitz with a stick-blender until it is all smooth.

Reheat gently and check the seasoning.

And serve at once.

This soup is great hot, and is also very good cold, but because of the huge amounts of garlic I don’t think I could get away with eating it at work…  no one wants a massage therapist with garlic breath!

Shared at Paleo AIP Recipe Roundtable #22

Work….

Today was not a good day at work…. I left at 8:45am because according to the schedule I had a massage booked at 9:45.
By the time I got to work at 9:30, the guy had already cancelled (not cool folks!!! give us some notice if you are going to cancel!!!! 30 mins is NOT enough! the clinic does not open until 9am). then my next scheduled appointment was an RTA at 11…. he was a no show… (GRRRRRR means I did not get paid for that one either!… again not cool! If you book SHOW UP! even if it is not costing you a penny because your insurance is paying- if you don’t show up I don’t get paid!).
Then there was a HUGE gap… next massage was a 45 min one at 2pm…, followed by a 60 min at 3pm and finally a 60 min at 4:40… and I eventually got home at nearly 7pm… a long, long day with only 3 massages due to people messing me around – and lots of time wandering around downtown getting bored.  And I didn’t get paid much because it was only 2.75 hours of massage…  REMEMBER, massage therapists are mostly contractors, we only get paid when we do massages…  you mess us around, we loose money!

I am not annoyed with the front desk/reception ppl – they can’t control the cancellations and no shows – just that people wasted my time and meant I spent more than I needed in coffee shops because people were inconsiderate! And I HATE inconsiderate people!

please guys, if you book a massage keep that appointment! your therapist will thank you for it!

Avocado Eggs

Eggs are one of natures wonder foods, and we often eat them for lunch or breakfast in our house.

They are cheap, economical and very tasty.  They are also very quick to prepare, which makes them an ideal go-to food for a busy parent…

And as I mentioned in this post, there is no reason to fear the cholesterol in the egg yolk – eating eggs has been demonstrated to not raise blood cholesterol levels or increase the risk of heart-disease in more than a few studies.

But eating the same egg dish again and again and again gets boring very quickly.  So I try to mix things up and do something different with our eggs.

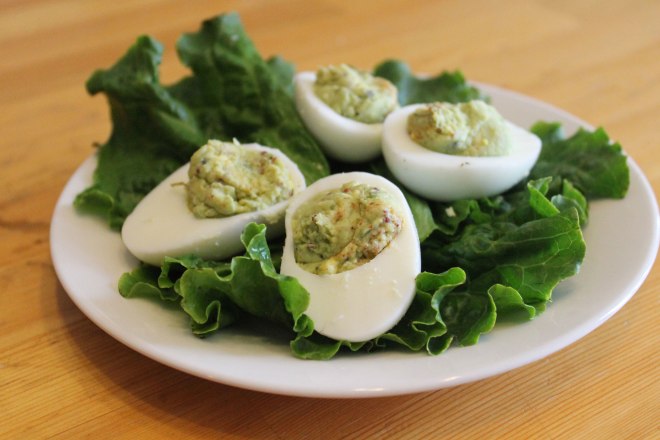
Which brings me to Avocado Eggs.

Egg yolks are rich in healthy fats, avocados are also rich in healthy fats.  So why not mix the two together?

These are quick and easy to make for breakfast or lunch and make a great snack for the kids.  If you could work out how to pack them so that they don’t get squished and the avo-yolk mixture doesn’t go everywhere they could make a really healthy lunch-box choice as well.

Whole eggs are a stage 2 reintroduction to AIP.  When reintroducing foods on the AIP, I recommend this guide.

Avocado Eggs

makes 12 half eggs

avoeggs3

6 eggs

1 large avocado (the riper the better)

1 tbsp lemon juice

1 tbsp olive oil

salt and freshly ground black pepper

1/4 tsp cayenne (or to taste)

Take your eggs and hard-boil them – submerge them in cold water and bring it to the boil.  Reduce the heat to a simmer and cook for 10 minutes.  Drain and submerge in cold water to cool them fast (this stops you getting that nasty grey ring around the yolk).  I find that if I crack the shells while they are cooling, that the shells will come off more easily.  Oh and fresher eggs are harder to peel the shells off – use your really fresh eggs for soft-boiled “dippy eggs” and your older ones for hard boiled ones!

Once the eggs are cool, shell them and cut in half.  Pop the yolks out into a food processor.  Add in the peeled and stoned avocado and all the rest of the ingredients and pulse until it is smooth and creamy.

Now you are going to transfer this green creamy goodness back into the hollows that the yolks left in the whites.  I find this easiest to do using a piping bag, but if you have not got one you could either spoon it in or improvise using a small sandwich bag with one corner cut off to allow the mixture to be squeezed into the whites.

Arrange these babies on a bed of lettuce and serve at once.

avoeggs1