Turmeric-Avocado Deviled Eggs

This is the second batch of deviled eggs that I made for the Ostara Potluck I attended.

ye2
The first batch was the Pink Deviled Eggs I wrote about a few days ago.

Unlike the pink eggs, which used leftover beet brine, I made a fermented turmeric brine especially for these eggs.  They will need to be started at least 2 weeks in advance of when you want to serve them in order for you to have time to ferment the turmeric brine.

But the results are worth it!

Turmeric adds the yellow colour to the outside of the eggs, and is also a powerful antioxidant and anti-inflamatory.

The avocado not only provides the green creamyness to the yolk filling, it also provides some heart-healthy monounsaturated fats, a ton of nutrients and yet more anti-inflammatory properties.

These are a stunning contribution to a potluck, but also make great snacks and would look wonderful on an Easter buffet table.  They would also be good for breakfast or in packed lunches.

You could also just eat the turmeric pickled eggs whole without going to the trouble of cutting and filling them with the avocado mixture.

Whole eggs/egg whites are an AIP stage 2 reintroduction, so if you are following the AIP plan, you will need to wait until you have successfully reintroduced egg yolks and egg whites before eating these.  When reintroducing foods on the AIP, I recommend this guide.

Turmeric Avocado Deviled Eggs

Makes 24 halved eggs

YE4

To make the turmeric brine:

  • 2 TBSP pink Himalayan salt
  • 1 small carrot – sliced – peel if not organic
  • 2″fresh root ginger – sliced thinly
  • 2″ fresh turmeric root – sliced thinly
  • 4-5 slices fresh horseradish root
  • 3 cloves garlic – peeled
  • 3 bay leaves
  • 2 sprigs fresh rosemary
  • 2 sprigs fresh thyme
  • 1 cabbage leaf (to weigh down the veggies to ensure they all stay underneath the brine)

To make the eggs

  • 1 dozen eggs – preferably free-range/pastured/soy-free

To make the filling

  • 1 large ripe avocado – peeled and diced
  • sea salt to taste
  • 1 tbsp fresh parsley – chopped
  • 1 tbsp fresh basil – chopped
  • 1 tbsp fresh chives – chopped
  • 1 tbsp fresh thyme – chopped
  • 1 clove garlic
  • 2 tbsp lemon juice
  • 2 tbsp extra virgin olive oil

The first thing that needs to be done is that the brine needs to be made and fermented.  This needs to be started at least 2 weeks before you want to serve the eggs.

Take all the brine ingredients, except for the cabbage, and put them in a quart mason jar.  Add filtered water to cover and mix well to dissolve the salt.  Tuck the cabbage leaf on top of the veggies to hold them down under the brine.  If necessary weigh this down with a small jar or shot-glass filled with brine.

YE1

Cover and leave to stand at room temperature for at least 7 days.  It may get fizzy and bubbly as the naturally occurring cultures start to ferment the sugars in the veggies and herbs.  This is normal.  Open the lid every now and again to release the gas.

Once the brine is fermented to your liking, strain out all the solids, reserving the fermented brine.

Take the dozen eggs, and place them in a pan with cold water.  Bring to the boil, reduce the heat and simmer for 10 minutes.

Drain and place in cold water.

Once the eggs have cooled enough to handle, peel off the shells and pack the eggs in a large mason jar.

Carefully pour over the brine to cover the eggs.

Place the eggs in the fridge and leave to “pickle” for 5-7 days.

To make the deviled eggs…

Drain the eggs from the brine.

Cut each egg in half lengthwise and carefully scoop out the yolk.

Mash the yolks with the avocado.

Place the herbs, garlic, lemon juice and the olive oil in a blender or food processor and puree to a paste.

Add the herb puree to the egg yolks and avocado and mix well.

Season to taste with sea salt.

ye3

Carefully spoon or pipe the green mixture back into the egg whites and arrange on a serving platter.

Shared At Full PlateThursday

Shared at Home & Garden Thursday

Shared at All Things Thursday

Shared at Pure Blog Love

Shared at Natural Family Friday

Shared at What to do Weekends

Shared at Simply Natural Saturday

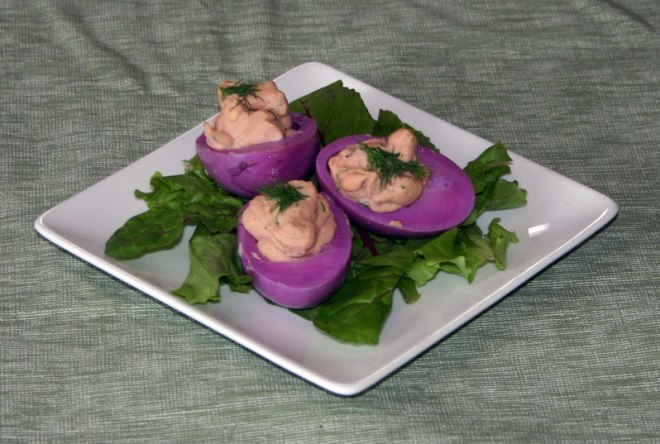
Pink Deviled Eggs

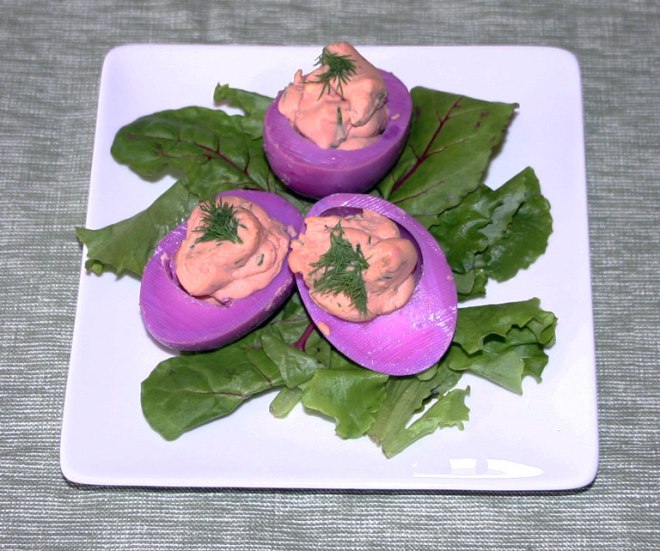
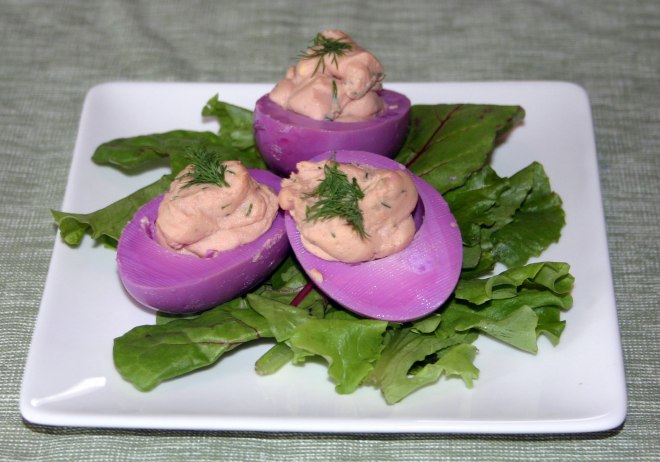
This is an unusual way to prepare eggs, but it is both delicious and very striking to look at.

I made these for a Ostara celebration that I attended.

bpe3

They would also be perfect for Easter, and would make a stunning addition to a brunch table.  I also made some yellow deviled eggs as well, but they are a separate recipe.

They also make great appetizers or snacks.  Kids love them due to the unusual colour…

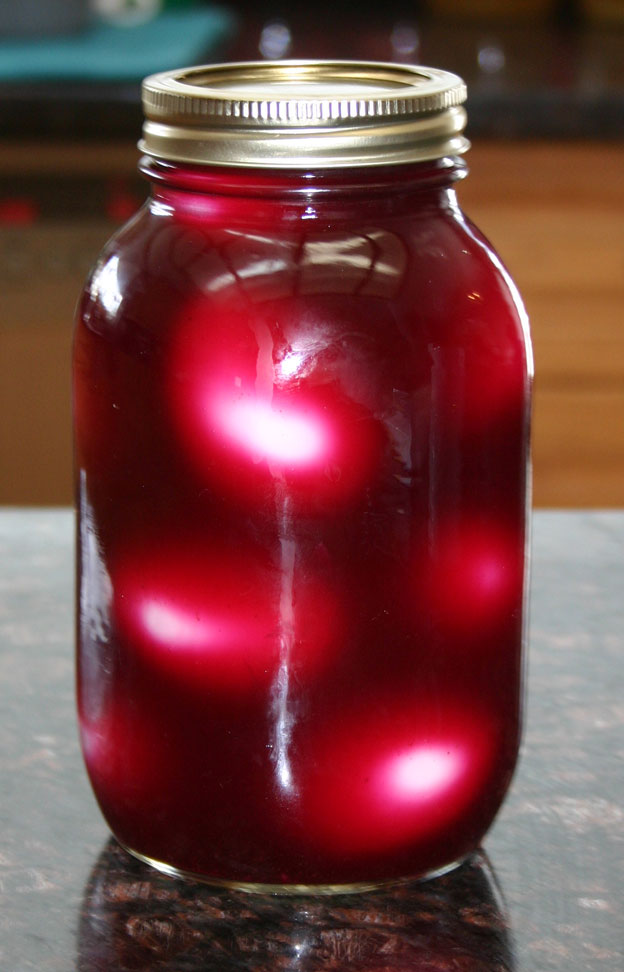
The striking pink-purple colour is 100% natural, and comes from soaking the cooked and peeled eggs in leftover beet-brine or beet kvass.

BPE1

The eggs need to soak in the brine for several days  – the longer you soak them, the more the whites take on the colour – I left these in the brine for 7 days, and as you can see, the purple-pink colour penetrated all the way to the yolks.  In fact, the yolks were stained slightly pink at the edges.  I suspect that leaving them in the brine for even longer would result in pink yolks as well.

If you also need to make the beet brine or kvass, you will need to start these at least 2 weeks in advance.  The recipe for the beet brine/kvass can be found here.

While these are not 100% AIP (egg yolks are a stage 1 reintroduction, and egg whites are a stage 2 reintroduction), if you have successfully managed to reintroduce eggs, you could enjoy these beauties.  When reintroducing foods on the AIP, I recommend this guide.

Pink Deviled Eggs

makes 2 dozen halved eggs

BPE2

  • 1 dozen eggs
  • beet brine or beet kvass to cover
  • ¼ cup homemade mayonnaise
  • ¼ cup coconut milk yoghurt
  • 2 tbsp fresh dill – chopped
  • salt and black pepper to taste (black pepper is a stage 2 reintroduction – omit this if sensitive to it)
  • dill sprigs to garnish

Place the eggs in a pan and cover with cold water.  Bring to the boil, then simmer for 10 minutes.

Drain the eggs and cover in cold water.  Leave to stand until completely cold.

Remove the shells from the eggs, and place them in a large mason jar.  Cover the eggs with the beet brine/beet kvass, and put on a lid.

BPE1

Store the eggs in the fridge for between 3 and 7 days.  The longer you leave the eggs, the more colour the whites will take.

To make the deviled eggs, drain off the beet brine/kvass.

Slice each egg in half, lengthwise and scoop the yolks into a bowl.

Mash the yolks with the mayonnaise and coconut milk yoghurt until smooth.  Season with salt and black pepper, and stir in the dill.

Spoon or pipe the yolk mixture back into the whites and garnish with a small sprig of dill.

bpe4

Keep in the fridge until you are ready to serve, and be prepared to explain to everyone how you achieved that wonderful colour!

Shared at Mostly Homemade Monday

Shared at Fat Tuesday

Shared at Tuesdays With a Twist

Shared at Corn Free Everyday

Shared at Handmade Tuesday

Shared at Simple Life Sunday

Shared at Show and Share

Shared at The Art of Homemaking Mondays

Shared at Wildcrafting Wednesday

Shared at Homestead Blog Hop

Shared at Full Plate Thursday

Shared at Home & Garden Thursday

Shared at All Things Thursday

Shared at Awesome Life Friday

Shared at Simply Natural Saturday
Paleo Breakfast Sandwich

Back in the days before I was Paleo, I used to love a Tim Hortons Breakfast sandwich.  I usually got the sausage biscuit one with no cheese.

But these are not paleo – they contain gluten that I react to and dairy that I am allergic to.

I do find that I miss them though – and sometimes you want a portable hand-held breakfast.

I came up with this breakfast sandwich the other day, it is paleo, but not AIP as it contains eggs.  This recipe is both gluten and dairy-free as well.

It is essentially a fried egg and bacon sandwiched between 2 gluten-free pancakes.

And it was very, very tasty!

This recipe makes 6 sandwiches.  If you do not need this amount, you could just make up the 12 pancakes and freeze the extra ones to eat on another day.

These are an AIP stage 2 reintroduction.  When reintroducing foods on the AIP, I recommend this guide.

Paleo Breakfast Sandwiches

makes 6 sandwiches

BS9

For the pancakes (makes 12):

  • 2 large eggs
  • 3 tbsp coconut milk
  • 1 ripe banana – mashed
  • ½ tsp apple cider vinegar
  • 1½ tbsp coconut flour
  • ¼ tsp baking soda
  • pinch of sea salt
  • coconut oil or bacon fat to cook

For the breakfast sandwiches:

The first thing you need to do is to make the pancakes.

Mix the eggs, coconut milk, banana and apple cider vinegar, and beat well until smooth.  Add the coconut flour, baking soda and salt and beat well.

Melt a little coconut oil or bacon fat in a large skillet.  Add 1 tbsp portions of the batter to the skillet (you can cook several at once – I usually cook 4 at a time).  Cook over a medium high heat until small bubbles start to form on the top of the pancake.  This will take around 1½ –  2 minutes.  Flip the pancakes and cook until golden brown on the other side – ½ – 1 minutes.

Remove the pancakes from the skillet and keep them warm while cooking the remaining batter.

Once all your pancakes are cooked, add the bacon to the skillet and cook until crisp.

Remove the bacon, reserving as much fat as possible.  Keep the bacon warm while you cook your eggs in the bacon fat.  Cook them to the stage you like – I like my eggs with runny yolks (over-easy), but if you like them cooked hard, cook them that way.

To assemble the breakfast sandwich you place a pancake on a serving plate.  Top with a little paleo ketchup if using.  I added this for Hubby and the kids sandwiches, but not for mine.

Cut each rasher of bacon in half and place 4 halves on top of each sandwich.

Now place the fried egg on top and add the second pancake to make a sandwich.

BS8

Eat at once, trying to not get egg-yolk all down your front.

Sweet Potato French Toast Frittata

This recipe is based on one that was posted on a facebook group that I am a meView Postmber of.

It is absolutely delicious, and it really DOES taste like French toast.  But without all that gluten.

My kids absolutely LOVED this when I made it for breakfast the other day – it was a good way of getting some healthy carbs and protein into them.

This recipe contains whole eggs, and as a result is an AIP stage 2 reintroduction.  When reintroducing foods on the AIP, I recommend this guide.

Sweet Potato French Toast Frittata

serves 4-6

swpf1

  • 1 large (or 2 small) sweet potatoes – peeled and grated
  • 2 tbsp coconut oil
  • 1 tsp cinnamon
  • 8 eggs
  • 100% maple syrup to serve

Melt the coconut oil in a large skillet, then add the sweet potatoes.  SAute over a medium-low heat for 5 minutes until it is tender.

Beat the eggs with the cinnamon and add to the sweet potato.  Stir briefly to mix it all together, then cover with a lid and allow to cook for 5 minutes.

Remove the lid and brown the top under a broiler until golden brown.

Serve cut in wedges and drizzled with maple syrup.

I did not manage to get a photograph of this served on the plates – they devoured it far too fast and it was gone before I had managed to get the camera out!

Omelette in a Jar

I love food in mason jars – there is just something cute about them.  But it is also a practical way of taking food to work.

The other day, I knew I would not have time to eat breakfast before running out of the door to get to work.  So the night before I threw together this cute mason jar omelette that I put uncooked in the fridge.  Next morning, all I had to do was grab it and go.  Once I was at work, I removed the lid, popped it in the microwave and cooked it.

An easy, tasty and nutritious breakfast.

If you like, you could probably make a batch of these up at the weekend, one for each workday and store them in the fridge until required.

These would not just be good for breakfast though – they would make a delicious lunch too.

This is an AIP stage 2 reintroduction recipe due to the whole eggs.  When reintroducing foods on the AIP, I recommend this guide.

Omelette in a Jar

makes 1

OJ2

  • 2 eggs – preferably pastured/free-range/organic
  • 1 tbsp coconut milk
  • 1 cooked rasher of bacon
  • 1 cooked sliced mushroom
  • 1 green onion – chopped
  • 1 clove of garlic
  • sea salt and freshly ground black pepper to taste.

Whisk together the eggs and coconut milk.  This can be done directly in your jar.

Crumble the bacon and add to the jar with the remaining ingredients and stir to mix.

If not cooking this immediately, seal with a mason jar lid and store in the fridge.

When you want to cook and eat your omelet, remove the lid and microwave for 1-2 minutes until cooked.  I cooked it for 1 minute and then checked it at 15 second intervals.  It took 1 minute and 45 seconds to cook mine in total, but the timing will really depend on your microwave.

OJ4

Eat at once.  Be warned, the outside of the jar does get hot.

OJ1

I know some people are suspicious of using microwaves to cook or even reheat food, but there is really no need to avoid it when you need to.

There is not one single peer-reviewed scientific study that shows that microwaves are unsafe or that using one to cook/reheat your food makes your food unsafe.

In the Paleo Approach, Sarah Ballantyne, a scientist, published author and paleo blogger that I really respect, states that use of a microwave is safe and that there is no degradation of nutrients in the food, and that it could even be better than conventional cooking in some cases.

This agrees with Mark Sissons approach in this post on Marks Daily Apple, although he does conclude that it is better to use a microwave judiciously.  If you can heat or cook your food in another way, it may be better to do so rather than using the microwave.

There are plenty of other sites that agree with both of them about microwave safety.  See this, this, and this.

It seems as if the biggest danger to using a microwave is the container that you are cooking in – some plastics, unless they are labeled “Microwave safe” can leach undesirable chemicals into your food.  The simplest way to deal with this is to not use plastic as a container when cooking in a microwave – Using a glass mason jar should not be a problem however.

As for the urban legend about microwaves being banned in certain countries, it is just that – an urban legend.  Microwaves were only banned in Russia for a very short period in 1976, and not because of safety concerns.  There is no country in the world today that currently bans microwaves.

The other reason I have heard cited is that it is not recommended that you heat a baby’s bottle in a microwave – the reason given for this is that it damages the milk in some unspecified way…  This is not true.  The reason they say not to heat the bottle in a microwave is because microwaves do not heat food evenly.  This can cause hot spots in the milk which can result in serious burns to the baby’s mouth.  It is a safety concern, not a nutritional or health concern.

Having said all this, I do prefer not to use a microwave if I can avoid it – I find it very easy to over-cook foods when using one, and this affects the taste and the texture.  Also overcooking WILL result in fewer nutrients.  It is not the fault of the microwave and is simply because the food is overcooked and that can destroy the vitamin content.  This would happen if you overcooked the food using more conventional means as well.

But when I have no other choice – when at work for example, when the only means I have of reheating or cooking food is a microwave, I do not worry about using one.

Shared at Simple Meals Friday #83

Shared at Whole Food Fridays 5-2-2014

Shared at Waste Not Want Not Wednesday #71

Shared at Real Food Wednesday

Beef Taco Muffins

These are a popular lunch box filler in our house.  They would also be great for a picnic or a snack.  And I guess you could also eat them for a lighter evening meal with a salad as well.  They are good both cold and hot right out of the oven.

My family all love spicy food, so these are a little spicy.  I am sad that I cannot eat them (chilli is a nightshade and is banned on the AIP), but then again, I also cannot eat eggs either…  If you don’t eat chilli or don’t like spice, you can easily leave it out or reduce the amount to your taste.

You cannot leave out the eggs however.

Nightshade spices such as chilli are an AIP stage 4 reintroduction.  Eggs are a stage 2 reintroduction.  When reintroducing foods on the AIP, I recommend this guide.

Beef Taco Muffins

makes around 18 small muffins

BTM1

  • 1lb ground beef (preferably grass-fed)
  • 1 tbsp fat of choice (I used coconut oil)
  • ½ onion – pulsed until finely chopped in the food processor
  • 8 mushrooms – pulsed until finely chopped in the food processor
  • 1 tbsp chilli powder (or to taste)
  • 1 tsp garlic powder
  • 1 tsp paprika
  • 1 tsp ground cumin
  • ½ tsp oregano
  • ½ tsp sea salt salt
  • ½ tsp freshly ground black pepper
  • 2 cups spinach
  • 8 eggs – beaten
  • ¼ cup coconut flour
  • ¼ cup almond flour
  • 1 cup grated cheese (optional)

First of all you need to make your taco meat.  Place the ground beef in a skillet and brown, stirring it often.

Remove and allow any excess fat to drain.  Melt the coconut oil in the skillet, and add the onion and mushrooms.  Cook gently for 5 minutes or so until the onion is softened.  Return the ground beef to the skillet and add all the spices, herbs and other seasonings.  Toss well for 5 minutes until everything is well mixed and heated through.

Turn the ground meat into a large bowl.

Now you need to wilt the spinach (I use the same skillet and just toss it with the water that clings to the leaves after washing it).  Once it is wilted, chop the spinach finely and add to the bowl along with the beef.

Add the eggs, coconut flour and almond flour and mix everything well.

Pour the batter into muffin cups (I like silicone ones), filling each one ¾ full.  Don’t overfill them or the mixture will run everywhere making a mess on the base of your oven!

Top each muffin with a little grated cheese if using (this is not a paleo option, it is more primal, but it does taste good).

Bake in a preheated 190°C/375°F oven for 20-30 minutes until set and the tops are browned.

BTM3

Cool on a wire rack and store in the fridge.

Warm Dandelion Greens Salad with Poached Eggs

We eat a lot of eggs for breakfast – usually with each one of us having 2-3 eggs every single day.

Usually, we eat these as some kind of scramble, but that gets boring pretty fast.  So the other day I decided to do something different for Hubby and myself.

Rummaging in the fridge produced bacon, some dandelion greens and the ever-present eggs.

Once I had those ingredients on the chopping board, it was pretty obvious what I was going to make.

This recipe is a stage 2 reintroduction if you include the eggs.  To make this 100% AIP, elimination stage friendly, you would have to just make the bacon and dandelion greens salad.  When reintroducing foods on the AIP, I recommend this guide.

Warm Dandelion Greens Salad with Poached Eggs

Serves 2

eggbacongreens1

4 rashers of bacon (our bacon comes from the half-pig that we buy from Sprags Meat Shop)

1 large bunch of dandelion greens

a splash of balsamic vinegar

4 eggs (omit the poached eggs if 100% AIP)

boiling salted water to poach the eggs

A splash of apple cider vinegar

Chop the bacon and cook it in a heavy based skillet until the bacon is crisp and the fat has run out of it.

While this is cooking, you want to chop your dandelion greens and place them in a large bowl.

Next, bring the pan of salted water to the boil.  Turn it down to a bare simmer, add the apple cider vinegar and then crack in your eggs.  You are going to cook them at the barest simmer for 3-4 minutes until the whites are set but the yolks are still runny.

Once the bacon is crisp, remove it from the pan and add to the dandelion greens.

Now pour the balsamic vinegar into the bacon fat and swirl it well to mix and form a warm salad dressing.  Pour this over the greens and toss well to coat in the balsamic and fat mixture.

Divide the salad between 2 serving plates and top each with 2 poached eggs and serve at once.

eggbacongreens2

Delicious!

Aside from being a very tasty breakfast, this would also make a good light lunch or dinner.

Shared at:  Full Plate Thursday

Mini Frittatas

These are the Mini Frittatas that I include in our lunch boxes at least once a week.

They are really quick to make, very tasty, and perfect for a packed lunch as they hold up very well to being transported in a lunch box.

These would also make a great appetizer or breakfast dish.

This recipe contains tomatoes which are a stage 4 reintroduction.  When reintroducing foods on the AIP, I recommend this guide.

Mini Frittatas
Makes 12

minifrittata

5oz bacon (try to use bacon from pastured pork, preferably with a sugar-free, nitrate-free cure) -chopped
1 onion – finely chopped
2 cloves of garlic – crushed
8oz button mushrooms – thinly sliced
8oz frozen spinach – thawed and drained (squeeze out as much liquid as possible)
8 large eggs
1/4 cup of coconut milk
3 tomatoes – sliced
Sea salt and freshly ground black pepper
Pinch of nutmeg
Dried basil

Preheat the oven to 190C/375F.

Put the bacon in a large skillet over a medium heat and cook until crispy but not burned. Remove from the skillet, reserving as much of the bacon fat as possible, and set aside.

Add the onion to the bacon fat in the skillet and cook gently until soft and translucent. Add the mushrooms and garlic and continue cooking until the mushrooms are tender. Stir in the spinach and season well with salt and pepper. Add a pinch of nutmeg and stir well. Allow to cool.

In a bowl, mix the eggs with the coconut milk and then stir in the onion/mushroom/spinach mixture and the reserved bacon.

Brush the inside of a 12 cup muffin tin with a little bacon fat or coconut oil, and then spoon in the mixture. Top each frittata with a slice of tomato and sprinkle with a little dried basil.

Cook the frittatas in the pre-heated oven for 20-25 minutes until firm and slightly browned on top.

Allow to cool in the tin for a few minutes before removing and cooling completely.

These taste great cold, but are also good hot. Just heat them up in a microwave for a minute or two.

Packed Lunches (09/09/13)

Today all 6 of us are having exactly the same packed lunch.

lunch09-09-13

Clockwise from top left we have:

In addition to this, Hubby also took a 1/4 cup of walnuts in his mini-dipper as a snack, and A took a half cup of mixed frozen berries in her large dipper.

One-Pan Sweet Potato Breakfast Skillet

We went hiking today, and this was the breakfast that I made for all of us before we left.  It is loosely based on this recipe by the Civilized Caveman, but I made a few tweaks.  It was very filling, and kept us all going from 8am until the time we returned to the car at around 1:30 despite some fairly strenuous exercise.  It would probably also make a filling lunch.

Whole eggs are an AIP stage 2 reintroduction.  When reintroducing foods on the AIP, I recommend this guide.

One-Pan Sweet Potato Breakfast Skillet

Serves 6

sweetpotatoskillet1

2-3 tbsp bacon fat

1 onion – finely chopped

2 sticks celery – finely chopped

3 cloves garlic – crushed

1lb breakfast sausage patties (aprox 6)

1 red pepper – chopped

1 bunch green onions – chopped

1 sweet potato – peeled and grated

2 big handfulls spinach leaves

7 eggs

salt and pepper to taste

Heat the bacon fat in a 12″ cast-iron skillet over a medium heat and add the onion and celery.  Cook gently for 4-5 minutes until they are softenend and starting to turn translucent.

Add the garlic and cook for a few seconds.  Add the breakfast sausage, breaking the patties up into small pieces.  Cook until browned and cooked through.  This will take about 5 minutes.

Add the pepper, green onions and sweet potato and cook for 5-10 minutes until the sweet potato is tender.

Mix in the spinach and cook until wilted.  Season well.

Make 7 hollows in the mixture in the skillet and crack and egg into each one.

Season the eggs and then place under a hot broiler until the eggs are just cooked.  3-4 minutes gave me runny yolks and just set whites.

Serve at once.