Beet, Pumpkin and Tomato Soup (AKA “Blood Soup”)

This tasty and seasonal soup is not called “Blood Soup” because it contains blood…. it is because the rich red colour resembles blood.  And because it has become a family tradition that I serve it every Halloween for dinner…

blood1

Because you HAVE to have gorey and scarey food at Halloween.  Just like a soup that might imply you are eating blood even when you are not!

And the best thing is that this is a nutritionally dense, filling meal that will help mitigate some of the adverse effects of all that candy.  Plus, if you fill them up BEFORE they go out, they are going to eat less candy anyway…  win-win!

This soup uses up the pumpkin you will produce while carving your Halloween Pumpkin.  And I like to garnish it with a few of the roasted pumpkin seeds as well…

This recipe is a stage 4 reintroduction because it contains tomatoes.  When reintroducing foods on the AIP, I recommend this guide.

Blood Soup (Beet, Pumpkin and Tomato)

Serves 6 with leftovers

blood4

  • 1 tbsp fat of choice – I used coconut oil today
  • 1 onion – chopped
  • 3 cloves garlic – diced
  • 1″ piece of fresh root ginger (grated)
  • 2 cups diced pumpkin (use the leftovers from scraping out your Halloween pumpkin!)
  • 2 cups diced beets
  • 1 cup leftover diced ham (optional – I added it because we had it in the fridge.  You could also sub in bacon)
  • 1 28oz/796ml can diced tomatoes
  • 3 cups rich bone broth
  • 1/2 tsp cinnamon
  • 1/2 tsp dried basil
  • 1/2 tsp dried oregano
  • 1/4 tsp nutmeg
  • 1/4 tsp dried sage
  • salt and pepper to taste

Take the fat and melt it in a large pan.  Add the onion and cook for 4-5 minutes over a medium heat until it is starting to soften and turn translucent.  Add the garlic and ginger, the ham, pumpkin, beets and the can of tomatoes.  STir it all around and add the bone broth, herbs and spices and season well to taste with salt and black pepper.

Simmer for 30-40 minutes until all the vegetables are tender.

Puree with an immersion blender by which time it will be a bright red colour.

I like to serve this with a little milk kefir over the top (I use coconut kefir for mine due to my issues with dairy that does not seem to affect the rest of the family), and then I sprinkle it with some of the roasted pumpkin seeds as a garnish.

blood3

Add some gluten-free bread on the side and maybe some oven-roasted bacon-wrapped sausages (Witches fingers) and you are good to go.

Happy Halloween!

So are you ready for the hoardes of kids?

I am giving out glow-sticks and glow-in-the-dark bracelets that I bought from the dollar store.  For around $20, I have enough for 50 kids…

I am planning on letting my kids go out trick or treating, but I will go through what they bring back.  Any gum is being removed right away.  Then I will allow them to choose 2-3 pieces of candy that they can eat.  The rest (and the gum, which I personally HATE) is going down to the dentist tomorrow morning as they do a buy-back scheme.

Other options, which works for younger kids, is to have a visit from the Switch Witch, who takes away candy and leaves a gift in it’s place….

I have done the decorations, although most of them got covered by snow (bones, gravestones etc on the front lawn.

But here is “Bones McCoy” taking his ease on the front porch:

hall2013d

And of course we have the obligatory Pumpkin:

halloween2013c

And a HUGE scary spider in a web right by the front door…

halloween2013a

And what to do with the seeds and “pumpkin guts” that you scrape out of the pumpkin?

You roast them of course….  no need to waste them at all, they are delicious and healthy!

pumpseed1

First up, you need to cut the top off your pumpkin (or you could do what I did and cut a hole in the back of it).  Scoop out all the seeds and “Guts” and set them aside until after the pumpkin is carved.

Now you pick through those pumpkin guts, throwing away all the orange squishy, stringy bits and saving all the seeds.

The seeds in the picture up above are from 1 small pumpkin.

Place the seeds on a rimmed baking tray and add 2-3 tbsp coconut oil (you could use other fats as well) and a sprinkling of sea salt.

Now roast them in a 190°C/375°F oven for 20-30 minutes until they are crispy and golden brown.  Toss them every 10 minutes or so and watch them right at the end so that they don’t burn.

Allow to cool and serve as a healthy snack.

These would be great in tomorrow’s lunch box, but I am most likely going to use them as  garnish on the beet, pumpkin and tomato soup (affectionately known in our house as blood soup), that I am serving for dinner

The kids dressed up to go trick or treating of course…

C went as an axe-murderer, wearing a blood-stained t-shirt and wristlets, and carrying a plastic axe.

hall2013i

J went as the Grim Reaper:

hall2013h

And B was a mummy:

hall2013e

I didn’t manage to get a picture of A.  She escorted the younger 2 around the neighbourhood wearing a black evening dress, black boots, black gloves and a long black cloak.


Crispy Pork Belly

I love pork belly… the crispy crackling, the juicy, unctuous fattiness of the meat…  I particually like it when it is prepared Asian style. The other day I made some pork belly for dinner, and it was just delicious!  It is also a very economical cut of meat….

porkbelly1

This recipe is not Paleo because it does use soy and also miso, but I am OK with using them occasionally…  fermented soy products are not as problematic as unfermented soy as the fermentation process breaks down many of the anti-nutients.  And the soy sauce I buy is both wheat-free and naturally fermented.  And miso, being a fermented product will actually provide a certain amount of gut-friendly probiotics as well.  This post gives a good argument for including some fermented soy products in your diet occasionally.

You could substitute coconut aminos for the soy sauce, but there really isn’t a substitute for the miso, and it does provide a good flavour along with thickening the paste that you are going to rub over the pork.  Leave it out if you must, but use extra coconut aminos in this case.  It won’t be as thick, so you may have to sit the pork in the marinade rather than rubbing it over the meat.

If you need a Paleo or AIP Crispy Pork Belly recipe, please see my other post, Crispy Pork Belly Revisited.

This recipe does take a fair bit of advance preparation…  for best results plan on starting it the day before you want to eat it….  it is worth the wait!

Crispy Roasted Pork Belly

serves 6

porkbelly1

  • 2kg pork belly (for us this was 3 large pieces) – skin on
  • 1 tbsp sesame oil
  • 1 tbsp salt
  • 4 tbsp miso
  • 2 tbsp five-spice powder
  • 2 tbsp honey
  • 2 tbsp soy sauce (you could substitute coconut aminos if you prefer)

Score the skin on the pork belly, cutting through the skin but not the thick layer of fat.

porkbelly7

Place the pork belly skin-side up on a wire rack over your sink.  Pour a kettle-full of boiling water over the pork to scald the skin.  It is this step that makes the crackling so crunchy and crispy.

Dry the skin well with paper towels and place the pork, uncovered, in the fridge for 2-3 hours to dry the skin out.

After 2 hours, remove the pork, mix the miso, five spice powder, honey and soy sauce and rub all over the flesh side of the pork.  Do not rub it into the skin.  Place the pork, skin side up on a wire rack in a roasting tin.  Place this back in the fridge for several more hours. If you can leave it overnight, so much the better.  The longer you leave it, the dryer the skin becomes and the more it will crisp up.

When the time comes to cook your pork, preheat the oven to 180°C/350°F.

porkbelly6

Rub the skin of the pork well with sesame oil and scatter with salt.

Roast the pork, skin-side up in the oven for 1½- 2 hours until the meat is cooked and tender.  Increase the oven temperature to 220°C/425°F and continue roasting for 15 minutes until the skin is crispy

Remove from the oven and allow to rest for 15 minutes while you prepare the accompaniments.

Serve cut into 1cm thick slices.

porkbelly4

Serve on a bed of stir-fried vegetables (I used bok choy) with a chilli-garlic dipping sauce.

Chilli Garlic Dipping Sauce for Roast Pork Belly

serves 6

porkbelly5

  • 3 cloves of garlic – finely chopped
  • 1-2 birds eye chilli peppers – finely chopped
  • 4 tbsp apple cider vinegar
  • 2 tbsp fish sauce
  • 1/2 tbsp honey
  • 1 tbsp soy sauce
  • 1 tbsp chopped cilantro

Mix all the ingredients well and serve with the pork belly

How to prepare herrings and sardines

Oily fish is very good for you, there is no getting away from that.  Rich in heart and brain-healthy omega3 fatty acids, they can also be a cheap source of protein.

I can buy enough herrings to feed my family for just $5.99.  It would cost me 3 times that amount to buy salmon fillets

The only downside is that the fish need cleaning and preparing, and that can be a little daunting if you don’t know how to do it.

This is how I prepare these small fish.  I will warn you now, this is a very picture-dense post as Hubby was taking pictures as I was actually gutting and preparing the fish.

This exact same method can be used for any of the smaller oily fish – I prepare sardines, sprats, pilchard, herring and mackerel this way amongst others.  Even small trout can be prepared this way and it is much easier than the traditional method of filleting.  But in this post I am using herring.

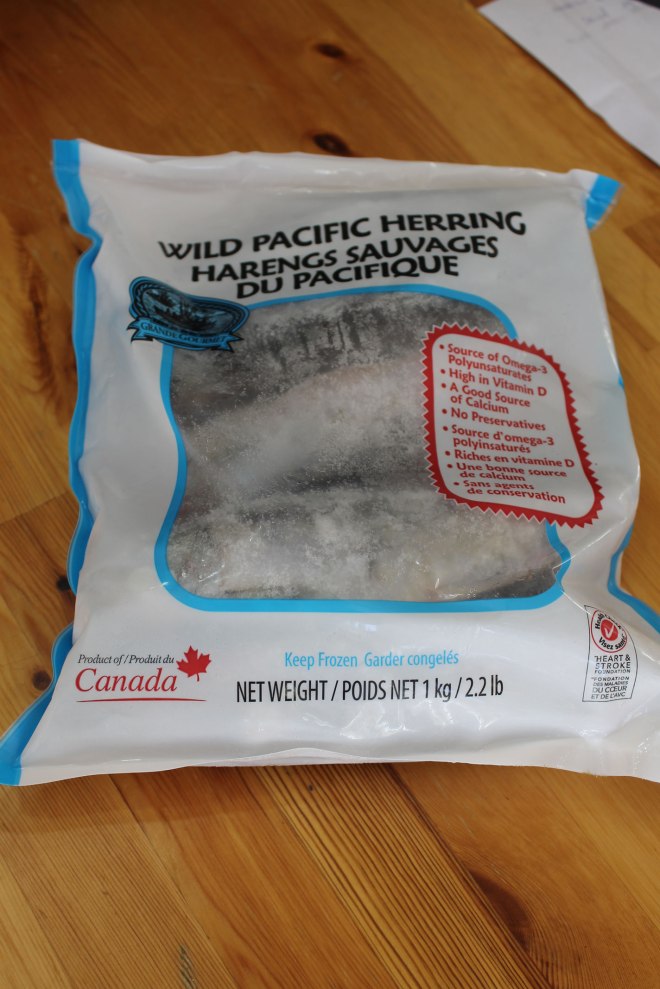
The fish were frozen when I bought them – living in land-locked Alberta, it is very hard to buy unfrozen fresh sea-fish.  And these small oily fish go bad very quickly, so it is best for me to buy them frozen.   A 1kg (2.2lb) bag costs me $5.99, and usually contains around 12 fish…  2 per person, which makes for a very satisfying meal.

herr32

So I thawed the bag of fish out by leaving it in the refrigerator overnight (never thaw fish on the counter-top at room temperature!).  If you need to do a fast thaw, you can submerge the bag into cold running water, but don’t use warm/hot water either.  I also do not recommend that you attempt to thaw fish in the microwave – it tends to cook them as it is thawing them.

Once they are fully defrosted, take them out of the bag, discarding any liquid that is in the bag (there is nearly always some!).

herr7

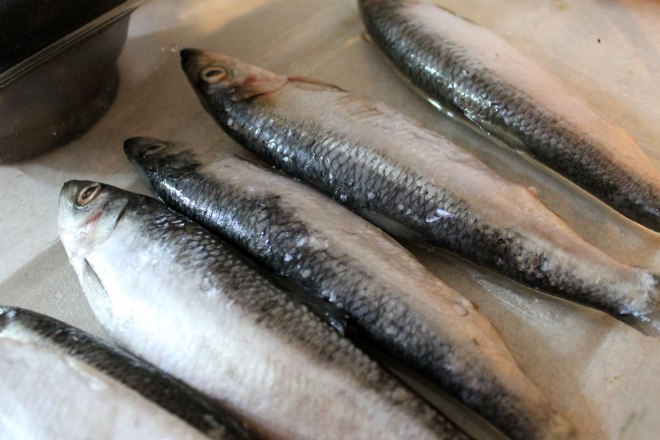
Obviously, if you are using fresh fish, there is no need to go through the above 2 steps, you can jump right in to cleaning them.

The first step is to descale them.  To do this, I use the back of a paring knife under a running tap (the non-sharp edge).  I just run the knife from tail to head (Against the grain of the scales) while the water is flowing over the fish.  Not all fish need descaling.  Herring almost always do, but mackerel don’t.

herr25

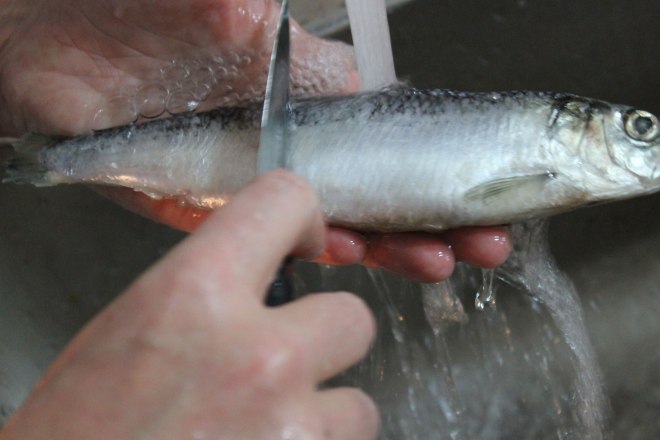
Make sure you get all the scales off – scales are not pleasant to eat!

Next you need to cut the heads and tails off.  Some people like to do this after gutting the fish, I prefer to do it before as most often, a lot of the guts will come out along with the head.  Simply cut with a knife right behind the gills as close as you can because you don’t want to waste any of the flesh.

herr22

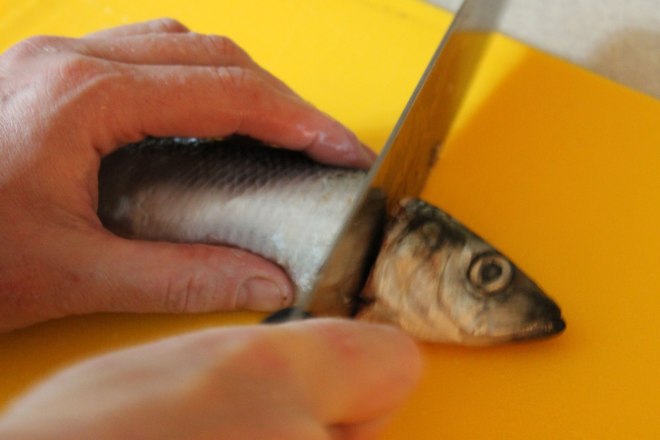
At the tail end, you simply cut close to the tail….  not so much flesh down that end to waste!  I like to use a french cooks knife for cutting heads and tails off, but I use a paring knife to actually gut the fish.

herr31

To remove the guts and open up the belly, you simply insert the point of your paring knife into the small opening on the fish’s belly and then run the knife up the underside of the fish towards the head end:

herr21

All the way up to where you cut the head off:

herr20

At this point you can remove the innards of the fish:

herr17

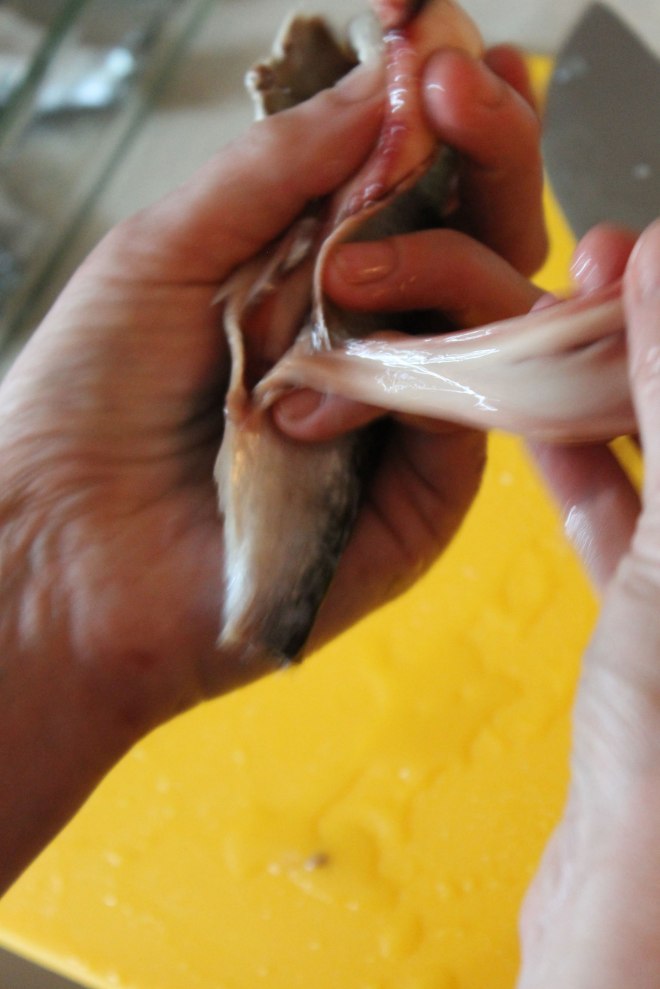
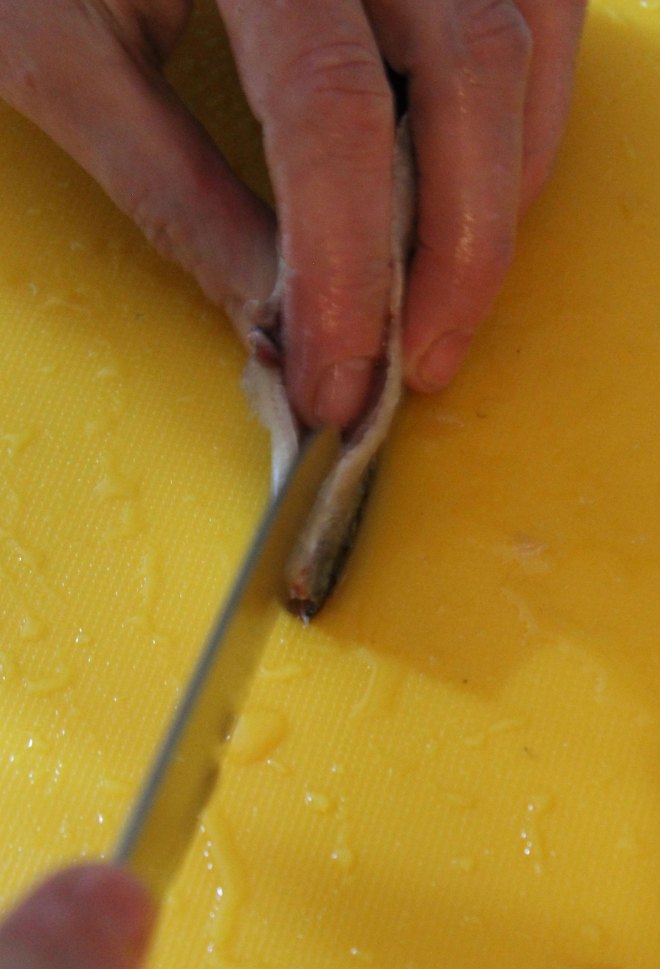
If you find any long creamy coloured sacs that look like what I am removing in the above photograph, these are the soft-roes (more properly called Milt) that are found in male fish.

herr5

Put them to one side as they are delicious when fried in a little bacon fat.

You might also find some hard roes if you have female fish (sadly all of mine were male).  Female herring tend to be larger than the males.

Hard roes look like this:

herringroe

These are the true fish roes and are again contained in long sacs.  But unlike the soft roes, they have a grainy texture as they contain the fish-eggs.  In herring, they are an orangy-red colour.  The colour can vary depending on what species of fish you are cleaning however.  Like the soft-roes, you should also set these aside as they are not only delicious, they are very good for you.

I most often find roes in herring…. but sometimes you find them in other fish as well…  no matter what species of fish you are using, the roes are all edible and should not be wasted.  If you are going to get roes in your fish it really depends on the season in which they were caught.  With frozen fish this can be a bit hit or miss as you can never be sure how long the fish has been frozen for.  But with really fresh (never frozen) fish, you will only find the soft and hard roes during the times when they are spawning.

Rinse the roe under cold running water but be gentle with them – they are very delicate!

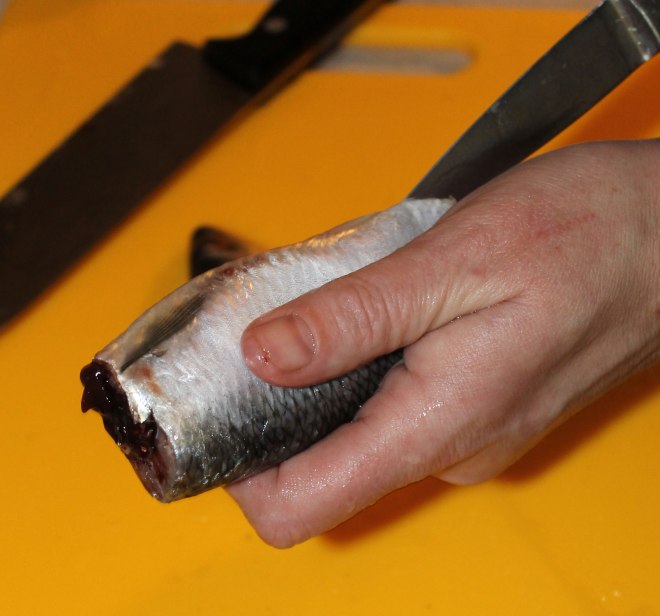
The remaining guts should be thrown away (although I did feed a fish-head and some of the guts to my raw-food fed cat!  He enjoyed them immensely.  I tried giving the dog a fish head and he just got confused and licked it a little then wagged his tail to show willing….  It goes to show that cats are smarter than dogs!  They know when food is good for them….

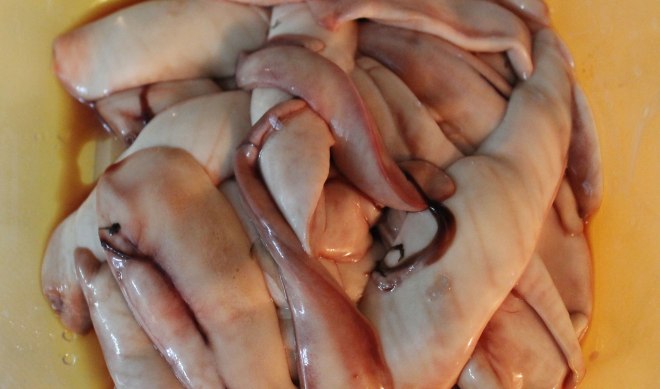
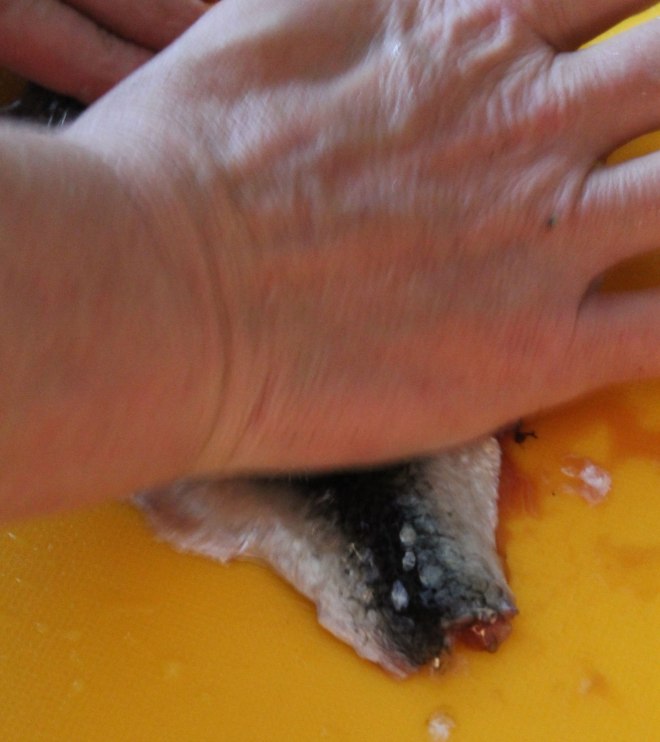
By the time your fish has been gutted, you should end up with something that looks like this:

herr16

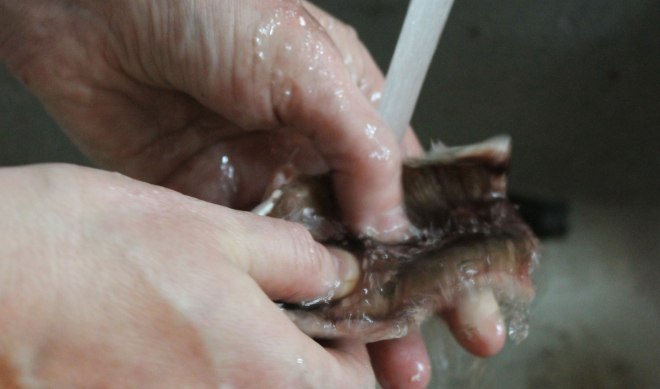
Now it is back to the sink to wash out the innards.  Make sure you rub inside well as there is a dark film lining the internal cavity.  Using a little salt on your fingers can help remove this.  Also make sure you scrape down towards the backbone to remove the blood-line (the main arteries in the fish) as these can taste bitter.  The running water will wash all this away.

herr27

If you are wanting to serve your fish whole, that is all you need to do (Actually, you don’t even need to remove the head in this case…..  I do because I am not fond of my food looking at me when it is on the plate!).  In this case, you will simply move on to how you have decided to cook your fish…..

But in the case of the meal I was making, I wanted boneless  (or as nearly boneless as I can) split fish fillets.

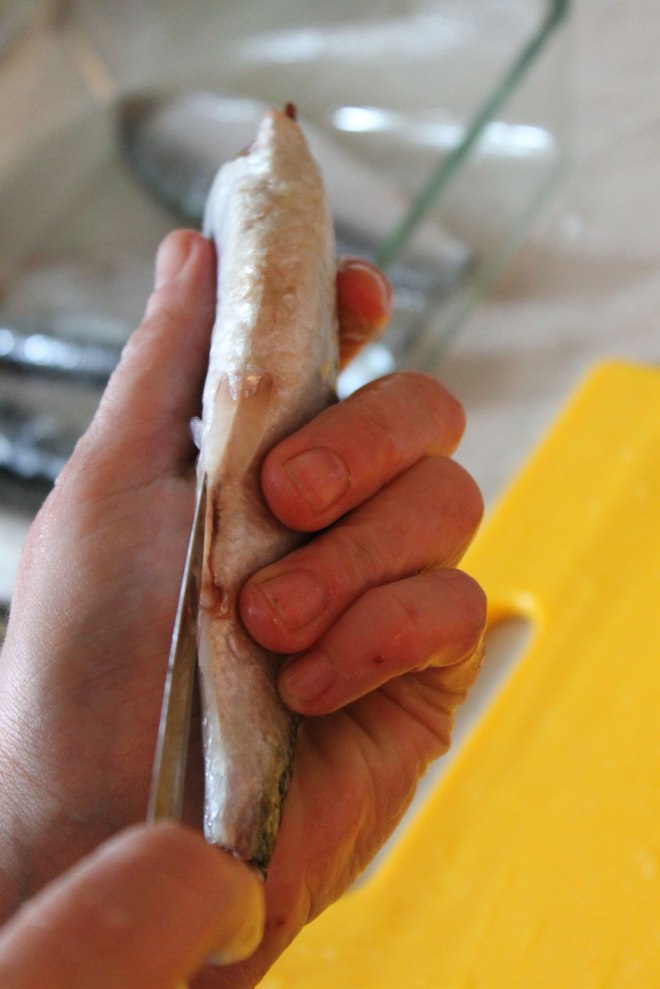
So I took my fish and I used my paring knife to slit it down from the open cavity towards the tail, cutting right down to the backbone:

herr15

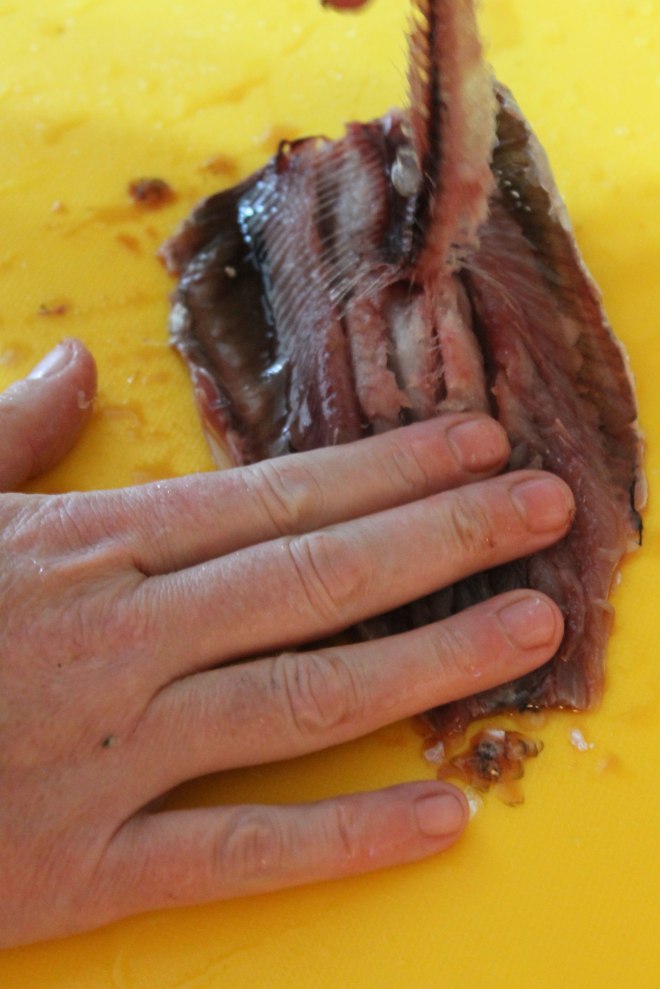
Then I inverted the fish so that it was belly-down on the cutting board and it’s stomach flaps were spread out.  Press down hard along the backbone of your fish, squashing it flat:

herr13

You might need to use the heel of your hand to do this:

herr14

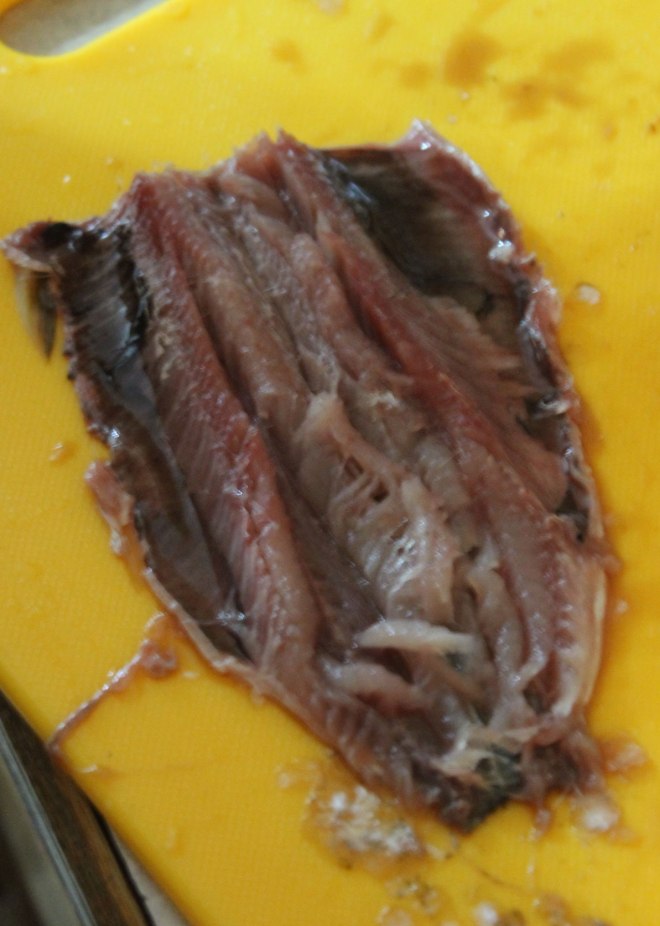
The flatter you get your fish, the easier it will be to remove the backbone:  Get it as flat as you can! Do you see those scales on the cutting board?  I obviously didn’t de-scale this fish well enough!

herr12

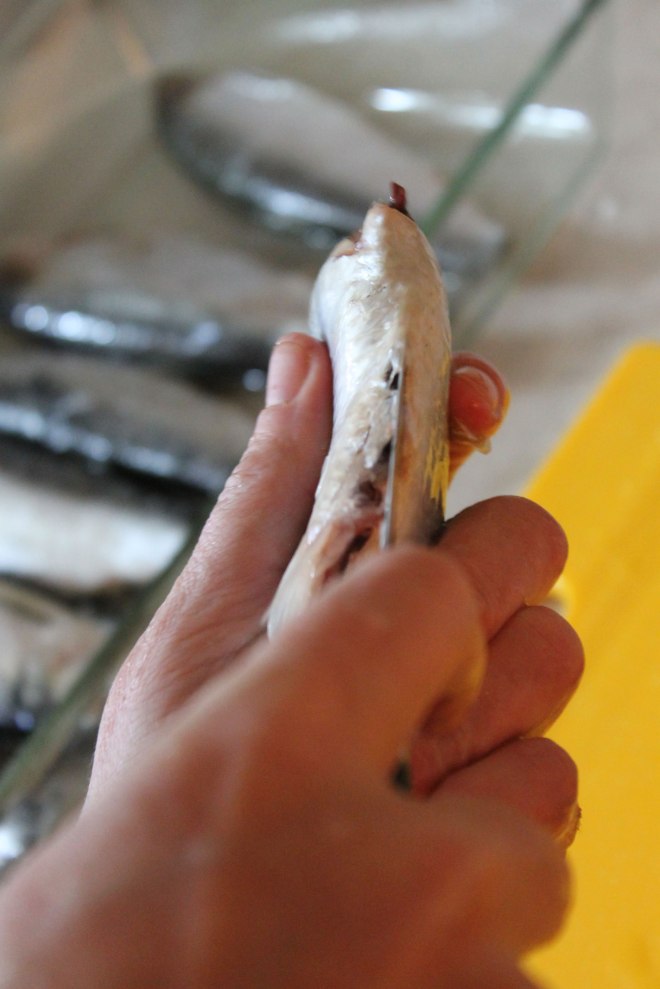
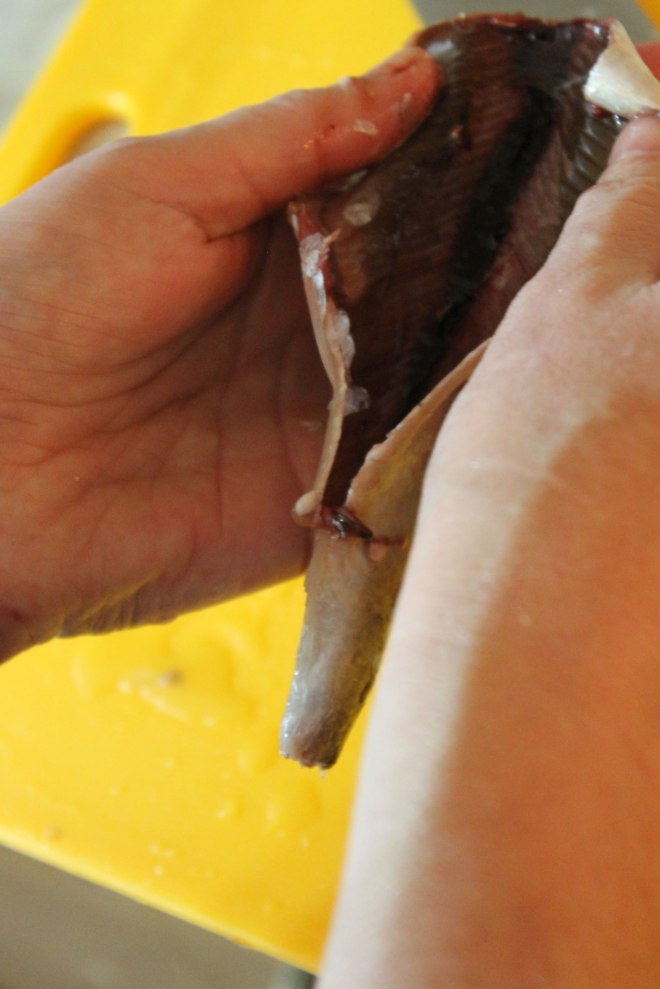
Now turn the fish over so the open side is uppermost.  Take hold of the tail end of the backbone and peel it out…  most of the ribs should come away with it.

herr11

If it does not come away easily, you didn’t squash the fish enough, so turn it back over and squish it some more!

What you will end up with is something that looks a bit like this:

herr26

Now you just need to trim off any fins.  A pair of scissors is easiest for this.

herr6

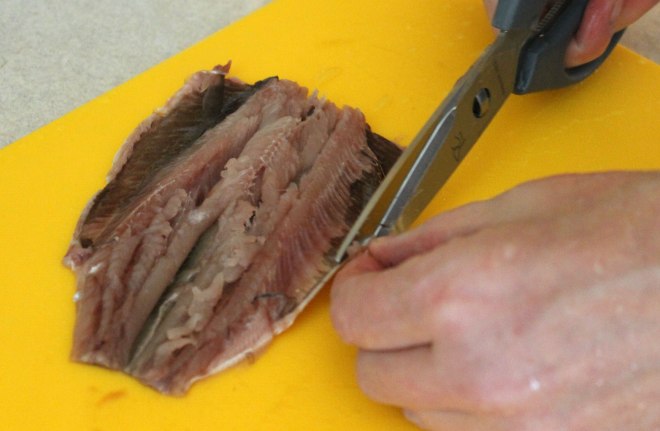
On herring, there are usually 2 sets left after you cut off the head – one set along the edges of the belly which I am removing in the picture above, and one set along the back, which I am removing in the picture below:

herr1

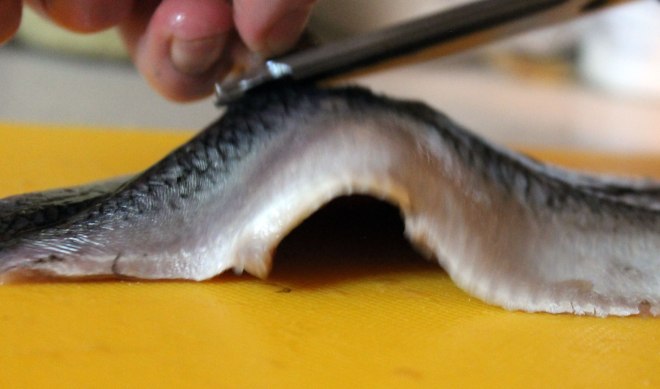
Give the entire fish a quick wash to make sure that there are no stray scales hanging around, and you are done!

If your fish is small, just leave it with the 2 halves attached, but if it is on the larger side, you can divide it into 2 fillets…  your choice….

Congratulations!  you have just prepared your first whole fish…..

Now cook and eat and enjoy!

I like my fish cooked very simply.  Most often I just fry them in a little coconut oil:

mack9

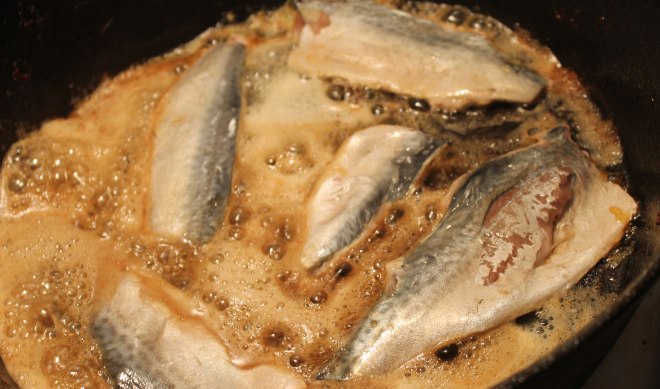
The fish in the picture above are actually mackerel.  I didn’t think to take a picture of the herring that I was cooking.

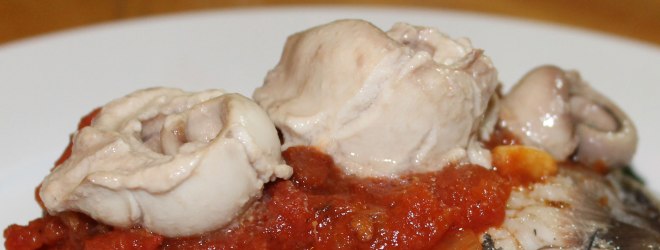
As far as the roe goes, soft roes (milt) I just briefly pan-fry in a little coconut oil.  They will curl up into a cute spiral shape and have a very creamy texture.  I serve these on top of the fish:

herr33

You could also save them and mix them into your scrambled eggs at breakfast.  That would be delicious!  But I am just not that organized.  I have considered blending them into a sauce as well…  I bet that would work well!

As far as the hard roes (or true roe) goes, I remove the membrane that surrounds the sac, and I just use them in anything that I would normally use fish eggs for (sushi, sashimi, stirred into scrambled egg).  I don’t tend to cook these, they are better raw so that you can appreciate that little “pop” and burst of fishy salty goodness as you bite into them.

I hope this post will give you the confidence to start gutting and prepping whole fish as it is really very easy if a little time-consuming.

And if your hands smell “fishy” afterwards, there is a really simple tip for getting rid of that….  just wash your hands in your stainless-steel sink and rub the surface of your hands all over the metal…  I don’t know why it works, but it does!   Sadly this will not work if you have a non-stainless-steel sink….

Slow-cooked Pork Shoulder (AKA Porky Goodness)

I made a slow-cooked pork shoulder joint for dinner…  I use my slow cooker a LOT, especially on the days that I work as it makes dinner preparation so much easier.  It also means that dinner can be left cooking while everyone is out of the house.

This is one of our favourites as it  comes out of the slow cooker tasting rich and delicious.  It uses some of the wonderful pastured pork that we buy from Spragg’s Meat Shop.

Slow Cooked Pork Shoulder

serves 6

slowpork3

  • 2lb boned and rolled pork shoulder joint
  • 1 large onion – sliced
  • 1 apple – cored and sliced (I chose to leave the skin on)
  • 2 bay leaves
  • 1/2 cup bone broth
  • salt to taste
  • ½ tsp dried oregano
  • ½ tsp dried thyme
  • ½ tsp garlic powder
  • ¼ tsp dried rosemary
  • ¼ tsp dried sage
  • a drizzle of melted lard

Take all the dried herbs and salt and mix together.  Rub into all sides of the pork.

Place the sliced apple and onion in the bottom of the slow-cooker, put the bayleaves on top and pour over the bone broth.  Now sit the seasoned pork on top of the bed of vegetables.  Dribble over a small amount of melted lard, put on the lid and cook on low for 8 hours (or on high for 4 hours).

When ready, remove the pork and leave to rest.  Remove and discard the 2 bay-leaves and blend the apple and onion with the cooking juices in the pot to make a gravy.

Serve the pork cut into thick slices with the gravy poured over.

slowpork4

I also served this with Mofongo (Plantain mash), brussels sprouts stir-fried with bacon and sliced fresh tomatoes (the tomatoes are not suitable for the elimination stage of AIP – they are a stage 4 reintroduction).

slowpork2

And the name porky goodness?  it is because 3 out of the 4 components of this dish contain pork in one form or another….

Spicy Tomato Bisque

This is yet another soup that I make fairly often for lunch…  smooth, creamy yet with a spicy kick, it is great on a cold day.

Csnow1

Seeing that today Calgary had it’s first snow-fall of 2013, it seemed like the ideal day to make this wonderful soup.

snow10-27-13

Use it for a warming lunch on a cold day, a comforting snack, as an appetizer…  this soup is very adaptable.  It even reheats well, so is a good contender for a lunch box.  Either send it in a mason jar (if the person taking it has access to a microwave), or heat it up in the morning and pack it in a thermos.

This recipe contains nightshades which are an AIP stage 4 reintroduction.  When reintroducing foods on the AIP, I recommend this guide.

Spicy Tomato Bisque

serves 6 with some leftovers

tomsoup2

  • 1 tbsp fat of choice (I used bacon fat)
  • 1 onion – peeled and chopped
  • 1 carrot – peeled and chopped
  • 1 stalk of celery – chopped
  • 3 cloves of garlic – crushed
  • 1 28floz (796ml) can diced tomatoes
  • 1 pint ( aprox 500ml) bone broth – I used a ham-bone broth made from the bones from 3 smoked hams.  Use whatever you have.
  • 2 chipotle chillies in adobo sauce (you can substitute other chillies if you like)
  • 1 tsp dried oregano
  • 1 tsp dried thyme
  • 1 tsp paprika
  • 1 can coconut milk (400ml/13.5oz)
  • sea salt and freshly ground black pepper to taste

Melt the fat in a large, heavy based pan and add the chopped onion, carrot and celery.  Cook for 5 minutes until starting to soften.  Now add in the garlic and cook for a few more minutes.  Add the tomatoes, bone broth, chipotle chille, herbs and paprika and simmer for around 30 minutes until all the vegetables are tender.  Pour in the can of coconut milk and blend with a stick blender.

Taste and season with salt and black pepper.

Serve at once although it does reheat beautifully if you have any leftovers.  I am planning on taking some to work with me tomorrow!

tomsoup3

I will pack them into a mason jar, which can go in the microwave at work (once I have removed the metal lid), and I can eat it right out of the jar….  Hubby has also said that he wants to take some of the leftovers to work tomorrow for lunch as have C, J and A.  All of these 3 have a microwave they can use in the lunch-room at school, and they are perfectly old enough to take care of a glass jar.   B will have to take hers in an insulated food jar….  no microwave for students use at her school.

Simple Roasted Chicken Breasts

This was a really quick meal, that tasted absolutely incredible.

chicdin2

While shopping at an Asian grocery store, I noticed that they had skin-on, bone-in chicken breasts on special offer for $3:99 a pound…  knowing that I had not got anything out of the freezer, I could not resist this price!  So I bought 6 of the breasts and brought them home (at a total cost of slightly over $15).  I know that these will not be organic or free-range, but they were a good price that fitted well within our grocery budget.

These were simplicity itself to cook as well, which made them great for a quick weeknight meal.  Let me tell you, the chicken was wonderful.  Tender, juicy and perfectly cooked and it went so well with all the accompaniments.  The only issue was that there was SO MUCH of it!  Most of us failed to eat the entire breast (only C managed this – I think she must have hollow legs!).

The extra chicken that we could not manage to eat was stashed in the fridge and was taken for lunch the next day!  So all in all, it was a very economical meal.  Not only did that $15 feed all 6 of us, it also did a second meal as well…

Cooking chicken breasts on the bone results in very flavourful juicy meat as the bone add extra flavour and the skin helps stop the breast-meat from drying out.  In addition, the bones help conduct the heat of the oven into the meat which speeds up cooking time.

This recipe is a stage 1 reintroduction because it contains black pepper.  If you are strict AIP, you can simply omit the pepper from the recipe.

The tomatoes served along side the chicken are a stage 4 reintroduction.

These chicken breasts were served with a side of celeriac puree, roasted broccoli and sliced tomato and cumber and made for a very tasty and easy meal.

Simple Roasted Chicken Breasts

serves 6

chicdin2

  • 6 bone-in, skin-on chicken breasts
  • 2 tbsp fat of choice (I used coconut oil) – melted if solid
  • 1 tbsp dried oregano
  • 1 tbsp dried thyme
  • 1 tsp dried sage
  • 4 cloves of garlic – crushed
  • sea salt and freshly ground black pepper to taste (omit the pepper if sensitive or strict AIP)

Heat the oven to 220°C/425°F.

While the oven is heating up, place the chicken, skin-side up on a rack over a rimmed backing sheet and brush with a little fat.  Use whatever you fancy.  I used melted coconut oil, but bacon fat would be good, and even lard, chicken fat (schmaltz) or butter would work.  Please don’t use olive oil…  it should never be heated to these temperatures.  Save your EVOO for salad dressings!  And most definitely do not use canola oil, corn oil, sunflower oil or “vegetable oil”.  All of these are far too high in omega 6 fatty acids, most are GMO, and none of these should be heated to high temperatures either as they start to break down and turn rancid…  and rancid fat is NOT good for you!

Next you need to mix all your seasonings together.  Crush the garlic cloves, and mix with the oregano, thyme, sage and salt and pepper.

Rub this mixture into the skin of the chicken.

By now, the oven should be heated so slide the pan of chicken into the oven and leave to cook for about an hour by which time the skin should be crisped and the meat should be cooked.  Check the internal temperature of the meat in the thickest part of the breast with a meat thermometer…  you are aiming for an internal temperature of 82°C/180F.  If when you test it it does not reach this, just give it 10 or 15 minutes more.

Serve hot with whatever you like to eat with chicken.

chicdin6

This time I served celeriac puree,

chicdin3

oven roasted broccoli (had to utilize the extra space in the oven somehow!)

chicdin7

and sliced tomato and cucumber (Tomato is an AIP stage 4 reintroduction)

chicdin1

Yummy!

Bacon and Blue Cheese Breakfast Bake

This is yet another of the make-ahead bakes that I make for breakfast on a regular basis.

It doesn’t have to be kept for breakfast though, it would also make a fantastic lunch, and is just as tasty cold as it is hot.  And you could serve it right away if you were not planning on keeping it for another time.

Because this one contains blue cheese, it is not really paleo.  This is more of a primal dish.

Bacon and Blue Cheese Breakfast Bake

serves 6

Bacbake1

  • 1 tbsp coconut oil
  • 1 onion
  • 8 rashers of bacon – chopped
  • 1 small sweet potato – grated
  • 1 zucchini grated
  • 3 green onions
  • 8 eggs
  • 1 tbsp chilli powder
  • salt and pepper to taste
  • 100g (3.5oz) blue cheese – crumbled (I used danish blue)

Preheat the oven to 190°C/375°F.

Melt the coconut oil in a large skillet and add the onion.  Cook over a medium heat for 5 minutes until the onion begins to soften.  Add the bacon and cook until crisp.

Add in the sweet potato and zucchini and cook for a few minutes until the vegetables start to soften.

Tip the contents of the skillet into a large bowl and mix in the green onion, eggs chilli powder, salt and pepper and blue cheese.

Pour everything into a large ovenproof dish and bake in the oven for 30 minutes until the egg is set and the top is browned.

Chill and stash in the fridge or serve hot right away.

Packed Lunch (10/25/13)

Today’s packed lunch is being posted rather late, because I didn’t have time to write a post this morning before going to work…  having just got back, I now finally get to sit down at the computer and post it!

I only made 1 packed lunch today….  All the girls have a half-day on a Friday, and I work a shorter day, finishing at 3pm.  Because it is not such a long day, I rarely take a lunch break and prefer to work straight-through.  I make a little extra money that way.  And as I get paid $58.50 per hour that I am doing a massage I would much rather be massaging a client if I can!  I make sure I eat a good protein rich breakfast and I find that I rarely get hungry before I get home at around 4pm.  And the 15 minute breaks that I have between massages are plenty of time to grab a snack if I do feel hungry.  On a Friday, I always make sure I keep a few paleo-friendly snacks such as jerkey, nuts and energy bars on me so that I can grab one and eat it if my stomach starts to rumble…

So this is the lunch I packed for Hubby to take to work:

lunch10-25-13

Clockwise from the top right hand section:

  • a honey cake with 1/4 cup of walnuts below
  • baby carrots and radishes
  • salad (watercress and spinach) with leftover diced turkey and cherry tomatoes
  • cucumber
  • 2 squares of extra-dark chocolate in the central treat container
  • a honey-mandarin (packed separately)

He also took his reusable water-bottle and will make coffee or tea at work.

Apple Cider Vinegar

When I made the Apple and Onion Chutney the other week, I had a large amount of apple peelings and cores that I did not want to waste.

I remembered seeing a post about how you could make your own from apple scraps on Real Food, Real Deals, so I looked it up, and started the process of making some.

We used the peels and cores of 3lb of the apples that I was lucky enough to be given on Freecycle.

These were packed into 2 mason jars, then we covered them in water with a glug of some apple cider vinegar that contained a mother, stirred in 2 tbsp of honey and covered the jars with some blue shop-towel (we didn’t have any paper-towel!) held in place with an elastic band.

ACV1

These went into the pantry for 2 weeks.

After that time, we strained off the liquid, discarded the peels and cores and returned the liquid to the jar, covering it once again with more towel and the elastic band.

This was left in the pantry for 4 weeks and we stirred it daily.

After that time we tasted it to see how acidic it was.

It actually tasted just like store-bought apple cider vinegar!

Then I sealed it up with a plastic mason jar lid (I figure that the vinegar is so acidic that it would cause a metal lid to corrode), and I have it stashed in the pantry ready to use…  From the 2 jars of apple peelings and cores I ended up with 1 full mason jar of ACV.

acv2

Not bad for something you normally throw away or compost!

Please note, this will not be as strong or as acidic as a commercial apple-cider vinegar, so it will not be suitable for preserving foods.  But it is great to use in salad dressings or other recipes where you would normally add some vinegar for flavour.