Dirty Dozen and Clean Fifteen 2015

The EWG has just published it’s list of the Dirty Dozen and Clean Fifteen fruits and veggies for 2015…

When you are trying to do AIP on a budget as I am, you cannot always afford to buy every single item of produce as organic, so knowing which ones “MUST” be organic (the dirty dozen) and which ones you can get away with being non-organic (the clean fifteen) is important.

Despite this, I would recommend that you still buy as much as you can as local and seasonal produce as it will be fresher and far more nutritious.  And lets face it, when we are eating an AIP diet to heal our bodies, nutrient density is very important.  And not only that, local, seasonal produce does tend to be cheaper as well.

Not everything on these lists is AIP-compliant however.  Those that are not 100% AIP are marked with an asterisk (*)

The Dirty Dozen (these should always be purchased as organic)

  • Apples
  • Celery
  • Cherry Tomatoes*
  • Cucumber
  • Grapes
  • Nectarines
  • Peaches
  • Potatoes*
  • Snap-Peas*
  • Spinach
  • Strawberries
  • Sweet Bell Peppers*
  • Hot Peppers*
  • Kale/Collard Greens

The Clean Fifteen (you can get away with purchasing non-organic versions of these)

  • Asparagus
  • Avocado
  • Cabbage
  • Cantaloup
  • Cauliflower
  • Eggplant*
  • Grapefruit
  • Kiwi
  • Mangoes
  • Onions
  • Papaya
  • Pineapple
  • Sweet Corn*
  • Sweet Peas (frozen)*
  • Sweet Potatoes

Hopefully this list may help keep your grocery budget under control…

Paleo Kedgeree – a Wonderful Brunch Dish

I make kedgeree for brunch fairly often on the weekends.

Actually, I also make it for breakfast, lunch or dinner!  It is very versatile, very quick and very good for you.

So what is Kedgeree?

According to Wikipedia, kedgeree is a dish that consists of cooked, flaked fish, most often smoked haddock or cod, along with boiled rice, herbs, hard-boiled eggs, curry powder, butter and cream.

And from About.com,   kedgeree is a traditional British breakfast dish made from curried rice, smoked fish, boiled eggs, parsley and lemon juice.

Kedgeree is a traditional British breakfast dish that originated from Indian cooking.  It originated in a rice and lentil/bean dish called Khichri.  During the British Raj occupation of the Indian subcontinent, fish and eggs were added to this simple, peasant dish, and then it was served for breakfast.

The dish was brought back to the U.K. by the returning British colonials, and was instituted as a popular breakfast dish during the Victorian Era.

Part of it’s success was that Anglo-Indian cuisine was insanely popular and fashionable. But another draw was that it could make a good use of leftovers.  Leftover cooked rice and fish could easily be re-purposed into a tasty, nutritious breakfast or brunch dish.  And this meant that it became very popular with the frugal middle-classes.

This dish can be eaten both hot and cold (which might make it a good packed lunch option?), and it can be made with fish other than the traditional smoked haddock or cod.  Actually, I most often make it with canned tuna, salmon, kippers or sardines due to the fact that it is hard to find smoked haddock or cod in Western Canada!

This kedgeree recipe would not be considered traditional because I use canned kippers rather than the traditional smoked haddock or cod, but it was still very, very good.  And kippers are a smoked fish so they taste similar to smoked haddock or cod.  But they are also an oily fish, so they are richer in omega 3 fatty acids.

This is the brand of kippers (smoked herrings) I use:


CH2

This is what the fillets look like inside:

CH1

Even though this fish is not authentic, I feel that the fact that herring is an oily fish, rich in omega-3 fatty acids makes it a beneficial addition.  And really, it DOES taste good!  If you can access smoked haddock or cod, feel free to use them in place of the canned kippers.  It is also insanely good with hot-smoked salmon.  You could also substitute any canned fish that you feel like using.  I have made delicious kedgerees using canned tuna, salmon or sardines.  The latter suggestion makes this a very cost effective dish (I can buy a can of sardines for less than $1… and the can of herrings I pictured above costs around $1.25).

Read the labels on your cans to check that they are in olive oil or water – many cans of fish are packaged in corn, soy or canola oil.  The brand I used for this recipe is packaged in water.

This recipe is loosely based on several recipes -Kedgeree on p 130 of the Loaves and Fishes Miracle Cookbook by Rosemary Stark (now out of print), Kedgeree on p 39 of the Complete Farmhouse Kitchen Cookbook (published by Yorkshire TV – now out of print), and Kedgeree Risotto from Feast, food that celebrates life by Nigella Lawson (p 155).

It is paleo, but is not strict AIP due to the fact that it contains some seed spices and eggs.  If you have not successfully reintroduced these ingredients, you could still make this dish by leaving them out.  It won’t quite be kedgeree, but it will still taste good.

The seed spices and egg make this an AIP stage 2 reintroduction recipe.  When reintroducing foods on the AIP, I recommend this guide.

Try it and let me know what you think!

Paleo Kedgeree

Serves 4-6

kedg2

  • 1 large head of cauliflower
  • 3-4 cans of Golden Smoked Seafood Snacks (or other canned fish – you may not need 3-4 cans if the fish you use comes in larger cans  than I used. When I make this with canned tuna or salmon I typically use only 2 cans)
  • 1 onion – chopped
  • 1 small bunch fresh parsley – chopped
  • 6 eggs (omit if strict AIP)
  • 3-4 tbsp coconut oil
  • ½ tsp ground cumin (omit if strict AIP)
  • ½ tsp ground coriander (omit if strict AIP)
  • ½ tsp turmeric
  • ¼ cup of coconut milk
  • zest and juice of 1 lemon
  • sea salt and freshly ground black pepper to taste (omit the pepper if strict AIP)

The first thing you need to do is to rice your cauliflower by pulsing it in a food processor until it resembles grains of rice.  If you do not own a food processor, you could grate it using a box grater, but this is very messy.

Put the eggs in a pan of boiling water and cook for 10 minutes until hard-boiled.  Crack the shells and place in a bowl of cold water.  This makes them easier to shell.  Once the eggs are cool enough to handle, remove the shells.  Chop the eggs into large chunks.

Melt the coconut oil in a large skillet and add the onion.  Saute over a medium heat until it is tender and golden brown.  Now add the cauliflower rice, the cumin, coriander and turmeric and season to taste with salt and pepper.  Toss well until all the spices are evenly distributed.  Cook for 4-5 minutes, tossing occasionally until the cauliflower is tender.

Drizzle over the coconut milk.

Open the cans of fish and drain any liquid into the pan.  Break the fillets into bite-sized chunks and add them to the pan along with the parsley and chopped eggs.

Toss everything together until heated through.

Taste and adjust seasonings.

Just before serving, scatter with the lemon zest and squeeze the lemon juice over.

kedg2

Serve at once.

The leftovers of this dish are very good cold, and it will store in the fridge for a couple of days.

Shared at Waste Not Want Not Wednesday

Pallets for the Garden

We are hoping to build some raised beds in our back yard this summer so that we can carry out Square Foot Gardening.

The aim is for us to grow as many vegetables as we can in the most economical way.

So in order to save some money on actually building the beds, we decided to get the timber as cheap as possible, and if at all possible for free.

So today, Hubby and I went out to pick up 2 loads of this:

pallets2

There are 30 pallets there, all full of useable timber.

pallets1

And the best bit is that they were totally free – we answered an ad on Kijiji and went and picked them up.

Now we have to take them apart, and then we can get on with making our beds.

Coconut Chicken Soup

This is another great leftovers meal that makes a fantastic lunch and a filling, economical dinner.

I make this with leftover chicken or turkey, and both taste great.  If you have no leftovers, you could cook some chicken breasts or thighs and then shred the meat to make this instead.

This recipe is AIP compliant.

CCS1

If we are eating this as a main course meal, I like to serve these with a starchy side or a side-salad.  I will often use a simple green salad dressed with a lemon-juice vinagrette, but sometimes I will make plantain muffins or tostones or other starchy sides.

This is a perfect meal for a cold winter night and even better because it uses up a lot of leftovers.  And all the ingredients are AIP approved as well which is a bonus because it does not aggravate my autoimmune conditions.

Don’t be tempted to leave out the garlic, lemongrass or ginger – they give this soup it’s wonderful flavour and aroma.  I buy whole lemongrass stalks and they cost me around $0.44 for 2…

Coconut Chicken Soup

serves 4-6

CCS3

  • 1½lb leftover cooked chicken (or 2lb chicken breast or thighs – cooked)
  • sea salt
  • 1 tbsp coconut oil
  • 1 onion – finely chopped
  • 8oz mushrooms – sliced
  • 2 cups greens (use kale, chard or spinach depending on preference) – shredded
  • 1 stalk of lemongrass
  • 2 tbsp grated root ginger
  • 2 cloves garlic – peeled
  • 1 can coconut milk (ensure that it contains nothing but coconut and water – no gums, fillers or emulsifiers)
  • 3-4 cups chicken bone broth
  • 2 tbsp fish sauce (try to find one that only contains AIP ingredients – fish, salt and water)
  • 1 lime – zest and juice
  • 1 bunch green onions – sliced
  • 1 kefir lime leaf – sliced as thinly as you can
  • ¼ cup basil – sliced (use thai basil if you can find it, regular basil will work fine though)
  • ¼ cup cilantro – chopped

If not using leftover chicken, you need to cook your chicken thighs/breasts.  I suggest you poach them in the bone broth, then remove, cool, and shred, discarding any bones and skin (save those to add to bone broth in the future – store in the freezer until you have enough).

If using leftover chicken, shred the cold chicken finely, discarding any bones and skin and saving as above to make bone broth.

Melt the coconut oil in a pan and add the mushrooms and onion and cook gently until tender and the mushrooms are starting to look translucent.

Meanwhile, take the lemongrass stalk and cut of the dry woody end.  Using a meat tenderizer, a mallet or a rolling pin, bash the heck out of this sucker.  You want to break down as many fibers as you can as this will release the flavour.  Slice it thinly.  Now put the beaten up and sliced lemon grass in your blender with the garlic and ginger and 1 cup of the bone broth.  Blend until there are no large chunks.

Once the mushrooms and onions are tender, add the lemongrass/broth mixture to the pan along with the rest of the broth and the can of coconut milk.  Taste and adjust seasonings..  Simmer gently for around 30 minutes.  Now add your shredded chicken and greens and simmer for 5 minutes to allow the chicken to heat through and the greens to wilt..

Stir in the lime zest and juice, fish sauce, lime zest and juice, basil and cilantro.  Taste again and adjust the seasonings one final time.

CCS4

We like to serve these with a starchy side such as my plantain muffins or Tostones

Serve hot.

Hash and Eggs for Breakfast

I mentioned in my beef hash post, that leftovers make an excellent breakfast (although I totally would make it from scratch for the entire breakfast, not just using the leftovers!).

This is what I made for the girls for their breakfast today after we had eaten it for dinner last night…

HE2

All I did was take the leftover Ground Beef Hash and toss it around in a skillet until it was all toasty warm and heated through.  then I fried an egg per person in some leftover bacon fat.

Once the egg was cooked to everyone’s liking (my family all like them sunny-side up), I topped the hash with the egg and served it.

HE3

A breakfast that was so easy-peasy that it barely qualifies as a recipe and took me less than 10 minutes to make.

This recipe is not 100% AIP approved because of the fried egg which is a stage 2 reintroduction.  If you need a 100% AIP breakfast, just reheat the hash….  When reintroducing foods on the AIP, I recommend this guide.

Chicken Liver Pate

I love eating liver, which is a good thing because it is so good for you.  And not only that, it is cheap to buy.  If you are struggling to make ends meet while eating paleo, definitely consider adding more organ meats to your diet.  Liver, and especially chicken livers are really economical.  I do recommend that you use pastured and/or organically reared chicken liver when possible.

Some people express concern about the possiblity of toxins in liver, and think that it is not a good idea to eat it because it is a detox organ.  While this is true that the liver does remove toxins from the body, it simply breaks them down so that they can be excreted by other organs.  The liver does not store any of these toxins and in a healthy animal is perfectly safe to eat.

Liver is one of the most nutrient dense foods you can buy.   It is a good source of Thiamin, Zinc, Copper and Manganese, and a very good source of Protein, Vitamin A, Vitamin C, Riboflavin, Niacin, Vitamin B6, Folate, Vitamin B12, Pantothenic Acid, Iron, Phosphorus and Selenium.  While liver is high in cholesterol, it has been shown that dietary cholesterol has very little bearing on blood cholesterol (1, 2, 3), and not only that, you actually NEED cholesterol to make a lot of the steroid hormones that your body relies on.  Your brain also relies on cholesterol to function  There have been studies that have shown that cholesterol is vital for memory.  And if you don’t eat enough of it your body will simply make more.

One of my favourite ways to eat liver, especially in the case of chicken livers, is to make a pate.

Smooth, creamy and rich, this barely tastes like liver.  And making it into a pate, paste or spread removes most of the “ick” factor that people have when faced with a hunk of liver.  Instead of that hunk of what is obviously an internal organ, you have this rich, creamy spread.  This is a good way to get kids to eat liver…  my girls love dipping veggies in the creamy meatiness.

I know what you are thinking though….  Pate should be served on toast.  And toast is not Paleo or AIP-friendly.

If you ate bread (even paleo bread), you could make toast and spread a generous amount of this pate onto it.  But seriously, it is just as good with celery sticks, baby carrots and cucumber slices.

CLP2

I will often spread it into the hollow center of a celery stick and make a savory version of “ants on a log”.  YUM!

This makes a great appetizer or snack, but it could also be a quick lunch.  And I have been known to eat it for breakfast as well!  In this snack that I prepared for B, the radish slices take the place of crackers.

PR1

And if you don’t have chicken livers, you could use any other liver you can get your hands on.  Calves liver makes a delicious pate, but even beef or pigs liver would work.  The flavour would not be so delicate, but it would be very nutritious, and would still taste good.

Chicken Liver Pate

CLP3

  • 1½lb chicken livers (or any other liver you care to use), trimmed
  • 1 shallot – chopped finely
  • 2 cloves garlic – crushed
  • 1 tsp dried sage
  • 1 tsp dried rosemary
  • 1 tsp dried thyme
  • 1 bay leaf
  • ⅓ cup bone broth
  • Sea salt to taste
  • pinch of ground cloves
  • 3 tbsp coconut cream (the thick layer from the top of a can of coconut milk)
  • ½ cup of good quality cooking fat (you can use anything that works with your diet – lard, tallow, coconut oil, bacon drippings, even ghee or butter as long as you are not sensitive to it)

Melt 2 tbsp of the cooking fat in a skillet and add the shallot and garlic.  Cook over a low heat until softened.  Add the sage, rosemary, thyme and bayleaf and continue cooking for about 10 minutes.

Meanwhile trim your liver and if large pieces, cut into chunks.

Add the liver to the pan and cook, stirring until it is browned on the outside but still pink in the middle.  Add the bone broth and bring to the boil.  Simmer for 5 minutes, then remove the bay leaf.

Transfer the contents of the skillet to a food processor or blender.  Add the coconut milk and remaining ingredients, including the leftover cooking fat.

Pulse until everything is smooth, creamy and evenly blended.

Pour into a serving dish and refrigerate until cold.

pate1

To serve, scoop out the amount required, and serve.

CLP4

If you want to be able to turn the finished pate out and slice it, you will need to line a loaf tin with parchment paper before pouring in the pate.

This will keep for at least a week in the fridge.

Ground Beef Hash

This is a quick, healthy and economical meal. It is pretty tasty as well.

And all the ingredients are AIP-friendly, and suitable for the elimination stage as long as you don’t serve it with ketchup (Ketchup would be a stage 4 reintroduction because it contains tomatoes).

We eat this a lot for dinner, and there are usually some leftovers which are great for breakfast. Having said that, this would make a great breakfast all by itself.

I pulse the mushrooms in the food processor for this. It means that they are very finely chopped and are hidden by the ground beef so that J (the mushroom hater) can’t find them. They still provide the same amount of nutrition and also add to the flavour.

Ground Beef Hash
Serves 6-8

BH1

2lb ground beef (preferably grass-fed)
2 tbsp coconut oil (you could also use bacon fat, tallow or lard)
1 onion – chopped
2 sticks celery – chopped
8 oz mushrooms – finely chopped
1 large sweet potato – diced
5 cloves of garlic – crushed
1 cup bone broth
Sea salt to taste
1 tbsp dried oregano
1 tbsp dried thyme
1tbsp coconut aminos
1tbsp balsamic vinegar
1-2tbsp coconut flour
2 cups greens – chopped (kale, chard, spinach etc.)

Chop the onion, and celery finely. Pulse the mushrooms in the food processor until very finely chopped. Dice the sweet potato and crush the garlic.

Melt the coconut oil in a large skillet and add the onions. Sauté them until lightly caramelized. Add the mushrooms, celery and sweet potato and cook for 5 minutes. Add the ground beef and toss until browned.

Now add the herbs, sea salt, broth, coconut aminos and balsamic vinegar. Toss it all we’ll and allow to cook for 10 minutes until the sweet potatoes are tender. Add the coconut flour and greens and cook for 5 minutes until the greens are wilted.

Taste and adjust the seasoning as necessary and serve at once.

BH2

We like to serve this with Paleo ketchup (this is a stage 4 reintroduction, I just don’t have the ketchup and everyone else does). As you can see, J likes hash with her ketchup…..

BH4

Shared at the Paleo AIP Recipe Roundup #21

How to make coconut milk and coconut flour

Coconut milk and coconut flour are used by most people eating a Paleo diet.

You can buy them, but it is just as easy to make them yourself.  And it usually works out far cheaper as well.

Packs of unsweetened coconut are readily available and very cost effective to buy.  Coconut flour is EXPENSIVE!  And while canned coconut milk is fairly cheap, the vast majority of brands contain questionable ingredients such as guar gum and carageenan, both of which can irritate your gut.

When you make your own coconut milk, you know exactly what has gone into it…  And the coconut flour is a buy-product of the coconut-milk making process.

Homemade Coconut Milk

makes aprox 4 cups

  • 2 cups unsweetened coconut (make sure you read the packet to make sure it does not contain any sugar)
  • 4 cups boiling water

The first thing you need to do is to put your coconut in a heat-proof container and add the boiling water.  I do not recommend you do this in your blender even if it claims that the glass jar is heat-proof…  I have had one break by doing just this!  I always use a pyrex jug to soak the coconut.

coco8

Leave it for half an hour to soak, then tip the mixture into your blender.  Blend on the highest heat setting for 5 minutes.  The longer you blend this, the more of the coconutty goodness you will extract.

You now need to strain out the coconut pulp.  For this, you need either a jelly or nut-milk bag or several thicknesses of muslin.  Line a sieve with whatever you are using to strain the milk, and place it over a bowl or jug.  Tip the contents of the blender in to the lined sieve.  Now you need to hang the bag somewhere and allow the coconut milk to drain out.  I usually hang it from one of the kitchen cupboard doors with the jug I am collecting the milk in underneath.  Hang it until the milk is no longer dripping out, then give the bag a good squeeze to extract as much liquid as possible.

The liquid you have extracted is coconut milk…

Pour it into a jar and store it in the fridge.

coco6

You may find that your coconut milk separates into a thick layer with a watery layer underneath…  this is perfectly OK and is because your homemade milk has no additives or thickeners added (this is what the guar gum and carageenan is added for).  Just stir the 2 layers back together before using.  Or you can use the thick creamy layer as coconut cream and add the thinner layer to smoothies.

You can make a second, thinner batch that is idea as a milk-replacement beverage with the pulp if you like by repeating this process.  I do sometimes, but this time I did not bother.

Don’t throw out the coconut residue… this is what you are going to make coconut flour from.

Homemade Coconut Flour

makes aprox 1 cup

To make this, you take the residue from the coconut milk that you have just made and dry it.

coco7

To do this, you can either use a food dehydrator as I do (line the trays with a paraflexx sheet, a silpat mat or a sheet of baking parchment first), or you can spread it out on a rimmed baking sheet and dry it in the oven at the lowest setting possible.  Watch it like a hawk if drying in the oven – it burns very easily!

coco4

Once your coconut residue is dry (this takes around 6 hours in my dehydrator), tip it into your blender and blend at high speed until you have a fine powder…

coco3

This is your coconut flour.

coco1

Use in any recipes that call for it just as you would use purchased coconut flour.

Dog Booties

We have been having problems with walking the dog during the cold weather because his feet get too cold and it becomes painful for him.   So we decided that because he does need a lot of walking, we needed to get some dog booties.

Hubby was doing some searching the other day and found this video on how to make dog booties on YouTube.

It seemed very straightforward, and he decided that he could make them himself…

A quick trip to Fabricland produced some remenants of black fleece and some cream coloured vinyl (we couldn’t find any faux suede as recommended in the video.  We also picked up some double sided velcro.

Back at home, we measured Casesar’s feet and Hubby got my sewing machine out…

dogboot4

The first attempt was a bit of a disaster – they were not long enough.  But a quick adjustment to the pattern and about 2 hours of work resulted in 4 nice looking dog booties.

dogboot5

They are a little tricky to get on him due to the snug fit, but they do fit really well.

dogboot1

These work really well…

dogboot3

they dry quickly, and despite there being quite deep snow, Ceasar’s feet were still warm and dry when he came back from his walk and he seemed to have no problems with them.

The total cost of the fabric and the velcro was less than $15, and we have enough fabric leftover to make several more pairs…  so it certainly worked out cheaper than buying ready made dog-boots from the pet-store.

We will be making him more pairs of these for certain!

How to make salad rolls

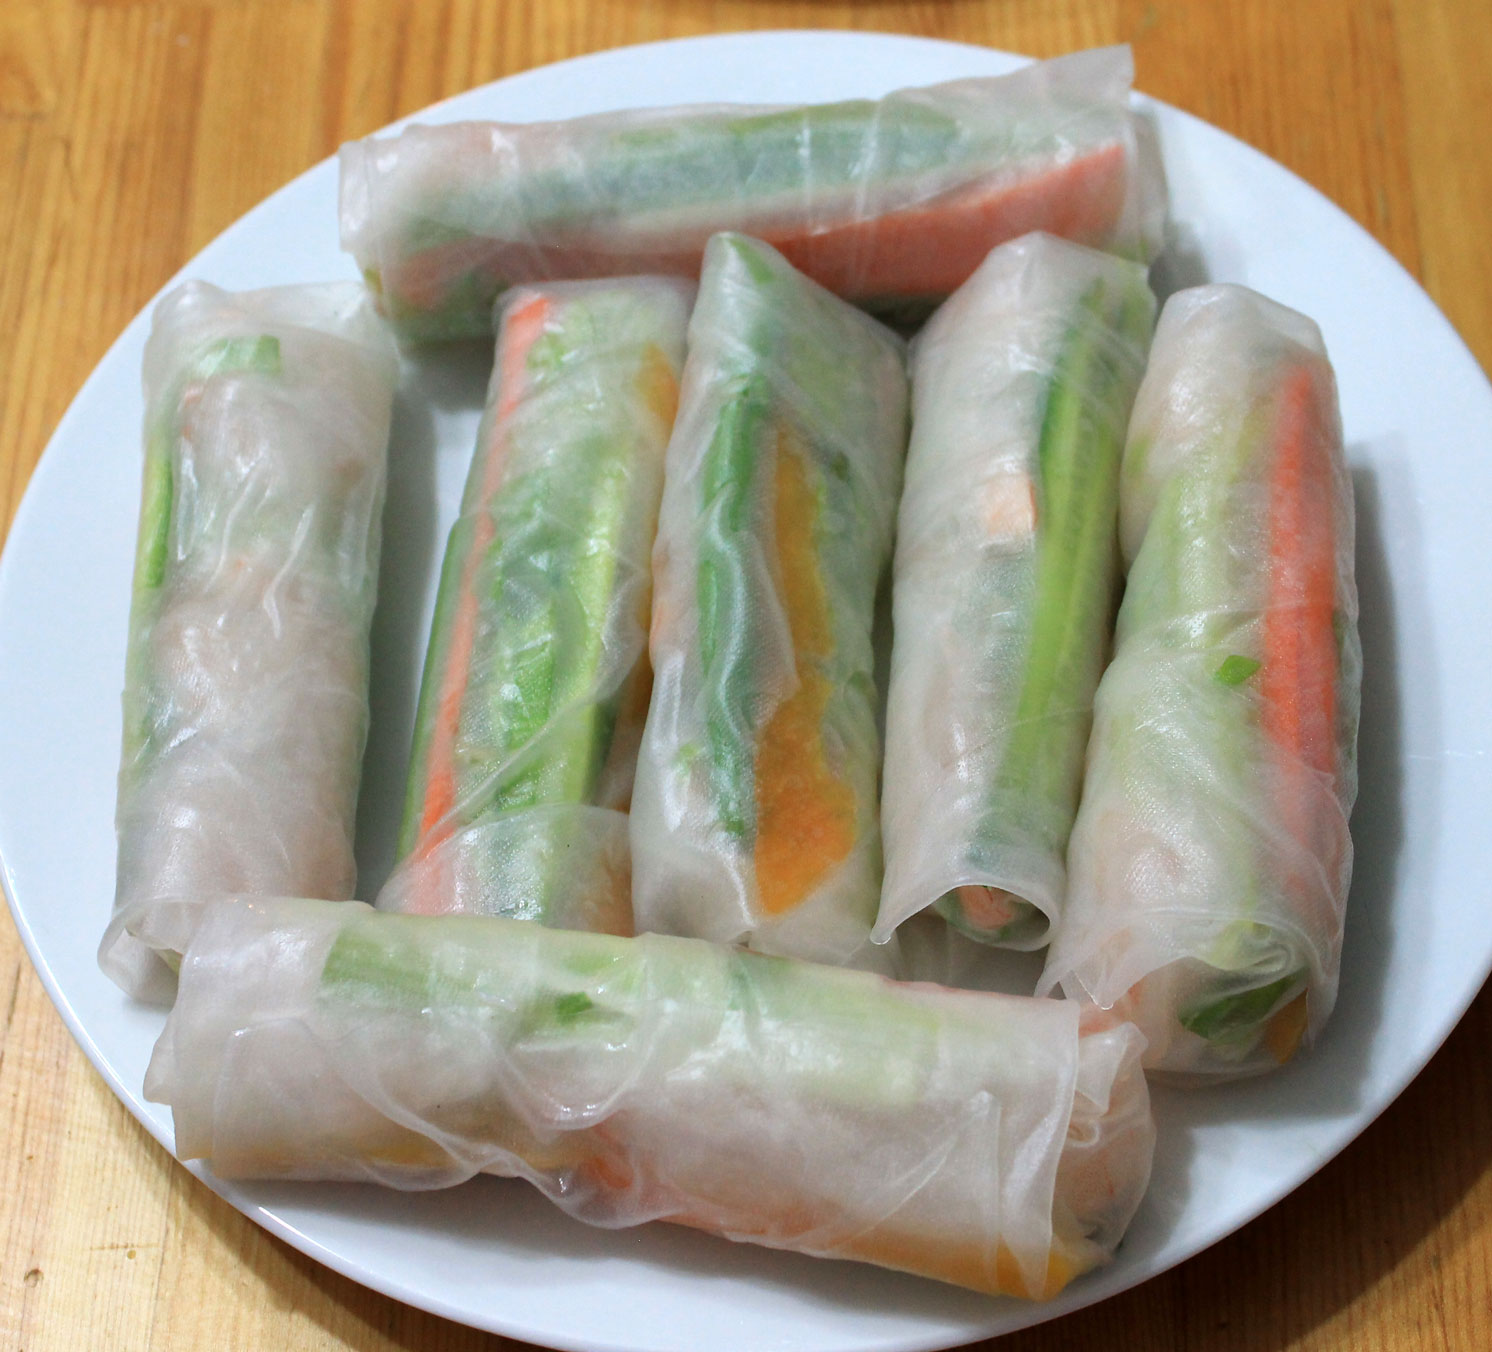
The other day, I posted about how I had packed salad rolls in our packed lunches – traditional rice-noodle filled ones for the kids

salad13

and veggie filled ones for A, Hubby and me.

salad2

Before anyone points it out, I know that salad rolls are not Paleo because they contain rice noodles and rice paper, they are not even particually low carb (although the veggie filled ones that Hubby and I ate were lower in carbs than the kids ones)…  but sometimes you just want a little “treat” and rice is considered the best of all the grains if you want extra carbs in your paleo diet…  Besides, I calculated that one portion of 3 of the veggie filled salad rolls only contained 35g of carbs… not bad all things considering!  Obviously the ones with the rice noodles inside them contained far more.

These salad rolls were actually made by A the day before we ate them for lunch, and they were individually wrapped in clingwrap to stop them sticking together or drying out.

These are a little fiddly to make, but well within the skill level of an older teen.  A learned to make these in her foods class at school.

And this is how she made them:

Shrimp Salad Rolls

I apologize for the ingredients being a little vague –  quantities all depends on how many rolls you want to make.  A made 18, 3 for each person.

  • Rice Paper
  • Rice vermicelli noodles
  • shrimp (cooked and peeled).  You need 3 per salad roll that you want to make
  • shredded lettuce
  • julienned vegetables (we used cucumber, carrot, green onions and red pepper)

The first step is to prepare all your ingredients…  you need to soak the rice noodles in some boiling water until they have softened.  This will take around 10 minutes.

A used this brand of noodles which I bought for less than $2 a packet from an Asian supermarket.  They contain nothing but rice flour and water.

salad29

This 1lb packet has made 2 batches of rice noodles so far and is still more than 3/4 full…

Then you need to shred the lettuce and julienne any vegetables that you are planning on using.  We used green onions, red pepper, carrots  and cucumber.  Don’t worry about exact quantities – if you don’t prepare enough veggies you can always do some more part way through.

Make sure the shrimp are thawed (if using frozen shrimp) and peeled.

Now you take your rice paper….

You want rice paper that contains no nasty ingredients.  Ours was this brand:

salad27

which I purchased from the same Asian supermarket as the rice noodles.  This brand contains only rice, water and salt.

Like the rice noodles, this 1lb pack cost less than $2 and we have used approximately half of it to make 2 batches of salad rolls.

You take your rice paper, which is a round, semi-opaque textured circle:

salad28

and you dip it into cold water until it becomes translucent and starts to soften.

salad26

Don’t let it become totally soft or it will be difficult to work with.  Remove it from the water before this happens:

salad24

and lay it out on a cutting board (a plastic one works better than a wooden/bamboo one as the rice paper tends to stick to these)

salad23

For traditional Vietnamese rice-noodle filled salad rolls, you now take your softened rice noodles and drain them from the hot water.  They should be soft but not sticky.

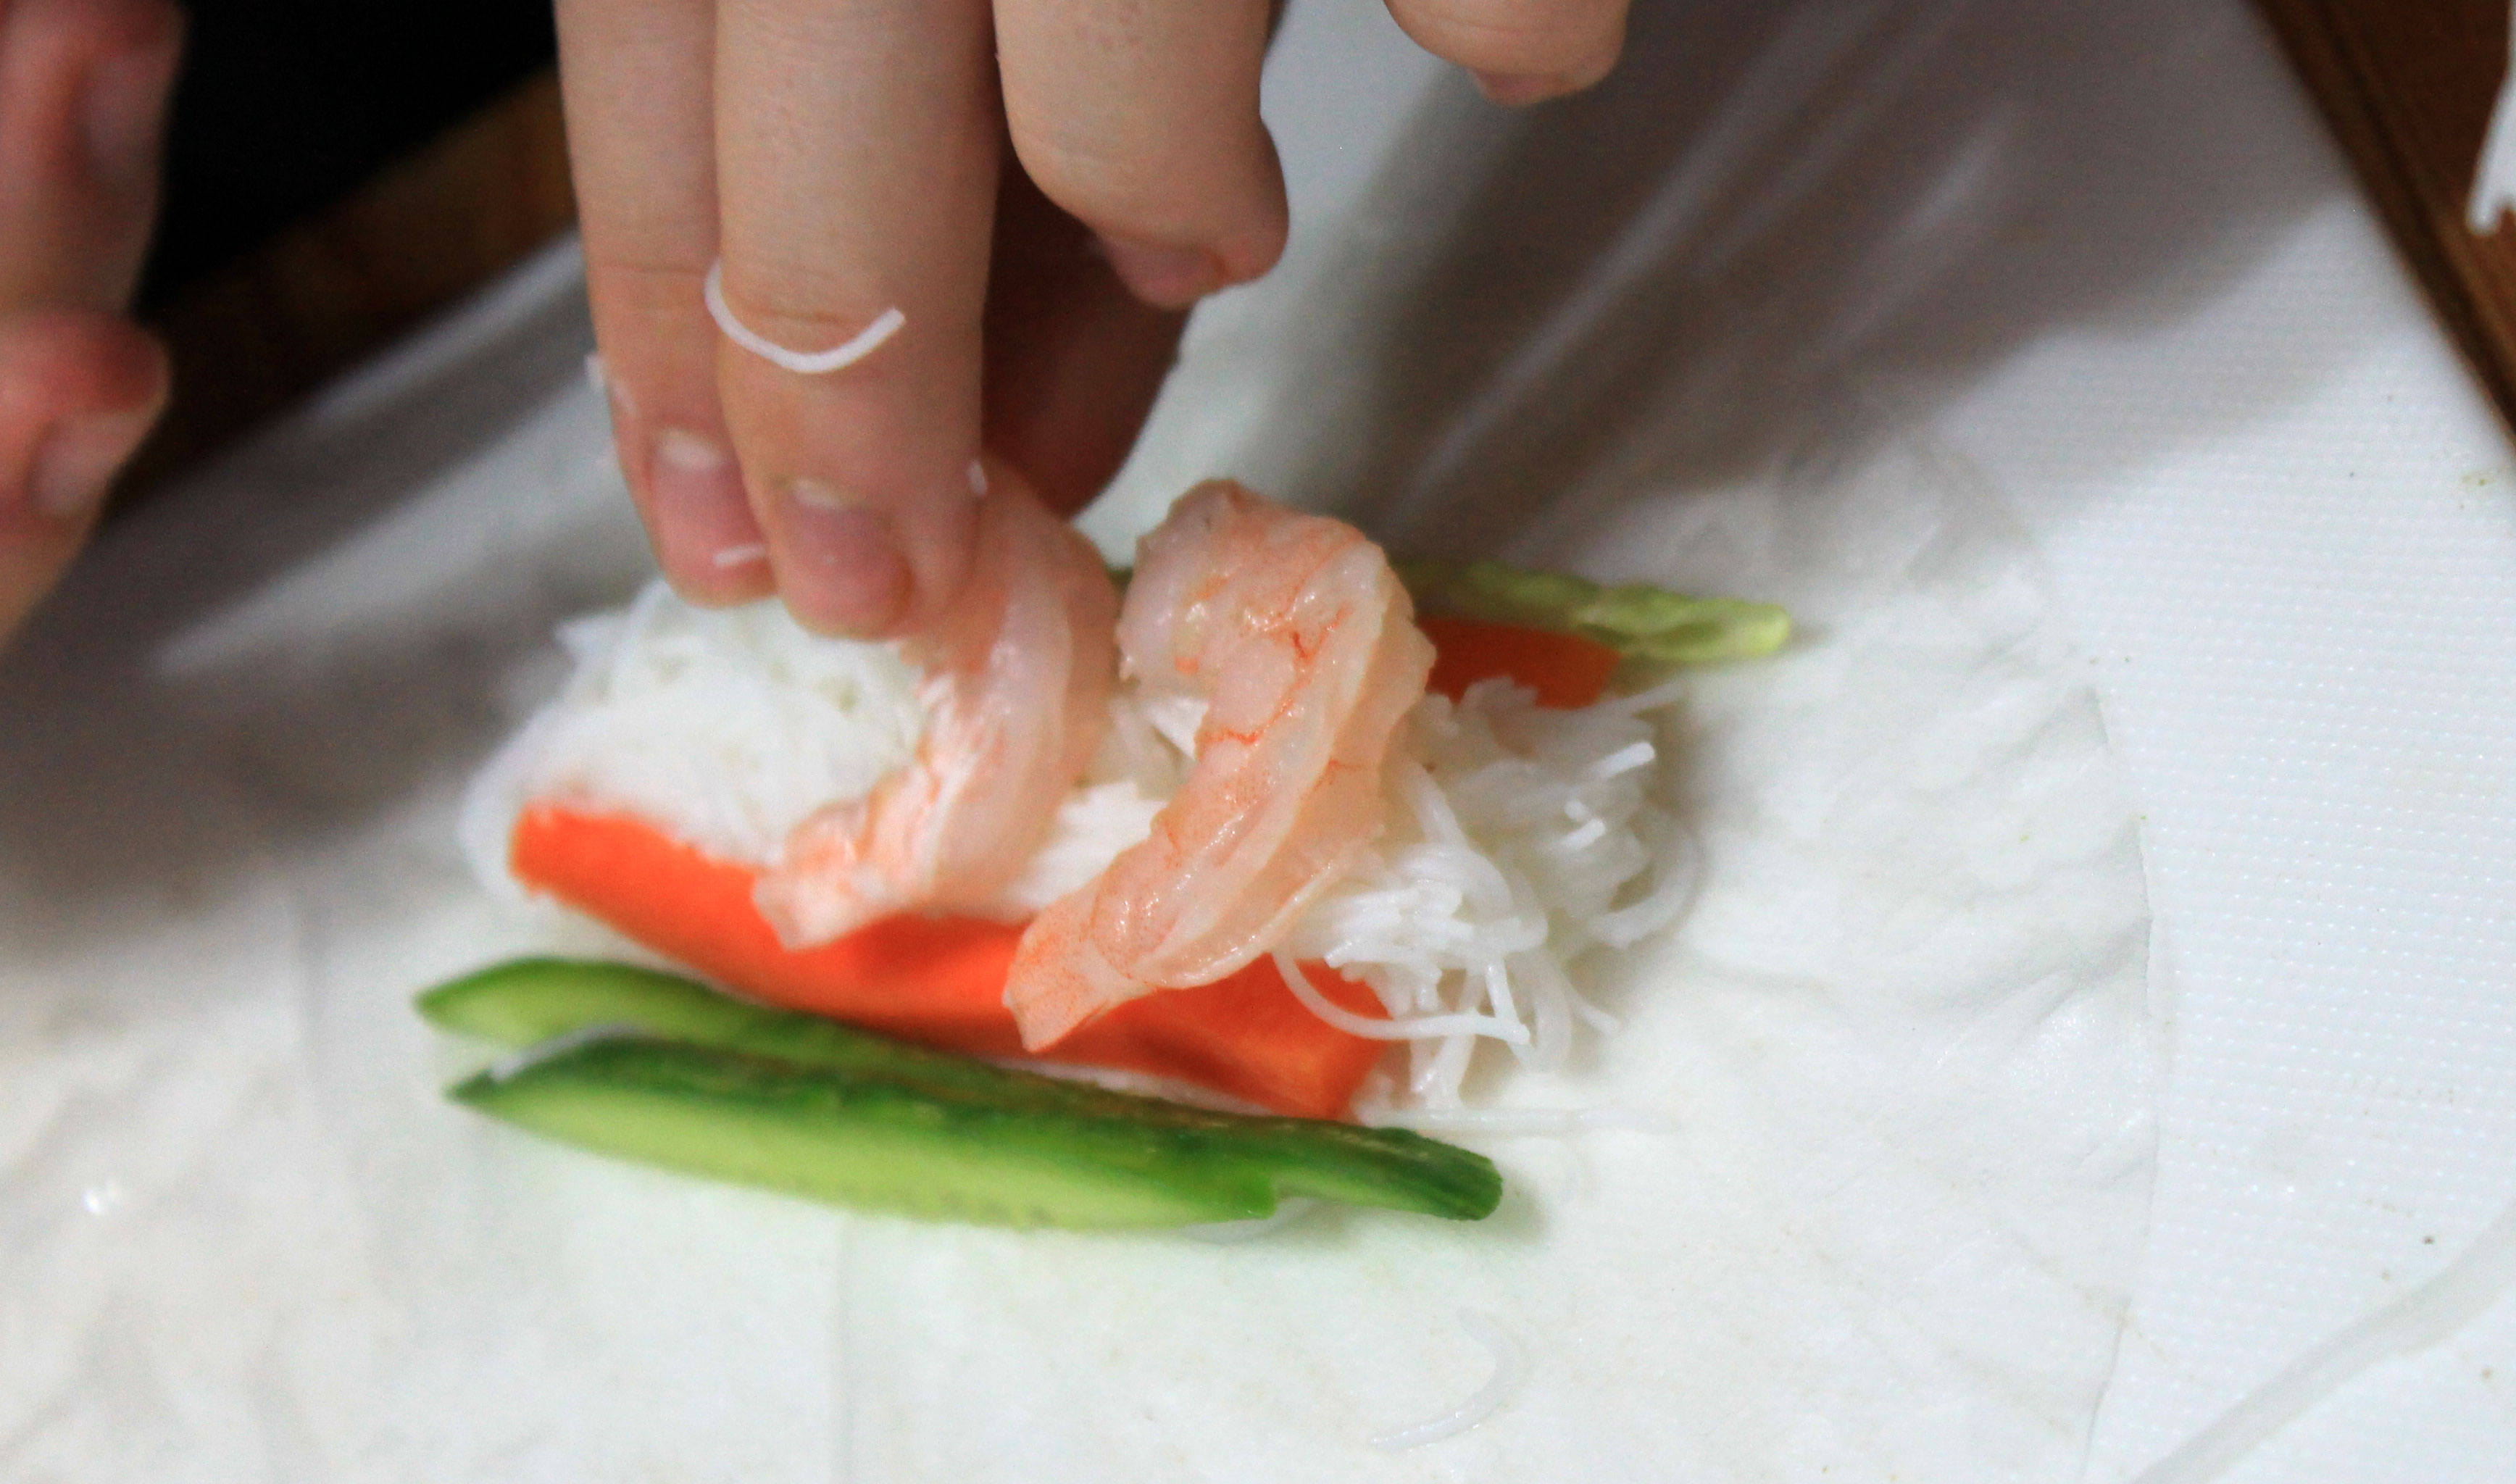
Place a small bundle of rice noodles towards one side of the rice paper.  Don’t be too generous, you don’t want to overfill your salad rolls.  A placed a mound no more than 1″ thick and 4″ long.

salad21

Add a small amount of shredded lettuce and some of the julienned vegetables:

salad20

And then top the rice noodles with 3 of the shrimp:

salad18

The next step is to roll the rice paper around the filling.

First you need to fold in the 2 sides:

salad16

salad17

Then starting at the end nearest the filling you begin to roll it up:

salad15

Roll it nice and firmly, but be careful not to tear the rice paper – it is very delicate!

salad4

Continue rolling until you reach the end of the rice paper and you have a nice neat roll:

salad14

Repeat with the remaining ingredients.

If planning on serving these immediately, they are now ready to be served with the dipping sauce of your choice.  If wanting them for packed lunches or to serve later in the day, I recommend that you wrap them in cling-wrap and store in the fridge.  The rice paper wrappers have a tendency to stick to each other, so I recommend that you wrap each one individually…  this is what we did for the packed lunches.

salad30

The lower-carb veggie filled versions are made in exactly the same way, but in place of the rice noodles you use shredded lettuce:

salad12

You add the julienned veggies (you might want to add more veggies to this version):

salad10

Then you top them with the shrimp:

salad11

Then you roll them up in exactly the same way:

salad7making sure that you roll them nice and firmly without tearing the delicate rice paper:

salad5

And once they are all made, you either serve them right away with a dipping sauce, or you individually wrap them in cling wrap and store them in the fridge in exactly the same way as the rice-noodle filled rolls.

These rolls make a fantastic snack, would be great as an appetizer, and are a really economical lunchbox filler…

salad30

Pack an icepack in with the lunchbox to help keep these cool as they contain shrimp!

Serve them with an Asian inspired dipping sauce – we like the almond-butter sate sauce that we used in this recipe, but you could use whatever you like best.  And if you are not bothered about non-paleo ingredients, use a jarred sauce – Hoisin or sweet chilli sauce would work really well with these

Shared at Tasty Tuesday