Cauliflower-Kale “Rice”

Cauliflower makes a great rice substitute, but being white, it can look a bit bland.  I like to add some extra colour and nutrition by adding greens.

Kale pairs really well with cauliflower, and is one of my favourites.

This recipe is not only paleo, it is gluten and grain-free and also AIP-friendly.

Cauliflower-Kale “Rice”

serves 4

ckr

  • 1 large head of cauliflower
  • 1 large bunch of kale
  • 1 onion
  • 2 cloves of garlic
  • 1-2 tbsp fat of choice (lard, tallow, bacon-fat or coconut oil are all good choices)
  • ¼ cup of bone-broth – preferably homemade from grass-fed/pastured bones
  • sea salt to taste

The first thing you need to do is to turn your cauliflower into “rice”.  The easiest (and least messy) way to do this is to use a food processor.  Cut the cauliflower into florets and place these in your food processor.  Pulse it until it resembles grains of rice.  You may need to do this in batches.

If you do not have a food processor, you can still make cauliflower “rice”, but it is a messy process – take a box grater and grate the cauliflower florets.

Take the tough stems out of the kale, and shred the green parts finely.

Peel and chop the onion.  Peel and crush the garlic and chop finely.

Melt the fat you are using in a large skillet or a wok (I actually use a wok for this as it is bigger than my skillet).

Add the onion and cook over a medium heat until softened.  Do not let the onion brown or burn.  Toss in the garlic and add the kale.  Now add the bone broth, and steam-saute the kale until it is tender.

Add the cauliflower and season well with salt.

Cook, tossing constantly until the cauliflower is heated through and is tender – about 5 minutes.

Serve at once.

This is a wonderful side dish that goes with pretty much anything.

.

Cod Baked With Lemon And Dill – AIP/Paleo

I try to eat fish fairly frequently – at least 2-3 times a week because it is so good for you.

I managed to get some frozen cod fillets at a really good price the other day, and this is what I made with them:

CBLD3

This is a simple dish to make – cod fillets baked in the oven with sea salt, olive oil, lemons and fresh dill to provide flavour.  Once cooked, I sat the fish on some spinach that had been simply cooked with a little olive oil and some sea salt.

I am not fond of overly fancy fish (what my mother would have called “fish messed around with”) – I like to keep it simple.  Baked, grilled, broiled or fried…  I love fish and like the flavour to shine, and I find that if you add too many ingredients, you do not get the real flavour of the fish.

And in this dish the flavour really really DID shine!

You don’t have to eat the lemon slices – they are really there to provide flavour as the fish cooks.  I actually did eat them, because I like lemon slices… and if you cut them thinly enough they become tender enough to eat.

When buying cod, make sure it comes from a sustainable source.  Alaskan Cod is what is currently recommended as the most sustainable.  Frozen fish is fine to eat on the AIP – in fact, unless you live on the coast, frozen fish may actually be better quality than fresh fish.  And this is certainly the case in land-locked Alberta where I live.

Also, do not be afraid to use frozen spinach – quite often it is cheaper than the fresh stuff, and it can even be fresher because it is frozen soon after picking.  The fresh spinach may often be shipped long distances and stored in grocery store warehouses for a few days before you can even purchase it.  That means that it’s nutritional value has diminished.  Of course if you can access fresh local spinach from a farmer’s market or CSA that is better still…  But no matter whether it is fresh or frozen, leafy greens like spinach are on the EWG’s Dirty Dozen list and should always be organic.

The lemon should also be organic because you will be using the skin.  I would also give it a good scrub to remove any waxes or finishes that may have been added to make it keep for longer.

This recipe is 100% AIP friendly because it was cooked so simply with minimal ingredients.

Cod Baked With Lemon And Dill

serves 2

CBLD4

  • 2 fresh or frozen cod fillets – aprox 6oz each – thawed if frozen
  • 1 small bunch of fresh dill
  • 1 organic lemon
  • Sea salt to taste
  • Extra virgin olive oil
  • 1 clove of garlic – minced
  • 1 bag of spinach, fresh or frozen (aprox 4 cups)

Preheat the oven to 350°F.

Use a small amount of olive oil to grease a baking dish that is big enough to hold the fish fillets without them overlapping – you do not want too much space, but equally, you don’t want them lying on top of one another….  this picture is a good guide…

CBLD2

This picture was taken after cooking,and the fish has shrunk slightly… as a guide, the fish should fit snugly with no overlaps….

Lay the fish in the base of the dish and drizzle with a little more olive oil (This will help keep it moist and will also add flavour – remember, fat is flavour!).  Season it generously with the salt.

Now lay 2-3 entire sprigs of the dill (remove any really large stalks – aim to just use the tender, edible ones) on top of the fish.

Take the lemon slices and lay 3-4 on top of each fish fillet.

This will give the fish the amazing flavour you are after

Drizzle with a little more olive oil (remember, fat is flavour!) and put the dish in the preheated oven…

Bake for 15-20 minutes until the fish is opaque and flaking.  Thin fillets may need less time, thicker ones may need more, check and adjust the time accordingly.  Just don’t over cook the fish!

While the fish is cooking, in what you estimate to be the last 5 minutes of the cooking time, heat 1 tbsp of olive oil in a skillet and add the garlic.  Cook for 1-2 minutes until it it fragrant but not browned.

Now add the spinach to the skillet, season with a little sea salt and cook for 2-3 minutes until wilted and tender.

Pile the spinach on serving plates and place a fish fillet on top.

CBLD1

Serve at once.

Shared at:  Paleo AIP Recipe Roundtable, Full Plate Thursday

Avocado-Nana Raspberry Parfait

Avocado in desserts?  Why not!

In this parfait, the avocado provides a smooth rich creamyness, while the banana sweetens it.

gRP1

It is simply a smooth avocado and banana puree layered with fresh raspberries and topped with a little coconut cream and a few more fresh raspberries.

Tasty, delicious and very good for you!

grp4

This dessert is sugar, dairy and egg free, is raw and 100% AIP.  .

Avocado-Nana Raspberry Parfait

makes 3


grp2

Peel and remove the stone from the avocado and place it in a food processor.  Add the peeled banana, yoghurt, honey and collagen (if using).

Process on high until the mixture is smooth and creamy.

Layer the avocado mixture in glasses or jars with the raspberries, topping with some coconut cream and a few more raspberries.

grp3

Chill in the fridge for at least 30 minutes before serving.

Shared at:  Mostly Homemade Mondays, Thank Goodness It’s Monday

Mackerel with a Green Herb Sauce

Mackerel are one of my favourite fish, and they are very economical to buy as well, which helps a lot with our ever-increasing grocery bills.

I can buy 6 whole fish (frozen from an Asian grocery store) for less than $10 which is a very good price for a wild-caught fish.

I am not worried about buying frozen fish as it does not change the nutritional profile, and most of the time they are frozen within minutes of being caught.  In fact, it might even be healthier to buy fish that has been frozen on the boat as opposed to fish that may have taken several days to be shipped to where you live.  Freezing may affect the texture, especially if they have been frozen for long periods or stored improperly.  But it is very difficult to buy fresh wild-caught fish in Alberta – most of the so called “fresh” fish in the stores has been previously frozen and then thawed for sale.

Mackerel are an oily fish, rich in those all-important omega 3 fatty acids, so I try to include them in our diet at least once a week.  They are also a good source of protein, phosphorus, Vitamin D, Niacin, Vitamin B12 and Selenium.

I usually prepare them using this method, but this time round I decided to fillet them using this method.  I didn’t get any photographs as hubby was not at home to take them for me, and my hands were covered in fish which I did not want to get all over the camera.

Next time I will though!

If thawing frozen fish, make sure you do so in the refrigerator or under cold running water.  NEVER thaw them on the countertop as that can lead to the growth of bacteria resulting in food poisoning.

If you can obtain fresh, unfrozen mackerel, you can still use them to make this recipe.

The green herb sauce has an Italian feel to it and really complements the oily fish.

This recipe is not only Paleo, it is also AIP friendly, and is incredibly quick to cook, taking only 10 minutes in the oven.

Mackerel with a Green Herb Sauce

serves 6

MS1

  • 6 mackerel – thawed if frozen and divided into 2 fillets using this method
  • 1-2 tbsp extra virgin olive oil
  • sea salt to taste

For the green herb sauce:

  • ¼ cup capers – rinsed, drained and chopped
  • 3 green onions – roughly chopped
  • 1 cup fresh Italian parsley
  • ¼cup fresh basil leaves
  • ¼tbsp apple cider vinegar (try to use one with a mother – this is the brand I like)
  • 1 cup extra virgin olive oil
  • sea salt to taste

Preheat the oven to 190°C/375°F.

Fillet your mackerel into 2 neat fillets using the method above, and lay them out on a rimmed baking sheet.  Drizzle with a little olive oil and then scatter with sea salt..

Bake in the preheated oven for around 10 minutes until the fish is firm and flakes easily.  Do not allow to overcook!

To make the green herb sauce you just put all the ingredients into a food processor or blender and process until the herbs are chopped and it is all evenly mixed.

GS7

Serve the sauce drizzled over your mackerel.

ms2

I served this with oven roasted rutabaga fries and oven roasted broccoli.

Lunch 25/06/14

There is only one more day of school after today, and this is what I packed for lunch today:

lunchchix1

Clockwise from the top left-hand corner:

I also sent a piece of fruit (a choice of apple, orange or banana) packed separately and a reusable water-bottle of water to drink.

The Easiest Mayo Recipe EVER!

A few months ago, I saw a post on IPMG about how to make mayo using a stick-blender and a mason jar.

Previously, I had been making my mayo either in my blender or the hard way with a mixing bowl and a hand whisk.

Put it this way, this method has literally changed my life!

It is so easy – rich, thick, additive-free mayonnaise without any hard work.  And the best bit is that it only takes seconds.

It works every time – the trick is to keep the stick-blender perfectly still until the mayonnaise has started to thicken.  If you move it before this it will go runny on you.

While not strict AIP (it contains egg yolks), this may be tolerated by anyone who has successfully reintroduced eggs or egg yolks (for the most part, it is the egg white that can be problematic for people with AIP issues).  This is also paleo, and free of all of the questionable additives that store-bought mayo contains.

And it is delicious!

This recipe contains egg yolks (stage 1 reintroduction).  When reintroducing foods on the AIP, I recommend this guide.

The Easiest Mayo Recipe EVER!

makes 1 cup

BM10

  • 1 large egg yolk
  • 1 tablespoon lemon juice 
  • ½ cup extra virgin olive oil
  • ½ cup avocado oil
  • sea salt and freshly ground black pepper

Place the egg yolk and lemon juice in a wide-mouthed mason jar.  Add the olive oil and avocado oil.  Season well with sea salt and freshly ground black pepper.

Place the stick blender in the mason jar and blend without moving the stick blender.  Once the mayonnaise is starting to form, you can move the blender up and down gently, but wait until it is starting to thicken before you do this.

Taste to check the seasoning and adjust by adding more salt or pepper as necessary.

BM9

This mayo will keep in the fridge for 1-2 weeks if it is stored in a sealed jar.

Use as you would use any mayonnaise.

Optional add-ins:

  • add 1-2 cloves of garlic before blending to make Aioli
  • add ½-1 tsp ready made mustard (mustard is an AIP stage 2 reintroduction).
  • add ½-1 tsp anchovy paste and a little nutritional yeast to make a paleo/aip version of ceasar salad dressing
  • add 1 canned sardine before blending to increase the omega 3 content
  • add any herbs you like along with some spinach to make a green dressing.
  • add a chilli pepper or even a chipotle chili in adobo to make a spicy chilli/chipotle salad dressing or dip. (chilli is a stage 4 reintroduction)

That is just 6 suggested add-ins, but really you could add anything you fancy to this

Go wild!  Experiment!  Have Fun!

Shared at Mostly Homemade Mondays #83

Paleo/AIP Dirty “Rice”

There is only one thing that I love more than cauliflower “rice”, and that is cauliflower “rice” with stuff in it…

Like this dirty “rice” recipe that I made for dinner the other day.

This recipe contains plenty of protein, lots of veggies and even some organ meats – chopped chicken livers.  This is not a good way to “hide” the liver in the dish as the flavour is fairly evident because I cut it into fairly large chunks.  If you wanted to try hiding it so that it was less detectable, I would grind it up in a food processor and mix it with the ground meats.

This recipe is both AIP and Paleo, it is also low in carbs and gluten/grain-free.

If you are not AIP, feel free to add some bell peppers along with the other veggies to make this more authentic.  You could also add some paprika and cayenne pepper to the spice mix to spice it up a bit.

This isn’t the prettiest dish in the world, but it is rich, filling and incredibly tasty.

Paleo/AIP Dirty “Rice”

serves 4-6

dcr3

  • 2 tbsp fat of choice – I used bacon fat, but lard, tallow or coconut oil would be equally good
  • 1lb chicken livers – trimmed and chopped into bite-size pieces
  • 1lb ground beef – preferably grass-fed
  • 1lb ground pork – preferably pasture-raised
  • 1 large cauliflower – riced in a food processor
  • 1 onion – chopped
  • 2 cloves of garlic – crushed
  • 2 stalks of celery – chopped
  • 1 tsp unrefined sea salt
  • 1 tsp garlic powder
  • 1 tsp onion powder
  • 1 tsp dried oregano
  • 1 tsp dried thyme
  • ¼ cup fresh parsley – chopped

Heat 1 tbsp of the fat in a large skillet and saute the chicken livers until browned and almost cooked through.  You want them to be slightly pink in the middle.  Remove from the pan and set aside.

Add the ground beef and pork to the pan and sautee until browned and cooked through.  Remove and set aside.

Melt the remaining tbsp of fat over a medium-high heat and add the onion, garlic and celery to the pan.  If not AIP you could add one chopped bell pepper at this stage.  Sautee the vegetables for 5 minutes until they are starting to soften.

Increase the heat to high and add the riced cauliflower and all the spices.  If not AIP, add 1 tsp paprika and ½-1 tsp cayenne pepper for heat.

Cook for 4-5 minutes until the cauliflower is starting to take on a light brown colour, tossing frequently.

Reduce the heat back to medium and add the chicken liver and ground meats back into the pan, stirring well to mix everything together.

Cook for a minute or two to reheat everything.

DCR1

Serve garnished with lots of chopped parsley.

Lemon and Mint Water Kefir Popsicles

I posted about how I made water kefir a few weeks ago.

One of my favourite flavours to make is lemon and mint.  To make this, you simply carry out a secondary fermentation in a sealed mason jar, adding sliced lemons and mint sprigs.

But I don’t always drink the water kefir.

During the summer I like to make the girls popsicles as a treat – homemade popsicles are wonderful – you can control exactly what goes in them to make sure that there is no nasty stuff.  Quite often I use fruit juice, coconut water or even the pureed fruit itself to make popsicles.

But the other day, I was thinking, why not use water kefir.

These are really good!

Not overly sweet, with a tangy lemon flavour and a subtle taste of mint.  They are incredibly refreshing, and a good way of getting some gut-friendly probiotics into your kids tummies.  The bacteria become dormant when frozen, but they “wake-up” again once they are ingested.

Lemon and Mint Water Kefir Popsicles

lmwkp3

  • 1 quart ready made water kefir – see here for instructions on how to make the water kefir
  • 1 lemon
  • 2-3 sprigs of mint
  • popsicle molds

Take the lemon and slice it into thin rounds – no need to peel.  Place the lemon in a quart mason jar and add the mint.

Strain the water kefir over the lemon and mint to make sure you retain all the grains so that you can use them for the next batch.

Seal the jar and leave at room temperature for 24 hours.

Next day, strain the liquid out of the jar and pour into popsicle molds – any kind works.  Bigger molds will make fewer popscles, with smaller ones you will get more.  If you do not have any popsicle molds, you could improvise with a small dixie cup and popsicle sticks.

Freeze for several hours until frozen solid.

lmwkp2

To release the popsicles from the mold, run them under the hot tap for a few seconds until they release.

lmwkp1

And enjoy!

Shared at Paleo AIP Recipe Roundup #29

Shared at Mostly Homemade Mondays #83

Shared at Gluten-free and DIY Tuesdays

Homemade Mixed Berry Fruit Rollups

These are the perfect treat to give your kids, and actually, I like them myself when I fancy a sweet treat. So much better for you than candy!

They are so easy to make, and much cheaper than buying the over-priced fruit leather at the grocery store that often contain additional sugar, colourings and other additives.

Because you are making them yourself, you can control exactly what goes into them.

This recipe is easiest made in a dehydrator, but you could use the oven set at it’s lowest temperature.

Homemade Mixed Berry Fruit Rollups

FL8

  • 2 ripe bananas
  • 2 cups mixed berries (I used an organic frozen brand that contains strawberries, raspberries, blackberries and blueberries).  Fresh berries would work too.

Puree the berries and banana in a food processor.  You don’t need to thaw the berries first – I just pureed them frozen.

Spread the puree out on a sheet of parchment paper placed on the dehydrator tray trying to get it as even as possible.  If using the oven, spread the puree out on parchment paper on a baking sheet.

FL6

Dry the fruit out in the dehydrator until the top is set.  If using the oven, set it to the lowest temperature that you can and prop the door open to allow air circulation.  You need to keep a close eye if using the oven to ensure that it does not burn.

Once the top is set, flip the fruit leather over and peel off the parchment paper.

Allow to dry for another few hours until the other side is no longer sticky.

Don’t over dry this or it will become brittle.  You want it to be a little pliable so that you can roll it up.  Mine took about 4 hours in the dehydrator in total, but it will vary depending on the heat of your dehydrator or oven.

FL7

Once your fruit leather is dry, you cut it into strips about 2″ wide.  The easiest way to do this is using a pair of scissors.

Cut a strip of parchment paper a little wider and longer than each strip of fruit leather.

Lay the fruit leather on the strip of paper and roll up tightly.

FL8

Seal with a piece of tape and store in an airtight container.

FL5

And there you have it – homemade mixed berry fruit roll-ups that contain nothing but fruit.

Shared at Gluten Free Wednesday, Home and Garden Thursday

Parchment Baked Cod – AIP/Paleo

Cooking fish in parchment paper results in moist, tender, flakey fish.

It takes a bit of advance preparation, and can be a little fiddley the first time you do it, but the results are SO worth it.  The parchment protects the delicate fish from the heat of the oven, and the vegetables, herbs and lemon provide so much flavour.

I find it so easy to overcook fish, but this method is almost foolproof.

This is my favourite way to cook all kinds of fish, not just cod.  Try it with salmon or sole – it will be beautiful.

I chose to use cod for this dish.  Cod is always wild caught, and as long as you avoid North Sea cod, is not an endangered species.  Please do not eat North Sea cod – it has been very over-fished in the last few years and the fish-stock is threatened.  But Pacific cod and North Atlantic cod are thriving.  I am not too worried about the radiation in the pacific from Fukishima – see this post for the reasons why.

This recipe does contain a little white wine, but the alcohol will evaporate during the cooking leaving only the flavour.  If this is still a concern for you, replace the wine with bone broth (preferably a fish bone broth) or some lemon juice.

The black pepper makes this a stage 1 reintroduction recipe.  This can easily be omitted to make this recipe strict AIP compliant.  When reintroducing foods on the AIP, I recommend this guide.

This recipe is easy to scale down for just one or two people…  simply reduce the quantities you make.  I made this for 6 people because there are 6 people in our family.

Parchment Baked Cod

serves 6

cip1

  • 6 fillets of wild-caught cod
  • 3 zucchini
  • 3 carrots – peeled
  • 2 onions
  • 1 bunch of green onions
  • 3 lemons
  • 1 handful of Italian parsley
  • sea salt and freshly ground black pepper to taste (omit the pepper if sensitive to it or strict AIP)
  • white wine to moisten (optional – if strict AIP replace with bone broth (preferably fish bone broth) or lemon juice)
  • Avocado or olive oil to drizzle

The first thing you need to do is to preheat your oven to 190°/375°F.

Next you cut 6 pieces of parchment paper – you want squares around 12-14 inches on each side.

Take the zucchini and use a spiral cutter to cut them in to thick spiral shapes.  If you do not own a spiral cutter, you could grate them or cut them into thin julienne shreds.

Peel the carrots and treat them in the same way as the zucchini – either spiral slice them, grate them or julienne them.

Trim the root end from the green onions and chop into small pieces.

Peel the onions and slice as thinly as you can.

Slice the lemons into  thin slices.

Chop the parsley.

If the fish fillets are long, you may need to cut them in half.  Use your judgment.  They need to be a suitable size to fit in the parchment paper parcel.  If they are too big, cut them in half.

Pile the veggies on the parchment paper sheets, dividing them evenly.

Top the veggies with the lemon slices, reserving one slice to lay on top of the fish fillets.

Now sit the fish on top of all the veggies.  Lay a lemon slice on top of the fish, scatter with the parsley and season well with salt and pepper.

cip4

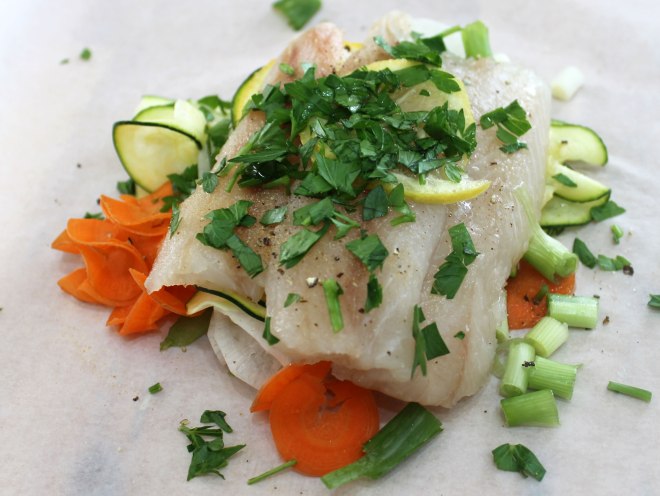
Pour a splash of white wine (if using ) over the fish – no more than 1 tbsp per parcel.  If you do not use wine, substitute fish bone broth or lemon juice.  Drizzle the fish with a little olive oil or avocado oil.

Fold the parchment in half so that opposite corners meet then start to roll the edges, twisting the corners and tucking them under to make a neat parcel.

cip6

Place the finished parcels on a baking sheet and then bake in the oven for 15-20 minutes until the fish is opaque and tender.

cip7

I recommend that you check one packet after 15 minutes and if it is not cooked, reseal and continue cooking.

Allow the fish to rest for 5 minutes then serve.

cip2

The diner opens their packet at the table releasing a delicious aroma.

I like to serve these with oven-baked vegetable fries.  No extra veggies are needed.

Shared at Paleo AIP Recipe Roundup #29

Shared at Gluten-free and DIY Tuesdays